Celeriac Terrine With Red Pepper Sauce

by Susan Smith in , , ,


I was slowly but surely getting through the training programme to become a qualified health coach until I was recently stopped in my tracks. Last week I received an email announcing “numerous coursework and program updates” that were being rolled out now and later this year. Gees! They don’t mean maybe. The volume of coursework has increased by a hefty 60% and I can’t now move on through the 16 original lessons and exams unless I first go back and then sequentially complete each of the new business building tasks interspersed between them. It’s not easy being forced to switch between academia and creative writing on demand - I simply don’t have the time or headspace for both - and last week’s task, which was to write ‘my story’, overwhelmed me. Firstly, who cares what trials and tribulations I’ve suffered? Secondly, it seems if anyone does, it’s me! I found wading through the timeline of my life and reliving the experience extremely upsetting. So today, I’m taking some welcome time out to write this blog. For sanity’s sake, I have to loosen my grip on my study work and let go of my original intention to be an accredited health coach before the end of the year. After all, there are so many other things I have to do. 

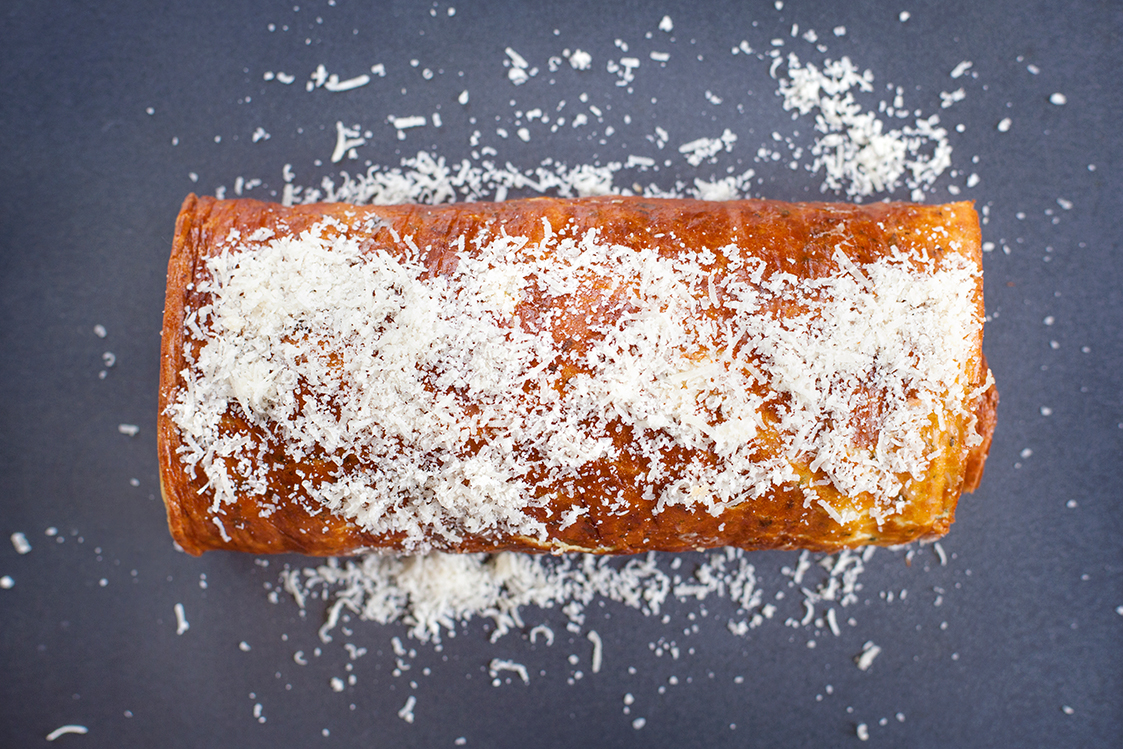
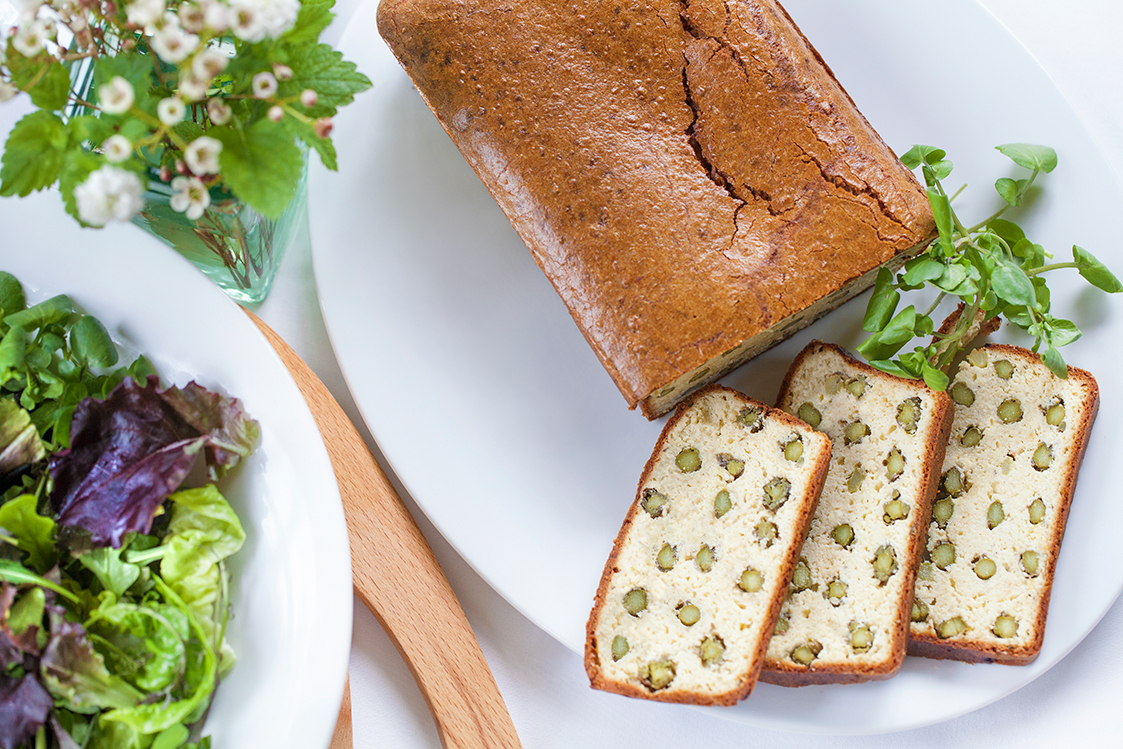
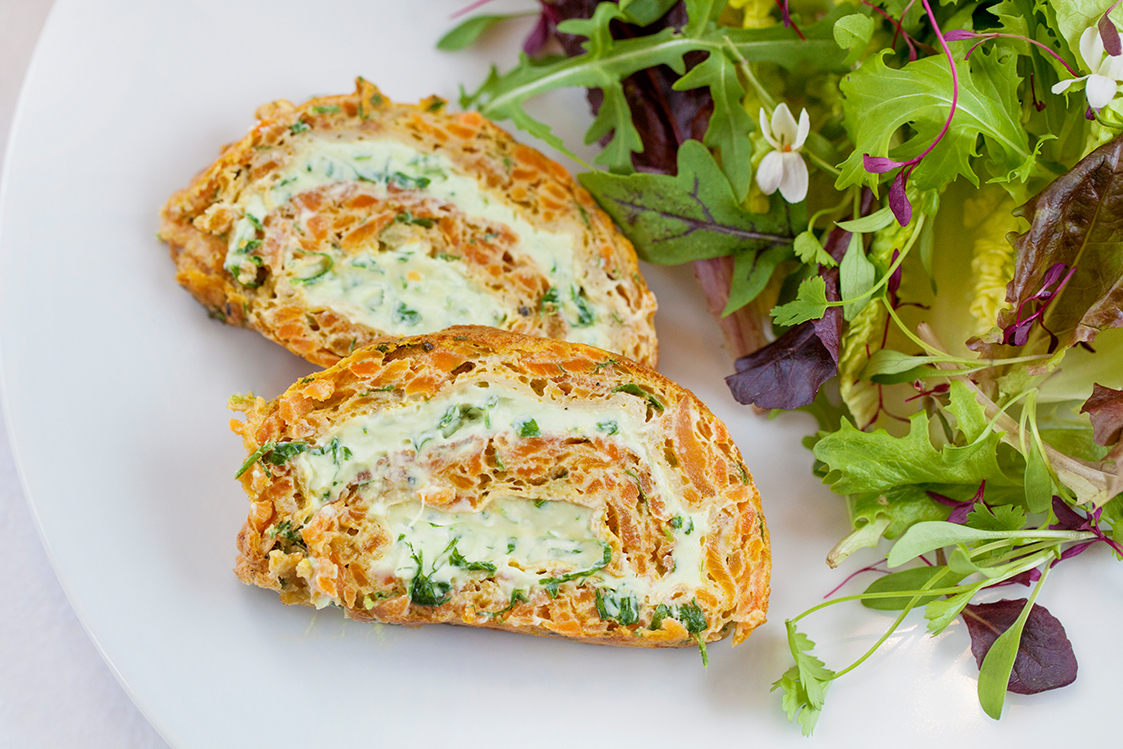
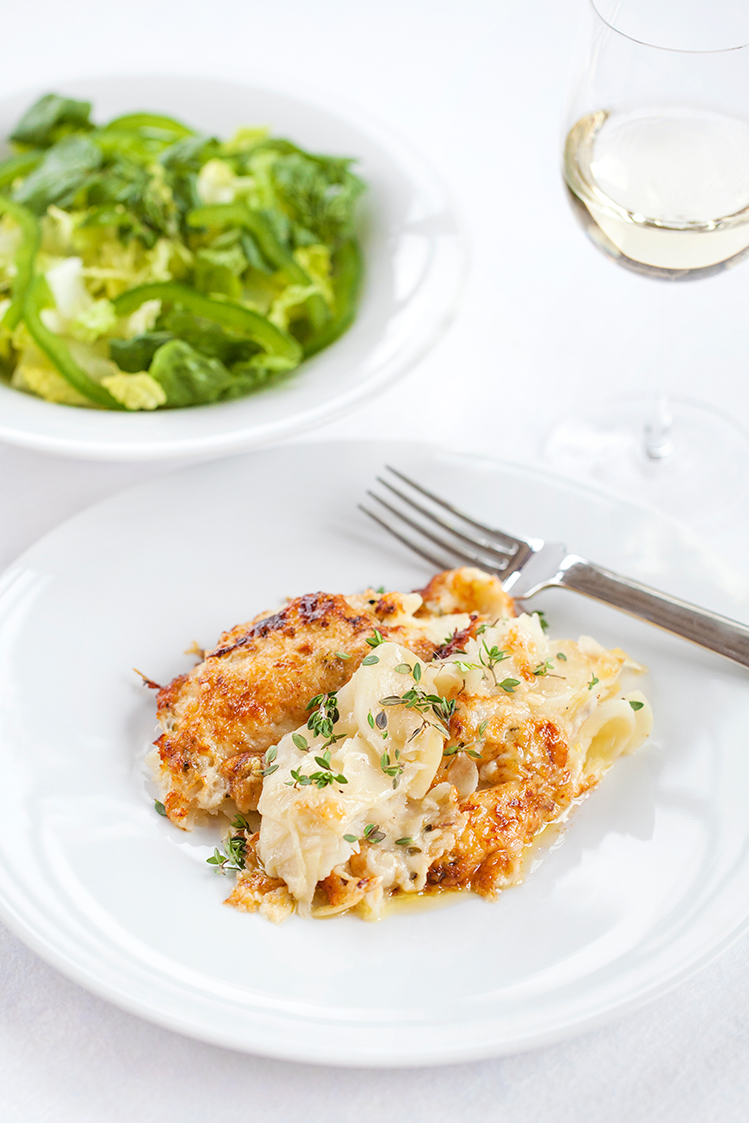
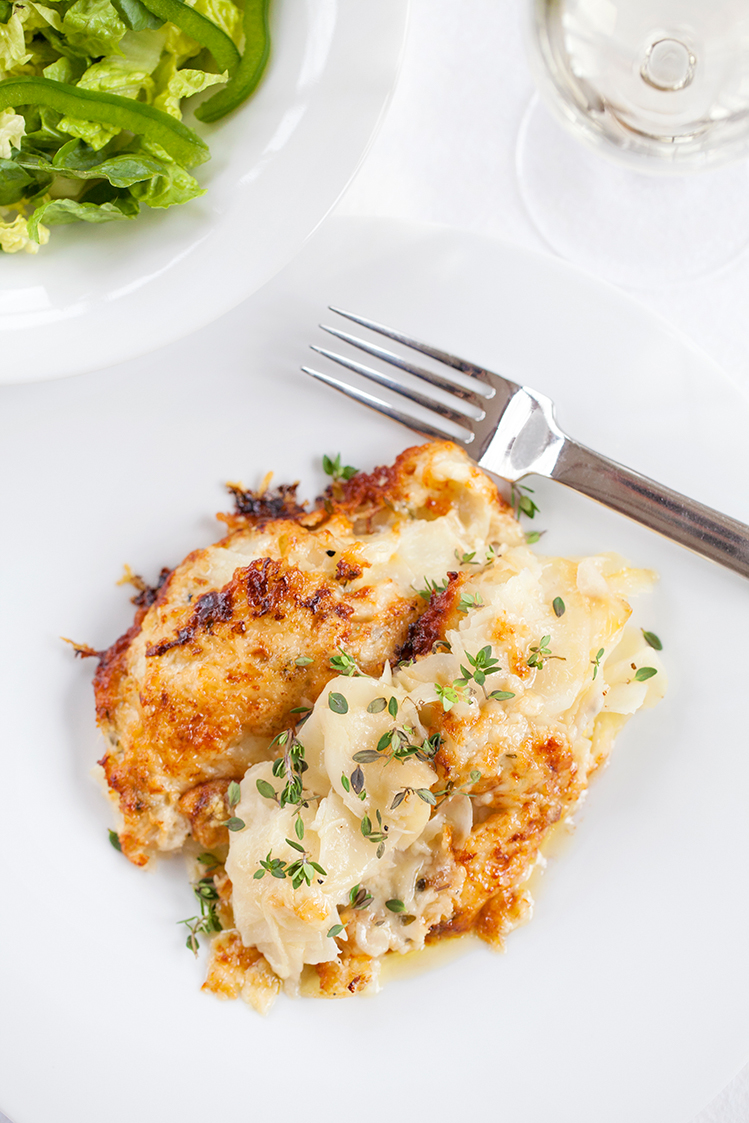
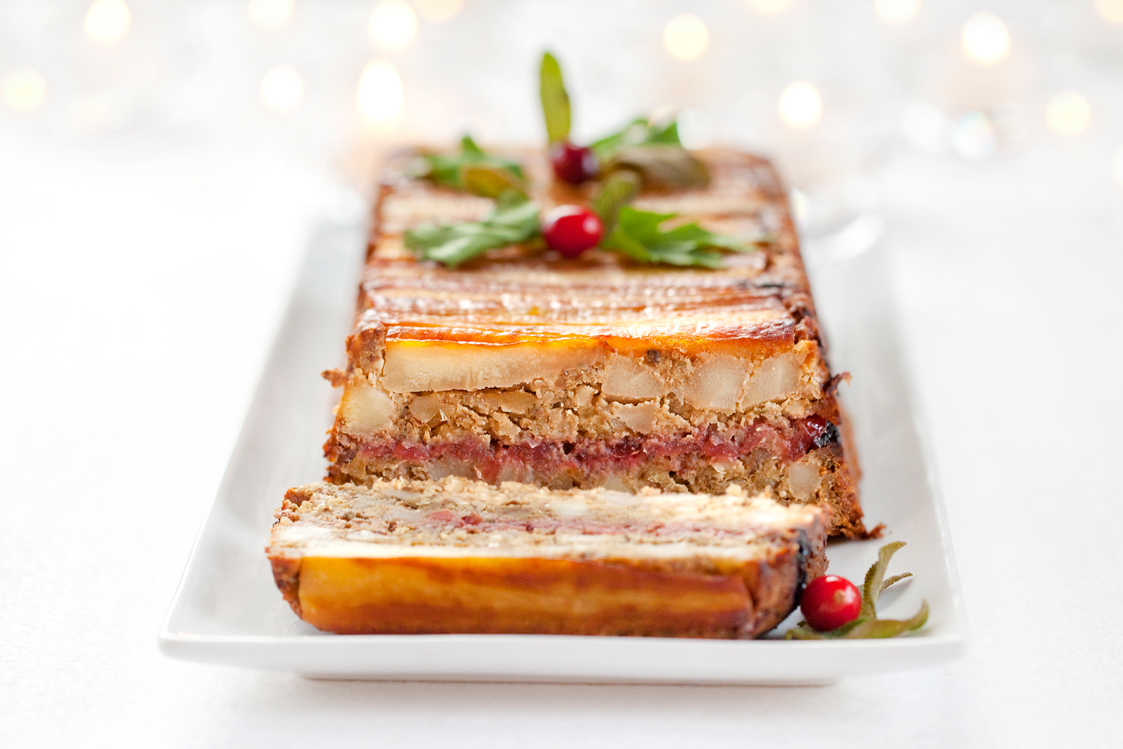
Without the support of my husband, who steps into the domestic breach every time he finds me glued to my computer, I would have given up completely. Economy of effort is where it’s at and Celeriac Terrine With Red Pepper Sauce is one of those meals that John can prepare single-handedly so that we’re still well fed even when I’m overly committed to tasks beyond the kitchen table. Celeriac Terrine With Red Pepper Sauce makes an impressive vegetarian meal for six people. Since there are only three of us to feed, that means enough leftovers to slice-up cold several days later, which you can then generously top with more cheese before reheating in the oven for 15 minutes and gently warming through the leftover red pepper sauce on the hob. Alternatively, the terrine eats equally well cold with homemade mayonnaise and salad leaves, preceded by a delicious creamy, hot tomato and red pepper soup that’s simply thrown together in minutes by combining the leftover red pepper sauce with a bottle of Abel & Coles cherry tomato passata and a generous dollop of double cream. Voilà, two nutritious, keto-inspired meals for the price of one! 

celeriac terrine recipe.jpg

Celeriac, otherwise known as celery root, is a bit of a culinary life saver when you’re living a low-carb lifestyle. Although a root vegetable, celeriac isn’t nearly as starchy as potatoes (potatoes contain over twice as many net carbohydrates) so it’s really useful for making mash, chips, gratins and soups - watercress soup thickened with celeriac instead of potato is even better. High in dietary fibre and loaded with vitamins and minerals for maintaining good health, this recipe totally transforms celeriac from its reputation as the gnarly hobbit of the vegetable world into a very elegant looking, make-ahead main course for entertaining, or a much more appetisingly colourful, meat-free alternative to a family roast.

celeriac organic vegetable.jpg

A long-standing favourite of ours, this recipe is taken from the Winter section of Rose Elliot’s book ‘Vegetarian Four Seasons’. However, while I can still buy organic celeriac in May, I make no apology for enjoying it in Spring! It’s simply delicious food, whenever!

Celeriac Terrine With Red Pepper Sauce (Serves 6)

Ingredients - for the celeriac terrine

700g organic celeriac

25g organic butter

125g organic strong Cheddar cheese, grated

25g freshly grated organic Parmesan or organic vegetarian Parmesan-style cheese 

4 tbsp snipped organic chives

3 organic eggs

Himalayan pink salt or Celtic sea salt

Freshly ground organic black pepper

Organic cherry tomatoes and fresh chives - to garnish 


Ingredients - for the red pepper sauce

2 tbsp organic olive oil or macadamia nut oil

2 organic onions, finely sliced

2 organic red peppers

150ml vegetable stock

Himalayan pink salt or Celtic sea salt

Freshly ground organic black pepper

15g cold organic unsalted butter, cut into small pieces

celeriac terrine.jpg

Instructions

Pre-heat the oven to 160℃ / 325 ℉ / Gas mark 3

Grease and line a 450g / 1lb loaf tin with a piece of non-stick parchment paper to cover the base and extend up the short sides. Grease again.

Boil a kettle of freshly filtered water.

Peel the celeriac and cut into even-sized 2cm chunks.

Pour the boiling water from the kettle into the base of a steamer. Place the celeriac into the top of the steamer and cook for about 12-15 minutes, or until the celeriac is tender.

Lift the celeriac out of the steamer and drain well before tipping into a bowl - the water in the bottom of the steamer makes wonderful stock.

Add the butter to the celeriac and mash, but don’t puree because some texture is good in this dish. Mix in the grated Cheddar and Parmesan cheeses, the chives, eggs and salt and pepper to taste.

Spoon the mixture into the prepared tin and level the top. Bake for about 50 minutes or until the terrine feels firm to the touch, is golden-brown and a skewer inserted in the middle comes out clean.

While the terrine is baking make the red pepper sauce. Heat the oil in a large saucepan, put in the onions and cook over a gentle heat with the pan lid on for about 10 minutes until the onions are softened but not browned.

Meanwhile, wash the peppers and cut into rough pieces - there’s no need to remove the seeds because the sauce will be strained.

Add the peppers to the onions, cover the pan again and cook gently for a further 5 minutes.

Pour in the stock. Cover and simmer for about 10 minutes or until the peppers are tender.

Liquidise the sauce, strain into a clean saucepan and season to taste.

When the terrine is cooked, remove from the oven and allow to stand for 5 minutes or so before slipping a knife around the edges to loosen, then turn it out onto a warm plate.

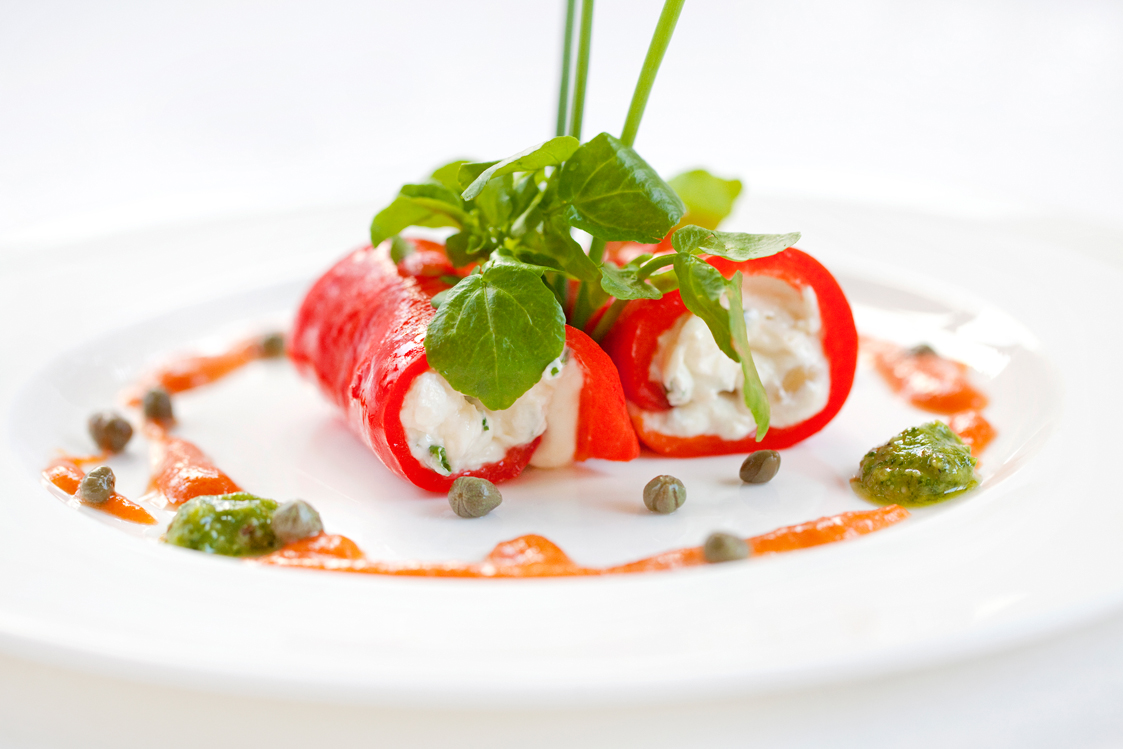
Garnish the terrine with halved cherry tomatoes, sprigs of parsley and small strips of chives.

Just before serving, bring the pepper sauce to the boil. Take off the heat and whisk in the cold butter, a little at a time, to make the sauce glossy. 

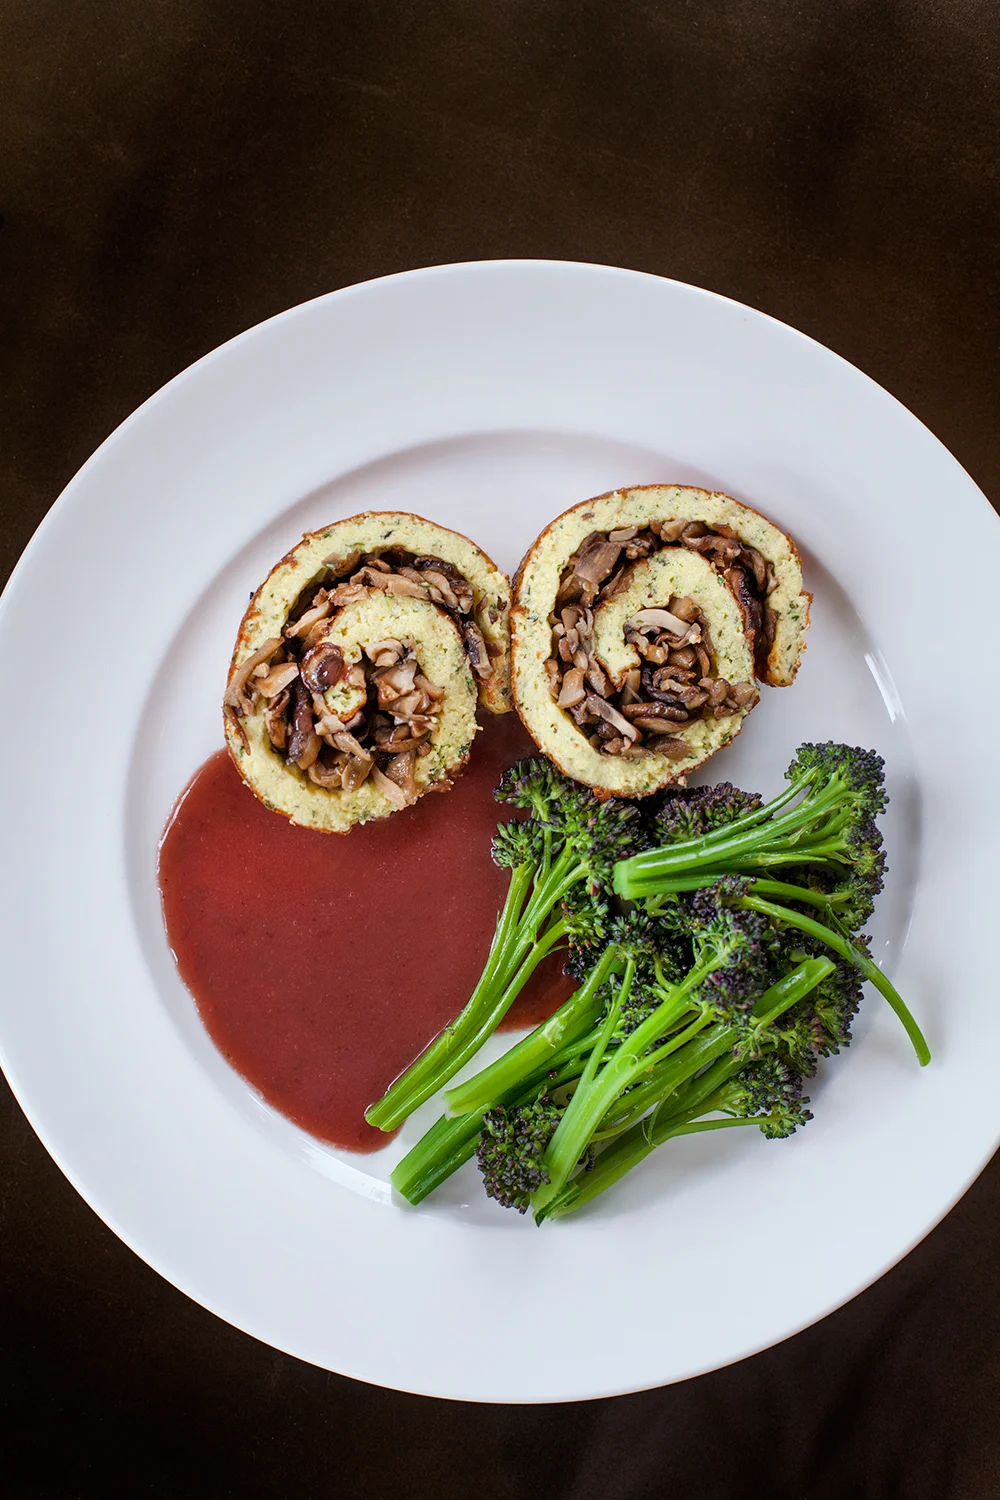
Serve the sauce with the terrine and some lightly cooked broccoli or other green vegetables. 


Fat 22g Protein 14g Carbohydrate 11g - per serving

celeriac terrine pepper sauce.jpg

Cheddar, Herb & Mushroom Roulade With Red Wine Sauce

by Susan Smith in ,


Less than two weeks ago I was boasting that Sushi our cat was in rude health, yet last week she suffered a six-day near death experience, which left us stressed-out and frantic with worry. Forgive my indulgence, but this is a cautionary tale that applies to anyone who solely relies on medical opinion and interventions as a strategy for health and healing. It seems to me that physicians should not get paid on the number of sick patients they treat but rather on the number of people (or animals) on their books that actually enjoy good health.

When a vet tells you to seriously consider euthanising your 17-year old cat because “You have a very, very poorly animal” that’s "too sick to go home", what would you do? It is at a times like these it pays to be contrarian. I’d only taken Sushi to the Minster Vets because three days earlier she’d suddenly stopped eating and was straining to use her litter tray. I’d even phoned them beforehand to explain my cat seemed to be constipated and to ask if they would give her an enema. As far as I was concerned, this was the only medical intervention required. 

According to the vet, I was wrong. After a brief physical examination, we were told that Sushi wasn’t seriously backed-up, but rather her intestine and colon were very thickened and inflamed and there was a distinct possibility that a cancerous tumour was the cause of the blockage. It still looked and smelt like ‘poo’ to me, but the vet made no attempt to clean-up Sushi’s backside and rejected giving her an enema because it would further dehydrate a cat suffering from kidney disease. Pardon? How do we know that she is? Furthermore, an X-ray might not show up a tumour so they’d need to perform an endoscopy, which had to be done under general anaesthetic. However, this might endanger Sushi's life because thirty per cent of cats her age do have kidney disease and undergoing a general anaesthetic can cause complete organ failure. Brilliant! If we didn’t want Sushi to suffer needlessly, euthanasia was, on the face of it, our best option. Naturally, I asked for a blood test to be done straight away to establish whether Sushi had kidney disease or not but was told: “Mum and dad can’t stay” for this procedure and we would have to leave Sushi with them.

In tears, I told the vet I couldn’t make a decision whilst in a state of shock and that if we were to agree to her killing our cat, we would need time to say our goodbyes. Not satisfied with this, the vet volunteered to leave the room for a few minutes, presumably so we could come to a more ‘reasoned’ decision in private. She needn’t have bothered, my mind was made up…if Sushi was going to die, it would be at home in my arms. Right on cue, the most horrendous howling of some poor creature that had been previously dispatched by it’s owner into the Minster’s veterinary care emanated from behind scenes to let me know with absolute certainty I needed to get us the hell out of there.  

The next 24 hours were an emotional roller coaster, not least because I knew we’d have to clean Sushi up and administer the enema ourselves. Nevertheless, I did have one ace up my sleeve. I’d just agreed to a new 10-year Lease on our old office premises and its change of use to a small veterinary practice. I managed to track down the vet that is going to be running the practice when it opens in a couple of months time and she was able to reassure me that the symptoms and events as I described them over the phone didn’t sound like Sushi was anything like at death’s door as far as she was concerned. She arranged to do a home visit the next day. 

Meanwhile, it took three of us to sort out Sushi’s nether regions. “Don’t try this yourself at home” applies to giving your feisty cat an enema and then some!  It’s a highly intimidating, emotionally charged procedure for both you and your cat! Three enemas later (organic coconut oil melted to blood temperature) Sushi had started to show more interest in grooming herself and the fragrance of coconut oil rather than poo pervaded the air as she was able to walk with her tail held high (a sign of confidence and contentment), rather than down at floor level, as if in an attempt to cover up her indignity.  

When the vet arrived the next day, Sushi had not eaten for four days nor had she had any success in the litter tray, but at least she was clean and ready for inspection. This is when drugs come into their own. Two injections later - one as an appetite stimulant and the other to get things moving along - Sushi started to come back to life. Life lesson: Never get stuck in your opinions. 

In desperation the day before, I had decided to contact Lily’s Kitchen to enquire about their organic cat food because it seemed it would be easier to persuade Sushi to eat something soft and pâté-like in texture than it would raw meat. I also bought her some probiotics to support healthy gut bacteria and intended to add a pinch of organic pysillium husk to her meals for extra fibre. At the time, I didn’t even know if Sushi would ever eat again. Lily’s Kitchen, sensing my distress, had sent complimentary samples of their cat food to me first class. Anyway, within three quarters of an hour of the vet leaving, Sushi was tucking into Lily’s Organic Chicken Dinner with relish. 

The next day Sushi passed something resembling a small, hard rock - the obvious cause of her discomfort - and within the hour everything was functioning normally again. Never have you seen more rejoicing over poo! Sushi now appears to enjoy Lily’s Kitchen dinners more than my lovingly prepared, fresh, organic meat - even with probiotic powder and pysilium husk added. Who am I to argue? Today, she is lively, chirrupy and content. Her coat is like silk and her breath as ‘fresh as a daisy’. Thank God, when it comes to taking responsibility for my family’s health, I fear the medics conditioning and stupidity more than I fear their disapproval! Some people might call it perverse, but my innate refusal to kowtow to a seemingly higher authority has again and again proven to be a lifesaver. Above all, I am so very grateful to Charlotte, Sushi’s new personal ‘physician’, who will hopefully help navigate us through any future cat crisis and who I think should be nominated for a ‘Vet With Heart’ award. Her professionalism together with her extremely gentle ‘first do no harm’ owner-empowering attitude to veterinary care, is a rare and precious find for any animal lover. When the Animal Doctor officially opens for business, Primal Plate will be celebrating the fact by baking this gorgeous girl a cake to show our appreciation. Local pet owners might want to take note.

Sushi fully recovered, enjoying being brushed!

Sushi fully recovered, enjoying being brushed!

Meanwhile, with Easter Sunday just around the corner, I am thinking about what we’re going to eat for our lunch. Today’s recipes for Cheddar, Herb & Mushroom Roulade with Red Wine Sauce are both taken from Rose Elliot’s book The Classic Vegetarian - although you’ll have to keep flicking between pages 34-37, 94 and 121 for instructions to cook. To help, I’ve brought both recipes together in one place for easy reference.

This is what I call ‘dinner party’ food. Just right for when you want something extra special for family and friends. To make things easy on yourself, cook the roulade in advance, then wrap it in tin foil and warm through in a hot oven for 15 minutes just before you want to serve it. Purple sprouting broccoli is my vegetable of choice. It’s a springtime seasonal star that’s just perfect with Cheddar, Herb & Mushroom Roulade with Red Wine Sauce because its dark green purplish hue sits so beautifully on the plate alongside the deep ruby red colour of the wine sauce. A truly elegant and impressive dish that’s every bit as tasty as a traditional Easter Sunday lunch but without a little lamb having to lose its legs. 

After the events of the past week do I need reminding that animals have a right to life and love as much as humans? No I do not! With this delicious festive meal, I wish everyone a happy, peaceful, vegetarian Easter.

vegetarian recipes primal plate.jpg

Cheddar, Herb & Mushroom Roulade With Red Wine Sauce (Serves 4)

Ingredients - for the roulade

Butter and very finely grated dry vegetarian Parmesan-style cheese for coating the base of the tin

60g organic full-fat soft ‘cream’ cheese

150ml organic single cream

4 large organic eggs, separated

200g organic Cheddar cheese, grated

3 tbsp of organic fresh herbs such as thyme, oregano and parsley

Sea salt and freshly ground black pepper

Freshly grated vegetarian Parmesan-style cheese to garnish, optional


Ingredients - for the mushroom filling

40g butter

600g mushrooms, cleaned and thinly sliced (I used a variety of organic & exotic mushrooms e.g. Chestnut, Shitake, Crimini, Enoki, Oyster and Beech) 

Sea salt and freshly ground black pepper 

Ingredients - for the red wine sauce

80g butter

2 organic shallots, finely chopped

2 tsps fresh thyme leaves, finely chopped

300ml red wine

45ml (3 tbsp) port, or other fortified wine

½ tsp vegetable bouillon powder

sea salt and freshly ground black pepper


Instructions to make the roulade

Pre heat the oven to 200℃ / 400 ℉ / Gas mark 6

Line a 22 x 12cm Swiss roll tin with nonstick paper. Grease the paper lightly with butter and sprinkle with the very finely grated Parmesan-style cheese.

Put the cream cheese into a large bowl, add the cream and mix until smooth. Beat in the eggs yolks one by one. Finally, stir in the grated cheese and the herbs and season to taste.

In a separate grease-free bowl, whisk the egg whites until stiff - but not so dry that you can slice them.

Gently fold the egg whites into the cheese mixture using a large metal spoon or a rubber spatula.

Pour the cheese and egg white mixture into the prepared tin, smoothing it to the edges. Tip: If you bang the tin down firmly onto a hard, flat surface this will help the mixture settle down evenly into the tin.

Bake until risen and just firm in the centre: 12 - 15 minutes.

Place a piece of nonstick paper large enough for the roulade onto a work surface close to the oven. Sprinkle it with vegetarian Parmesan-style cheese. 

Take the roulade to of the oven and turn it out, face side down onto the paper with a short side facing you. Peel the nonstick paper that was used to line the tin from the top of the roulade.

Allow the roulade to become cool to the touch before covering with the mushroom filling and rolling up. 


Instructions - to make the mushroom filling

Melt the butter in a large deep sauté or frying pan over a medium heat. 

Add the mushrooms and cook, stirring occasionally, until the mushrooms are tender and the liquid has evaporated: 12 - 15 minutes. Season to taste. 


Instructions to assemble the roulade

Cover the roulade base with the mushrooms and roll up as follows:

Spread the mushrooms over the base, leaving a border of about 1cm (½ inch) all round to make the roulade easier to roll.

Starting from a short side, firmly roll up the roulade - use the paper to help lift the base ‘up-and-over’ as you roll it.

Place the roulade with the seam underneath so it cannot unravel. Trim the ends if desired (I don’t bother) and sprinkle the top with more grated Parmesan-style cheese. 

The roulade may be served at once or reheated later (to reheat, see instructions below). 

Instructions - to reheat the roulade

Wrap in nonstick tin foil and place in a preheated oven (160℃ / 325℉ / gas mark 3) for 15 minutes.

Serve hot with red wine sauce. 


Instructions - to make the red wine sauce

Melt half the butter in a medium sized saucepan over a moderate heat and put the rest of the butter in the refrigerator.

Add the shallots and thyme to the pan, cover and cook for 5 minutes.

Add the wine, port wine and bouillon powder and season well. Bring to the boil. Cook until reduced by half. 

Meanwhile, cut the rest of the chilled butter into small pieces.

Strain the reduced sauce through a fine metal sieve into a small clean saucepan. Cover and set aside. 

Just before serving, bring the sauce back to boiling point, then take the pan off the heat and whisk in the cold butter, a little at a time, to make the sauce glossy. 

Serve immediately with the Cheddar, Herb & Mushroom Roulade.


Carbohydrate 13g Protein 25g - per serving of roulade with red wine sauce


Asparagus Loaf

by Susan Smith in , ,


There’s been a seismic shift in my life situation over the past few weeks - and yes, it’s been every bit as horrible as it sounds. All self-care has gone out of the window and I’ve thrown my despairing food-blogging hands up in the air more than once because there has been no time for me to be creative. Nevertheless, with just a few more days left to get your hands on the last of the English Asparagus - the notoriously short season starts on St. George’s Day and ends on 21st June - I was determined to blog one of my all time favourite asparagus recipes. 

Thankfully, not much original thought was required. I’ve borrowed this recipe straight out of Rose Elliot’s book ‘The New Vegetarian Cookbook’ - although I’ve more than doubled the amount of ingredients than the original recipe calls for, because it just doesn’t make enough of this delicious savoury loaf to satisfy my greed for English asparagus.

If I wasn’t strictly Primal, I would most enjoy eating a couple of slices of this asparagus loaf for a lazy lunch in the garden on a warm summer’s afternoon, with a few Jersey Royal potatoes, homemade mayo, a fresh leaf salad and a glass of ice-cold wine. My food fantasy aside - and the fact that so far this year there’s been precious little summer weather to speak of - mangetout peas and some crisp lettuce will do just as nicely in place of potatoes for a lovely Primal-inspired summer dinner party dish. Alternatively, cut the loaf into tasty, canapés-sized mouthfuls to serve with drinks, transport to a glamorous picnic, or serve as a delicious vegetarian option as part of a buffet party spread. I think Asparagus Loaf is very, very delicious - anywhere, anytime, any place. 

Asparagus Loaf (serves 6)

Ingredients

1 medium onion, peeled and grated

225g Parmesan or Vegetarian Parmesan-style Cheese (I used Gran Moravia)

225g organic ground almonds (I bulk buy ground almonds online here)

4 large organic eggs

285ml single cream (I actually used 250ml organic double cream and made up the quantity with filtered water)

sea salt and freshly ground black pepper

freshly-grated nutmeg (I used about ⅓ of a whole nutmeg)

750g green asparagus (at least 30 decent-sized asparagus spears)

Sprigs of organic watercress - to garnish


Instructions

Boil a kettle of water. 

Set the oven to 190℃ / 375℉ / Gas mark 5

Snap the ends off the asparagus spears and using a potato peeler trim off the bottom third of the spears to make sure that all the tough part has been removed - you should end up with about 325-350 grams of trimmed asparagus.

Pour the boiling water from the kettle into a large pan. Put the trimmed asparagus into a steamer basket set over the boiling water, put the pan lid on and steam the asparagus for 3 minutes. Drain, refresh under cold water, drain well again and set aside. 

Grease a 2lb loaf tin with melted butter and line with a long strip of baking parchment to cover the base and short-end sides.

In a large bowl, mix together the grated onion, cheese, ground almonds, eggs and cream.

Season with sea salt (about a teaspoon), a generous grinding of black pepper and the nutmeg.  

Put a layer of this nut mixture into the base of the loaf tin, then neatly arrange a layer of asparagus spears on top. Continue in layers like this until all the ingredients are used up, ending with the nut mixture. 

Bake for 60-70 minutes, until risen and firm in the centre.

Cool completely in the tin, then slip a knife around the sides and carefully turn out onto a plate.

Strip off the paper. Cut into slices. Arrange the slices on a plate - or individual plates - and garnish with watercress.


Notes

It’s well worth taking the time to arrange the asparagus spears neatly into the loaf tin. 

You’ll end up with 4 layers of the nut mixture and 3 layers of asparagus spears in your loaf tin, so try to split your ingredients evenly upfront. When baking this for the blog, I threatened to run out of the nut mixture for the final layer. From experience I know that If the top nut layer is too thin, when the loaf is cut into slices it will tend to break off. Annoyingly, I also ended up 2 asparagus spears short, which then had to be steamed separately! 

Season carefully as Parmesan cheese tends to be salty.

If you’re making canapés - makes about 48 - cut the slices neatly again into thirds.

Although leftovers keep well in a sealed container in the fridge, if the size of this loaf is too much for your needs, simply halve the ingredients and bake in a 1lb loaf tin for 45-60 minutes. 


Carbohydrates 11g Protein 28g - per serving


Lemon Curd Ice Cream With Vodka Blueberry Compote

by Susan Smith in , , ,


Last week, in the run up to Easter, our Nespresso machine, main oven and microwave all conked out over three consecutive days. The repairs and/or replacement of the coffee machine and oven are still outstanding, but did you know that in this day and age you can actually order a microwave on Easter Saturday afternoon and have it delivered free of charge on Easter Sunday morning? Really? Does no one take time out any more for those ‘we-wanna-be-together’ happy-holiday, family occasions, which for us means coming together to share some exceptional food and drink. Ah well, their loss, our gain. Not that I need a microwave for anything other than warming plates, but still, when you’ve only a half-sized oven left to cook in, you simply can’t have empty plates occupying the space. 

As if nothing else could go wrong, it did! I’d already made our Easter lunch starter to feature on last week’s blog but to get even further ahead of our Easter celebrations (after all, I do have my third share of a bottle of LPR Champagne to drink before lunch is served!) I decided to make little lemon cream pots for dessert (think lemon tart filling without the pastry).

Usually, when I’m trying out a recipe for the first time, I deliberately override my natural instincts and do exactly what the recipe tells me to. Oftentimes, it’s a big mistake but, hey, I’m not always in the mood for original thought! On this occasion, at a quarter to midnight on Saturday night, I was spooning twelve ramekins worth of expensive ingredients into the waste bin! Nor did I realise, until I finally got to bed at 2:16 am, that the clocks had gone forward and it was now only 4 hours before I needed to get up again! 

It’s at times like these that I am so grateful for Primal Plate. I don’t know if there’s anyone else ‘out there’ cooking Primal Plate recipes, but that becomes secondary when I actually find my own food blog the most essential guide to eating well every day! On Easter Sunday morning, just using the site’s search facility for ‘lemon’ was enough to spark the idea of Lemon Curd Ice Cream. The rest is down to what’s in the fridge. Hence it was a case of making ice cream with Co Yo natural coconut milk yogurt and the remnants in a pot of crème fraîche, or making something else. Turns out, if you simply stir lemon curd, coconut milk yogurt and crème fraîche together in a bowl and freeze, the result is food alchemy - a deliciously bright, light, primrose-yellow, zingy, creamy-smooth ice cream.

Purplish-blue Vodka Blueberry Compote and sunshiny Lemon Curd Ice Cream - sweetened with raw organic honey - is the perfect match in this refreshing, tangy dessert. Lemon and blue always look good together and juicy blueberries and lemons are a heady, flavour pairing that’s cooling, floral, citrusy and fresh - reminiscent of springtime and all things bright and beautiful.

If, at first glance, you think the recipe below looks a little complex, look again. The lemon curd takes less than 15 minutes to make, the 3-ingredient ice cream about 10 minutes and the blueberry compote even less than that! Lemon Curd Ice Cream With Vodka Blueberry Compote is in fact a spectacularly easy, make-ahead, special occasion dessert.

Cool, sophisticated, delectable…there aren’t enough superlatives to do this enticing, Vitamin C packed fruit dessert justice!  

Lemon Curd Ice Cream With Vodka Blueberry Compote (Serves 6)

Ingredients - for the lemon curd

3 large organic eggs

120g raw organic ‘runny’ honey

100ml fresh lemon juice (2-3 lemons worth)

60g unsalted butter, at room temperature, cut into small pieces

1 heaped tbsp lemon zest, finely grated

2-3 drops organic liquid stevia


Ingredients - for the lemon curd ice cream

420g (approx) lemon curd i.e. the full quantity of lemon curd made with ingredients above

250g plain (unsweetened) Greek-style yogurt - I used Co Yo Natural Coconut Milk Yogurt

125g crème fraîche (I used Longley Farm)


Ingredients - for the vodka blueberry compote

300g fresh blueberries

100g organic ‘sugar-free’ blueberry spread (I used Clearspring)

30 ml freshly squeezed lemon juice

1 tsp organic arrowroot

2 tbsp organic vodka (I used Snow Queen vodka)


Instructions - for the lemon curd

In a stainless steel bowl, whisk together the eggs, honey and 80ml lemon juice until well blended. Cut the butter into small pieces. 

Place the bowl over a saucepan of gently simmering water. Do not let the bottom of the bowl come into contact with the water. 

Cook for approximately 6-8 minutes, whisking constantly with a balloon whisk (to prevent it from curdling) until the mixture becomes thick (like soured cream or hollandaise sauce). Don’t get distracted, the mixture can quickly and suddenly turn from thin to thick! 

Remove from heat and immediately pour into a clean bowl. 

Add the butter to the mixture and whisk until it has melted, then add the grated lemon zest, the rest of the lemon juice and 2 drops liquid stevia. Give everything a good stir then taste. If you think the lemon curd is still too tart, stir in another single drop of stevia. 

Take a sheet of plastic cling-film and immediately lay it directly onto the surface of the lemon curd to stop the air getting to it (to prevent a skin forming). Allow the mixture to cool completely. The lemon curd will continue to thicken as it cools. Keep covered and refrigerate until needed.


Instructions - to make lemon curd ice cream

Tip all the ingredients into a bowl and stir together well. Churn the ice cream in an ice cream maker until soft-set consistency, then quickly transfer to a plastic freeze-proof container and freeze until solid.

If you don’t have an ice cream machine, pour into a plastic freeze-proof container and freeze for about an hour-and-a-half until the sides start to get solid. Then mash with a fork to combine the solid ice cream at the sides of the container with the softer centre. Straightaway, put it back into the freezer and freeze until solid.

Take out of the freezer and put in the refrigerator 20-30 minutes before serving to allow the ice cream to soften slightly.


Instructions - to make the vodka blueberry compote

Combine the blueberries, lemon juice and the fruit spread in a medium saucepan over medium heat and cook for about 5 minutes or until the fruit spread dissolves, the blueberry juices start to run and the mixture becomes syrupy - don’t let the berries cook too long or they will become mushy and lose their beautiful shape. Take the pan off the heat. 

In a small bowl or tea cup, combine the arrowroot powder with a little of the vodka until a very thin paste is formed. Add a little of the hot blueberry juice to the slaked arrowroot to even out the temperature between the two mixtures, then quickly pour the arrowroot mix into the berry compote, stirring continuously as you do so. 

Put the pan back on the heat and keep stirring until the mixture thickens slightly (just below boiling point). Stir in the rest of the vodka. 

Remove from the heat. Tip into a bowl and lay a piece of cling film directly onto the surface of the compote to stop the air getting to it - i.e. to stop a skin from forming. 

Best served warm or at room temperature.


Notes

Blueberries are known as a super fruit; rich in antioxidants, high in vitamins and minerals. Read more about them here: 20 Science-Backed Health Benefits of Blueberries


Carbohydrate 19g Protein 7g - per serving of lemon curd ice cream

Carbohydrate 13g Protein 0g - per serving of vodka blueberry compote


Carrot And Coriander Roulade

by Susan Smith in , ,


Recently my world has been turned upside down because my sixteen year old cat, seemingly at death’s door a few days ago, was, according to the vet, most likely suffering from kidney failure. I had thought she was going to live forever - well at least make The Guinness Book Of Records for being the most long-lived cat - but it seems I was deluding myself. 

To be fair, it wasn’t just wishful thinking. Along with her brothers and sisters, she’d been abandoned by her mother at birth. When I found her at just six weeks old she’d been locked inside a filthy shed, was suffering from a respiratory condition and was barely alive. Lady luck was smiling on her that day (in retrospect I wish I had taken all five kittens away with me) because from the moment she fearfully clung to me, pitifully mewing, her heart racing ten-to-the-dozen, she’s been treated royally - like the princess she is. Named Sushi, because I was determined to only feed her a raw food diet from the get-go, she has never eaten a single meal of pet food in her life. To read more about foods that make your cat and dog sick read the shocking truth here

In the Primal Plate household, we live by the maxim “Let food be thy medicine and medicine be thy food.” But it seems that even feeding my cat human-grade wild salmon, raw organic lamb, pork, chicken, egg yolks and raw grass-fed milk wasn't enough to stave off the progressive symptoms of disease associated with ageing. Following last week’s panic, when Sushi was so violently ill that I thought she must have been poisoned, I dug deeper still into the dietary requirements of felines. Only to discover that my best efforts to date have fallen short of her nutritional needs.  

Firstly, since there are no bones in pre-packed supermarket minced meat and I can’t purchase a domestic grinding machine in the UK to grind up bones at home, she’s consistently been deprived of calcium. I never connected the now obvious dot that as minced meat in supermarkets is intended for human consumption, it’s assumed it will always be cooked before eating. The larger surface area of ground-up meat means it’s more vulnerable to bacteria growth - not a problem for humans, since cooking kills off any harmful bacteria - but if contaminated meat is fed raw to your pet it can cause serious gastrointestinal upset.

I also suspect Sushi’s diet was lacking adequate amounts of taurine - an essential amino acid that’s a vital supplement for ageing animals and humans (vegetarians in particular, please take note!) - because I never added offal (specifically, raw chicken hearts, which are rich in taurine and raw liver) to her meat. Also, down to my sheer laziness, I failed to ‘dress’ her dinners with a daily dose of vitamins and minerals (I use Arthrydex).

One week later, with some back-up help from raw cat food supplier PurrForm to get me over the ‘hump’, my kitty’s dietary shortcomings have now been resolved. It cost £80 for a meat grinder (to make our own range of raw, organic pet food), £79 for extra food supplements (Vitamin E, Vitamin B, Taurine and Wild Salmon Omega 3 oil) plus the time and effort to make our own calcium supplement with powdered eggshells! However, this is nothing compared to the vet bills I was quoted for an initial blood test and diagnosis. As for the lifetime’s medication and regular check-ups that the vet thought was inevitable going forward into the future? In my view, unless it’s an absolute emergency, most human beings and animals seem to fare better without medical intervention. It seems that Hippocrates is right on point. Today, Sushi has never been more alive and full of the joys of Spring!  

Spirits lifted, I can now focus on what we’ll be eating for our Easter celebration lunch! Carrot And Coriander Roulade is a savoury carrot cake recipe that I’ve borrowed from the Vegetarian Good Housekeeping Institute’s Cookery Club book by Linda Yewdall (Ebury Press 1994).

Stylish and sustaining, it makes an interesting low-carb, protein-packed starter. The carrot roulade is rolled around a tasty, cream cheese filling flavoured with fresh herbs and coriander. Served with a mixed leaf and herb salad it’s like springtime on a plate. 

Wishing you all a happy, healthy Easter!

Carrot And Coriander Roulade (Serves 4-6)

Ingredients - for the roulade

50g organic butter

450g organic carrots, coarsely grated (I do this in a food processor to save time)

4 large eggs, separated

1 tbsp chopped fresh coriander leaves

sea salt and freshly ground black pepper


Ingredients - for the filling

175g full-fat soft cream cheese

1 tbsp chopped dill

1 tbsp chopped flat leaf parsley

1 tbsp chopped chives

1 tbsp chopped coriander leaves

2-3 tbsp crème fraîche

sea salt and freshly ground pepper, to taste


Ingredients - to serve

Assorted salad leaves

Herb sprigs such as dill, chervil or parsley 

Instructions

Pre-heat the oven to 200℃ / 400℉ / Gas mark 6

Line a 30cm x 20cm (12 x 8 inch) Swiss roll tin with non-stick baking parchment.

Coarsely grate the carrots using a grating disc in a food processor, or by hand.

Melt the butter in a pan, add the carrots and cook gently, stirring frequently, for 5 minutes or until slightly coloured. Transfer to a bowl, allow to cool slightly, then add the egg yolks and coriander and beat well. Season to taste with salt and pepper. 

Whisk the egg whites in a bowl until firm peaks form, then stir 2 tablespoons into the carrot mixture to lighten it. Using a metal tablespoon, carefully fold in the rest of the egg whites.

Spread the mixture evenly in the prepared tin and bake in the oven for 10-15 minutes until risen and firm to the touch. 

Turn out onto a sheet of non-stick baking parchment, cover with a clean, damp cloth and allow to cool.

Meanwhile, prepare the filling. Put the soft cheese in a bowl. Using a fork, mix in the chopped herbs (dill, parsley, chives, coriander) and enough crème fraîche to yield a smooth, spreading consistency. Taste and adjust the seasoning if necessary.

Remove the cloth from the roulade. Spread evenly with the filling, leaving a 1 cm (½ inch) border all round. With the short side facing you, carefully roll-up from this short side, using the paper to help.

To serve, cut the roulade into slices and arrange on individual plates with the salad leaves and herbs. 


Notes

If the idea of rolling up the roulade fazes you, bake the mixture in two loose-bottomed 8 cm (7 inch) sandwich tins instead. Turn out and cool on a wire rack, then sandwich together with the filling.

I’m very lucky to have an award-winning farm shop called Maxey’s close-by. They supply local restaurants with delicate micro leaves and kindly let me have my pick when I want something posh to garnish Primal Plate dishes with. On this occasion, I used baby coriander, amaranth leaves and edible flowers for some extra Easter prettiness! 


Carbohydrate 8g Protein 8g - per serving (total 6 servings)


Celeriac Dauphinoise

by Susan Smith in , ,


If I could have one 'mardy' about my Primal diet it’s that I just can’t seem to tactically allow potatoes back into my life…not ever! Having initially lost one and a half stones by eating low-carb, high fat (LCHF), I have on more than one occasion subsequently pined for the simplicity and density of potatoes. Carby they may be, but potatoes are in a league of their own and their virtues are not easily replicated. As well as being a naturally nutritious whole-food, simple spuds need no more than the application of heat to make them into something very, very tasty indeed (is there anyone that doesn’t love golden, crispy roasties?). When pre-cooked and chilled (think yummy potato salad) potatoes are also an alluring dietary source of resistant starch - which is top-notch food for ‘good’ gut bacteria, and thus your overall health. Or so I debate with myself…

Unfortunately, neither my nostalgia for potatoes or their nutritional profile is of any help to me. As far as my metabolism is concerned it’s not playing! I cannot ignore the fact that previously, within an hour or so of eating potatoes, my feet and ankles would swell alarmingly. No doubt potatoes had also long been playing havoc with my blood glucose levels, but after the age of fifty the almost immediate inflammatory response (edema) not only made me look like a frump, it actually made me feel quite queasy. I may forever mourn their loss, but for me it’s a case of R.I.P. potatoes! 

Another thing that peeves me is cheese! It’s virtually impossible to be a non-meat eater on compassionate grounds and still follow Primal principles without eating eggs and cheese. Unfortunately, almost all vegetarian recipes seem to ignore the fact that the most wonderful-tasting, beautifully-textured, traditionally-made cheeses, such as Parmesan, Gruyere and Mozzarella, are totally unsuitable for vegetarians. Whilst I’ve found good-enough substitutes for Parmesan and Mozzarella, I have still not found a copy-cat vegetarian version of Gruyere D.O.P. that’s available to retail customers, which can emulate anything like Gruyere’s unique melting quality and depth of flavour. Even if you can get past the ‘no-no’ of cheese made with calf rennet, there’s still the massive cruelty involved in milk production generally, and the nutritional degradation that occurs with pasteurised milk taken from grain-fed cows. Given that not all cheese is created equal, there is one family-run traditional cheese dairy that I am happy to be acquainted with because they share Primal Plate’s ethos - a passionate commitment to animal welfare and human health. This family run business makes award-winning, artisan, vegetarian cheeses from the raw milks of free-range, grass-fed cows, goats and ewes. In this day and age of intensive factory farming, small enterprises such as The Traditional Cheese Dairy make my heart sing. Not only because they fly in the face of extreme human exploitation of animals inherent in the dairy industry, but also because their end-products taste so good and are naturally healthful to animals and humans alike. I know it isn’t always practical, but please try to seek out and support all farmers that treat their animals as animals - not just a commodity for ‘growing’ meat or as 24/7 milking machines. Raw milk from free-range, grass-fed cows is not only better for the animals it is far, far better for you.  

Wherever you shop, substitute any mature, organic, vegetarian Cheddar in recipes that call for Gruyere. You may need to ask for advice at the Deli counter. It is often a case of trial and error when you’re trying to find a decent tasting vegetarian Cheddar cheese that doesn’t disintegrate into an oil-slick when baked or grilled! I will keep you posted if and when I find the perfect one!

Rant over, I have stopped arguing with reality long enough to create a potato-like dauphinoise using that great potato ‘pretender’…celeriac. Whilst the finished result isn’t as pillow-soft as cooked potatoes, cheesy gratins and bakes always have the yummy, comfort factor that low-carbers sometimes crave - and this cheese-topped Celeriac Dauphinois is no exception. I’ve lightened-up the full-on fat experience of double cream and cheese (oftentimes called for in traditional dauphinoise recipes), by substituting dry white wine for most of the cream. The crispy, crunchy cheesy topping speaks for itself. All in all, much tastier and less rich, Celeriac Dauphinois is an excellent low-carbohydrate main course for a light family supper or when entertaining vegetarians. It’s equally delicious served as a vegetable accompaniment.  

Ingredients

3 medium/large shallots, finely sliced

2 small celeriac, total weight about 900g

½ lemon, juiced

2 tbsp fresh lemon thyme, leaves only

2 tbsp olive oil

40g butter

sea salt and freshly ground black pepper

¼ tsp freshly grated nutmeg

150 ml dry white wine (I used a dry, white Spanish Rioja)

60 ml organic double cream

165g Gruyere (or mature, vegetarian Cheddar), finely grated              

60g Parmesan (or Parmesan-style cheese), freshly grated                 


Instructions

Pre-heat the oven to 190℃ / 375℉ / Gas mark 5

Fill a large bowl with cold fresh water and add the lemon juice.

Cut the top and bottom off the celeriac and then stand flat on a chopping board. With a sharp knife cut off the thick skin working all the way around the celeriac from top to bottom.

Cut each peeled celeriac into 4 quarters.

Using the thinnest slicer on a food processor, a hand-held mandolin slicer or a very sharp knife, cut the celeriac into 3mm thin slices. Put the celeriac slices into the lemon water to prevent them discolouring.

If not done already, finely slice the shallots. 

Heat the butter and olive oil together in a large pan until the butter has melted.

Drain the celeriac then either spin in a salad spinner or dry on a clean tea-towel. 

Add the shallots and drained celeriac to the pan. Continue to cook over a medium heat for about 5 minutes, turning the vegetables over now and again to make sure that everything is well coated in the olive oil and butter. 

Season with salt, freshly ground pepper and nutmeg then pour in the wine and continue to cook for about 10-12 minutes more with the pan lid on, stirring occasionally, until the celeriac is just tender.  

Tip the contents of the pan into a gratin dish. Scatter half the thyme leaves over the top then drizzle over the double cream and flatten the slices of celeriac down so they’re submerged as much as possible under the liquid.

Mix the two grated cheeses i.e. Gruyere & Parmesan (or vegetarian substitutes) together, then sprinkle on top of the celeriac in a thick even layer. Cover the dish with tin foil.

Place in the pre-heated oven and cook for 20 minutes. 

Remove the foil, then place back in the oven for a further 20-25 minutes until bubbling and golden brown. 

Remove from the oven and allow to stand for 2 minutes. 

Scatter over the rest of the thyme leaves before serving with a fresh green salad.


Notes

Cheese has a tendency to break down when cooked at high temperatures. The maximum temperature you should bake this dauphinoise - and any other cheesy casserole - is 190℃ / 375℉ / Gas mark 5, or below. If the cheese does separate and you’re left with a layer of fat sat on the surface of your Celeraic Dauphinoise, lightly dab off the excess oil with sheets of paper towel before allowing to stand for a couple of minutes prior to serving. It will still taste good!

If you like your cheese topping really brown and crozzly a couple of minutes under a very hot grill at the end of the cooking time should do the trick.  

Only buy small heads of celeriac - larger specimens can lack flavour, tend to be a bit woody and are much more unwieldy to peel and slice.


Carbohydrate 23g Protein 17g - per serving


Thai Green Curry With Prawns & Thai Green Garden Curry

by Susan Smith in , , , ,


Ever since I walked into the Royal Thai restaurant in Nottingham 20 years ago, I have been enchanted by Thai cuisine. Not so much the ‘farang' (Thai for Western foreigners of white descent!) version of Thai food, with our predilection for all things deep-fried - a sort of spring rolls with everything attitude - but the fresh and light, hot and spicy flavours brought together in a variety of harmonious dishes that seem to make every Thai meal a banquet.

Without dairy and hardly any emphasis on meat, Thai cooking is the embodiment of all the main flavour components - sweet, sour, spicy, salty and bitter - perfectly balanced in playful, imaginative dishes that are full of colour and texture. I’ll never forget the sheer joy and excitement of one gorgeous Thai girl called Tinkerbell (how endearing a nick-name is that?) as she ran out from the restaurant’s kitchen to proudly show us her first representation of a beautiful bird she’d painstakingly carved out of a carrot! 

Our first visit to the Royal Thai was an attempt to educate ourselves in anticipation of a month long business trip to Bangkok. At first they must have smiled at our naivety, but, prior to the journey we were generously afforded numerous ‘insider’ traveller’s tips and we quickly became one of their more regular customers…hungry for their companionship as much as the food! Subsequently, the amazingly beautiful, gracious and intelligent Thai girls running the business at that time welcomed us with open arms into the Thai community, and for many years it was as if we were part of their family. Sadly, the girl I most fell in love with died in a road traffic accident shortly after opening a second restaurant in Nottingham (formerly known as Siam Thani). Nang was the dearest of friends to me and the absolute epitome of all that I now associate with Thai people generally - kind, generous and incredibly friendly.

Now that we’re low-carb and Primal, it’s not so easy to eat out in Thai restaurants - you really do need lots of steamed rice to quieten down the chilli-heat - but for the home cook, authentic-tasting Thai food is simple and fast to prepare, and because you’re in control it doesn’t have to be the hottest of the hot. 

Prawns are synonymous with Thai cookery, but their popularity comes at a price. A violent, Asian slave trade exists to produce most of the prawns for sale in Western supermarkets, so please be careful that the prawns you buy are ethically and responsibly sourced. Choose organic king prawns from Waitrose or Honduran raw prawns from M&S. Thank you. Or you could forego the prawns altogether by opting for our vegan-friendly, equally flavoursome, Thai Green Garden Curry.

I’ve paired Primal Plate's tasty, just nicely spicy, warming green curry with pak-choi but Cauliflower Rice is good too. Vegans and vegetarians can simply substitute cherry tomatoes and asparagus tips for the prawns. Hand-carved vegetable flowers and birds are optional!

With food as delectable as this, no wonder Thailand is known as the “land of smiles”.

Thai Green Curry With Prawns (Serves 4) 

1 tbsp organic coconut oil

2 medium organic sweet red peppers, cored, de-seeded and cut into thin strips

4 medium/large organic spring onions, sliced diagonally into 5 or 6 pieces  

2 x 400ml tins organic coconut milk (full fat)

1 tbsp Marigold organic Swiss vegetable bouillon powder

4 tsp Thai green curry paste

1 tbsp organic tamari

450g raw peeled organic king prawns

200g frozen petits pois, defrosted  

½ tsp sea salt and freshly ground black pepper

20-30ml freshly-squeezed lime juice

2-3 drops organic liquid stevia

20g fresh coriander leaves, chopped

Thai Green Garden Curry

Simply follow the instructions given below - omitting the prawns and substituting with:

300g organic cherry tomatoes, halved

300g asparagus tips, trimmed and cut in to 5cm (2”) pieces

To Serve

2 x 235g packs pak choi, washed, prepared (*see below) and lightly steamed for 3 minutes. 

*If using very young pak choi they can be left whole or cut into halves or quarters. However, larger stems of pak choi will cook more evenly and are much easier to manage on the plate if you cut the leafy tops off their white stems. If the outer stems and leaves are still too large, split them in half down the middle. Place the white stems into the bottom of the steamer, then pile the green leaves on top and steam for 3 minutes with the pan lid on.


Instructions

Fill and boil a kettle of water. Pre-heat 4 large serving dishes/bowls. 

For making the Thai Green Garden Curry: Pour some of the boiling water from the kettle in to a medium saucepan. Bring back to the boil, throw in the asparagus and cook for just 2 minutes (do not overcook them, they should still have some ‘bite’). Drain and refresh the blanched asparagus in cold water (or place under a cold running tap) to stop the cooking process and set their bright green colour. Drain again and set aside.

To quickly defrost the petits pois: Put the peas in a heatproof jug, pour over the boiling water then drain and set aside.

Melt the coconut oil over a medium/high heat in a large, deep sauté pan. Add the pepper strips and spring onions to the pan and stir-fry for about 2 minutes or until just beginning to soften. 

Add the bouillon powder and the green curry paste and continue to stir-fry for a further 30 seconds - try to avoid breathing in the fumes at this stage, they’re quite pungent!

Pour the coconut milk into the pan and bring the mixture to the boil whilst stirring constantly. Once it comes to the boil turn the heat down to medium, then add the tamari, half the lime juice and a single drop of liquid stevia. Taste. Add a pinch of sea salt and a good grinding of black pepper - plus an extra drop of stevia, if you think it needs it. 

Let the sauce gently bubble away over a medium heat for 5 minutes to allow it to reduce down slightly.

Meanwhile fill a steamer with the rest of the boiling water from the kettle. Place the pak choi in the top of the steamer and cook with the pan lid on for 3 minutes.

Whilst the pak choi is cooking, tip the prawns (or, if making Thai Green Garden Curry, the cherry tomatoes and blanched asparagus tips) and the petits pois into the curry sauce and cook for a further 2 minutes or until the prawns turn pink and are completely opaque - or if making the Thai Green Garden Curry, just until the tomatoes, asparagus and peas are warmed through. 

Take the pan off the heat and stir in half the chopped coriander. Check the seasoning again and adjust to taste - also add a little more lime juice and/or another drop of stevia, if needed.

Pile the cooked and drained pak choi in the centre of the four pre-warmed serving bowls. Carefully ladle the green curry over the top dividing the prawns and vegetables equally between each bowl.

Sprinkle over the rest of the coriander and serve immediately. 


Notes

N.B. To keep the Thai green curry fresh and vibrant you need to be careful not to over-boil it in the final two minutes of cooking time. Gently heat through until just below boiling point. If you over-cook it at this stage, you’ll end up with tough prawns, collapsed tomatoes and dirty-looking, more-khaki-than-green, vegetables. Not very nice!


Carbohydrate 21g Protein 25g - per serving (with prawns)

Carbohydrate 26g Protein 10g - per serving (with cherry tomatoes & asparagus)


Tiramisu

by Susan Smith in , ,


Here’s a novel way to spoil your mum with anti-ageing skin care this Mother’s day - treat her to tiramisu! You are what you eat, and this skin-loving dessert is rich in Vitamin E and healthy oils that are sure to get her skin glowing from the inside!

A fantastic confection made with a light tiger nut and almond sponge cake layered with sweet-tasting macadamia nut cream and a rich coffee/chocolate flavoured ‘ganache’, this is tiramisu re-invented - without sugar, dairy or grains.  

Boasting a wealth of antioxidants, essential vitamins, minerals and healthy fats from the ‘darlings’ of the nutritionally-aware foodie brigade - avocados, coconut oil/milk, raw cacao, tree nuts, tiger nuts and a little raw, unpasteurised organic honey (because I simply couldn’t ignore the skin-enhancing benefits of honey!) - this isn’t just tiramisu, it’s superfood! An unrecognisably healthy retro dessert so choc-a-block with nutrients you won’t believe it’s not the luscious (though sadly off the carbohydrate richter-scale!), Italian classic.

Primal Plate’s ‘light as a feather’ Tiramisu is part of my stay slim and gorgeous action plan to make low-carbohydrate/high fat eating (LCHF) a way of life even when the occasion calls for some sweet-toothed indulgence. Not only is this impressive dessert relatively low in carbs, you are nourishing your skin from the inside out by eating Vitamin E packed tiger nuts, almonds, avocado and coconut oil. Vitamin E is widely used in the cosmetics industry to help slow down the ageing of the body cells, improve the elasticity of the skin and reduce skin wrinkles. 

Whilst I maintain that you should never put anything on to your skin that you’re not prepared to put in to your mouth, It’s good fun to turn this beauty maxim on its head with a deliciously decadent dessert that can help every woman channel her inner goddess. Ingenious…the perfect solution to having your cake and eating it! Happy Mother’s day girls!

Tiramisu (makes 4-6 servings)

Ingredients - for the sponge layer            

45g unsalted butter    

60g organic tiger nut flour 

40g organic ground almonds 

1 tbsp raw cacao powder

pinch of sea salt

3 large eggs                            

75g Sukrin:1                             


Ingredients - for the nut cream layer            

125g macadamia nuts, soaked overnight in cold filtered water

250g full-fat coconut milk

20g raw organic honey

4 drops organic liquid stevia

1tsp pure vanilla extract (I use sugar-free Ndali)

25g coconut oil                


Ingredients - for the coffee/chocolate ganache layer            

2 ripe medium avocados (approx 350g unpeeled weight)

20g raw organic cacao powder

50g raw organic honey                                     

10-12 drops organic liquid stevia                 

1 tsp pure vanilla extract (I use sugar-free Ndali)                        

80ml espresso-strength coffee        


Ingredients - to assemble the tiramisu            

100ml freshly brewed expresso-strength coffee                

40 ml malt whisky                    

30g Sukrin Gold               

raw cacao powder, sifted                    

Sukrin no-sugar milk chocolate


Instructions - to make the sponge

Pre-heat the oven to 180°C / 350℉ / Gas mark 4

Melt the butter gently and leave to cool slightly. Use a little of it to grease a 23cm x 30cm (9” x 12”) swiss roll tin, then line the base and sides of the tin with a single sheet of baking parchment (cut down into the corners so that the paper lies flat against the sides of the tin).

Sift the tiger nut flour, salt and cacao powder in to a medium sized bowl. Stir in the ground almonds and set aside. 

Put the eggs and Sukrin:1 in a large heatproof bowl that will sit snugly over the top of a saucepan. Pour boiling water into the saucepan and sit the bowl on top. The hot water must not actually touch the bowl. Set the pan over a low heat so that the water is barely simmering. The steam will help dissolve the Sukrin and the mixture to thicken slightly.

Using a hand-held electric beater set on High, whisk the eggs and Sukrin sweetener together for about 6-8 minutes, or until the mixture is very pale, thick and mousse-like and has at least tripled in volume. It should hold its shape for a few seconds when it’s flicked across the surface of the rest of the mix.

Add one-quarter of the sifted flour/ground almond mixture into the egg and Sukrin mixture and very lightly and gently fold it in with a large metal spoon. Repeat 3-4 times more with the remaining flour/ground almond mixture - folding it in gently each time. When all the flour/ground almonds have been incorporated into the mix, carefully pour in the melted butter and gently fold this in too. N.B. Don’t be in a rush to do this and try not to be too heavy-handed - the idea is to retain as much air as possible inside the mix whilst at the same time bring everything uniformly together. 

Quickly pour the mixture into the tin - tilting the tin this way and that until the cake mixture has levelled itself out evenly in to all four corners of the tin - then bake in the oven for 20-25 minutes, until golden brown and firm to the touch. 

Leave to cool in the tin for a few minutes and then turn it out on to a wire rack to cool completely.

Once cooled, peel off the parchment paper and slice the cake into fingers or squares for making tiramisu or trifle.


Instructions - to make the nut cream layer

Rinse the macadamia nuts in fresh water then blitz all the ingredients together to form a smooth cream. Place in the fridge to set.


Instructions - to make the coffee & chocolate ganache layer

Blitz all the ingredients together to form a rich, smooth, chocolatey cream.


Instructions - to assemble the tiramisu

Make a fresh batch of espresso strength coffee, add the whisky and liquid stevia and pour into a shallow dish.

Cut the cold sponge into suitable sized cubes or fingers (whatever best fits your serving dish).

Layer 1: very briefly (2-3 seconds!) dip the sponge pieces into the coffee mixture until you can see that the liquid has risen about half-way up the depth of the sponge and lay the pieces one at a time as you go into the base of your serving dish(es) (I used 2.5cm / 1” squares for the base layer in 4 x 225ml martini glass)

Layer 2: Spoon over the nut cream layer and spread out evenly

Layer 3: Add a second layer of coffee-soaked sponge

Layer 4: Spoon over a second layer of nut cream and spread out evenly

Layer 5: Spoon or pipe over the coffee & chocolate ganache and spread out evenly

Cover and chill for 1-2 hours in a refrigerator. Then, when you’re ready to serve the tiramisu...

Layer 6: Sift over a fine layer of raw cacao powder

Layer 7: Use a small spoon to carefully transfer a generous, even layer of Sukrin sugar-free milk chocolate (straight off the plate it was grated on to) directly on to the top of each tiramisu - don’t try to sprinkle over the grated chocolate with your fingers as it will melt instantly!


Notes

The best diet for weight loss and maintenance is one that you can easily stick to. A low-fat/low calorie diet requires Herculean willpower because food without fat doesn’t taste good and oftentimes you still feel hungry. The joy of a low-carb/high fat diet is that you don’t count calories and the food you can eat is deliciously satisfying. Nevertheless, Primal Plate desserts and other sweet treats are delights to be enjoyed occasionally, not every day. You can achieve steady, effortless weight loss by limiting carbohydrates to between 50 grams and 100 grams per day - unless you are morbidly obese, in which case you may need to kick-start your body into burning fat by eating less than 50 grams of carbohydrate per day and avoiding tiramisu for the time-being! You can keep a tally of your carb intake at MyFitnessPal. If you then cross the line from time to time (without exceeding 150 grams of carbohydrate) a long, brisk walk should sort things out!

There is enough sponge cake in this recipe to make 6 tiramisu (or to have leftovers). The rest of the ingredients will make 4 very generous servings (it’s deliberate!). If you’re cutting carbs, have a small appetite or just more mouths to feed, simply divide the recipe between 6 smaller (150ml) serving dishes.

All the individual components of this dish can be made separately in advance. The sponge-cake will keep for up to 3 days in an airtight container, and both the nut cream and coffee/chocolate ganache will keep for several days in the refrigerator. You can also assemble the tiramisu up to and including layer 5, twenty-four hours before you want to eat it - finishing with the final flourish of raw cacao and grated chocolate just before serving. 

Although organic liquid stevia is a zero-carb, natural alternative to sugar, it can leave a slight aftertaste. To minimise this and to not miss out on the skin-enhancing benefits of honey, I’ve used a combination of stevia and honey to sweeten both the nut and coffee/chocolate creams.

I do not like overly sweet food, so this sophisticated, not-too-sweet dessert with a touch of alcohol is definitely one for the grown-ups. However, it can easily be adapted for children (or tomorrow’s breakfast!) by substituting a small/medium sliced banana (per serving) for the coffee/whisky soaked sponge and layering it with the nut and coffee/chocolate creams in the same way as described above. You may also want to add a little extra honey to the coffee and chocolate cream to make it more child-friendly. 

The cake mixture rises just enough to make it nicely spongy without being too thick. Firm yet really light in texture, it’s just made for soaking up the boozy coffee in this recipe and for making trifle generally. Once cold, it’s easily cut into neat fingers or cubes (Sarah loves to eat these plain) and is a brilliant substitute for those nasty trifle sponge fingers you can buy in the shops. 


Carbohydrate 25g Protein 11g - per serving (6 people)

Carbohydrate 36g Protein 15g - per serving (4 people)


Spiedini - Two Ways

by Susan Smith in , , ,


Once you’re committed to a low-carb/high fat, Primal, predominantly vegetarian diet, the option of eating-out well often requires imagination, ingenuity and well-developed interpersonal skills! Whatever you do, don’t over-indulge at the bar before ordering your meal because you’re still ‘on-duty’ until you’ve successfully managed to cut through the swathe of waiting staffs’ confusion when you tell them that you don’t eat any grains, potato, meat, legumes, pulses or sugar! I can’t tell you how many times I’ve patiently explained that pasta counts as grain and it’s dried legumes e.g. chickpeas, lentils, beans - not fresh beans and peas - that are off limits. I’ll even re-jig the menu in advance so they can ask Chef if we can mix and match elements from several different dishes already listed to create just one meal that we can eat! That done, there are still numerous occasions when the bread basket appears, even after our in-depth discussion! 

Happily, there are three notable restaurant exceptions in our locale - namely, Hart’s, World Service and Piccolino - that without any fuss are still able to feed us ‘body and soul’. Thanks guys! In fact, the inspiration for this Primal Plate Valentine’s day main course of Spiedini (the Italian for ‘skewer’) is an almost copy-cat version of our favourite dish on Piccolino’s menu - skewered scallops, tuna and prawns. As with previous Primal Plate recipes, I felt compelled to conjure up a vegetarian equivalent and, as you can see in the photographs, swapping vegetables and Halloumi cheese for fish doesn’t compromise on its looks or yumminess. 

As this is a Valentine’s day celebration dinner for two, I’ve gone all fanciful and Italianesque when naming the recipes. After all, fish skewers or vegetarian skewers doesn’t do either justice, whilst Spiedini Di Pesce and Spiedini Vegetariani sound altogether more romantic and enticing…you can always trust the Italians on this score! 

However, in case you’ve not already picked up on my last blog post, the pièce de résistance of this special occasion meal is dessert. I think Feeling Fruity Sweet-Hearts is probably my best creation on this blog to date! Not only does this bold, colourful, sassy dessert say “I love you”, it tastes absolutely divine. It's a sweet treat that takes no more than 30 minutes hands-on time in the kitchen - but looks like fine restaurant dining at its best. A stunning, creamy, dreamy, fruity pudding that offers up pure pleasure by the mouthful. Talk about swoon! 

And as if this wasn’t enough to make you feel truly cared for, can you believe that this healthy, low-carb, two course dinner à deux boasts no more than 40g carbohydrate per person with Spiedini Di Pesce and just 44g with Spiedini Vegetariani?

When all you need is love, this amazingly simple, seriously impressive food served with a decent bottle of wine (I think Champagne’s obligatory) makes for a romantic, not-so-sober evening at home that has all the potential for this year's Valentine celebration being one to remember.

Spiedini Di Pesce

Spiedini Di Pesce

Spiedini Di Pesce (Serves 2 - Makes 6 skewers)

Ingredients

325g thick lean fresh tuna steak (sustainably sourced, MSC certified)

6 king scallops (sustainably sourced, MSC certified)

6 large peeled prawns (sustainably sourced, MSC certified)

24 ripe cherry tomatoes on the vine

50g organic butter, melted

3 tbsp parsley, finely chopped

Juice of ½ large organic lemon

sea salt and freshly ground black pepper

Olive oil - for cooking

1 organic lemon, halved - to serve

Sprigs of flat-leaf parsley - to serve

Organic Romaine lettuce, finely shredded - to serve

6 bamboo skewers - soaked in cold water for 30 minutes

Raw, marinated Spiedini Di Pesce ready for cooking

Raw, marinated Spiedini Di Pesce ready for cooking

Spiedini Di Pesce is delicious served simply with crispy lettuce and a wedge of lemon

Spiedini Di Pesce is delicious served simply with crispy lettuce and a wedge of lemon

Instructions 

Cut the tuna steak in to 6 even-sized pieces.

Thread a tomato, a prawn, a tomato, a scallop, a tomato, a tuna chunk and finally a tomato (in that order) on to 6 skewers and place them on to a large flat plate.

Combine the melted butter, parsley and lemon juice together and season with sea salt and freshly ground black pepper. 

Liberally brush the Spiedini di Pesce with the butter mixture and set aside.

Pre-heat the oven to 220℃ / 425℉ / Gas mark 7

Line a large baking tray with non-stick foil or a silicon baking sheet. 

Lightly oil a griddle pan with olive oil and set it over a medium/high heat. When the pan is really hot - you should see a slight haze rising - place the spiedini in to the griddle pan, buttered side down. Cook over a high heat for about 1-2 minutes, without moving.

Whilst they’re cooking, brush more of the butter mixture over the top of the spiedini. Once the underside is starting to lightly char, gingerly lift the ends of the skewers up with your fingers and turn them over. Cook for another 1½ minutes or so, then frequently turn the skewers thereafter making sure the surface of the fish stays in contact with the griddle pan - gently press it down once or twice with the back of a flat spatula if it doesn’t seem to be cooking evenly.

The process of griddling the spiedini should take no longer than 5-6 minutes, by which time the pieces of fish will be attractively and lightly charred and the prawns just turning pink. N.B. At this stage, the fish doesn’t need to be cooked all the way through but it does need to have taken on some stripes of gold from the grooves in the pan. This will likely mean cooking the spiedini in two batches. An overcrowded pan causes food to release too much moisture and you don’t want the fish to end up steamed rather than griddled.

Transfer the griddled spiedini to the baking tray and place in the hot oven for a further 3 minutes until sizzling hot.

Arrange three Spiedini di Pesce on each of two serving plates lined with shredded lettuce and garnish with lemon halves and flat leaf parsley. 

Serve immediately. 


Carbohydrate 12g Protein 62g - per serving (3 skewers per person)


Spiedini Vegetariani (Serves 2 - Makes 6 skewers)

375g (1½ 250g packs) Halloumi cheese, cut into 18 pieces (approx 4cm x 4cm x 2.5cm each)

24 ripe cherry tomatoes on the vine

12 marinated baby artichoke hearts, drained

12 large fresh basil leaves

1 medium/large organic courgette, cut lengthways into 12 very thin slices (best done on a mandolin or with a vegetable peeler)

50g organic butter, melted

3 tbsp fresh mint, finely chopped

Juice of 1 lime

sea salt and freshly ground black pepper

Olive oil - for cooking

Organic Romaine lettuce, finely shredded - to serve

1 lime, halved - to serve

sprigs of bay leaf or mint leaves - to serve

6 bamboo skewers - soaked in cold water for 30 minutes

Raw, marinated Spiedini Vegetariani ready for cooking

Raw, marinated Spiedini Vegetariani ready for cooking

Instructions

Cut the halloumi in to 18 even-sized pieces.

Roll-up a single basil leaf and a baby artichoke heart inside each slice of courgette. Repeat until you've made 12 courgette and artichoke rolls.

Thread a tomato, a piece of halloumi, a tomato, a courgette/artichoke ‘roll’, a piece of halloumi, a tomato, a courgette/artichoke ‘roll’, a piece of halloumi and finally a tomato (in that order) on to 6 skewers and place them on to a large flat plate.

Combine the melted butter, mint and lime juice together and season with sea salt and freshly ground black pepper. 

Liberally brush the Spiedini Vegetariani with the butter mixture and set aside.

Pre-heat the oven to 220℃ / 425℉ / Gas mark 7

Line a large baking tray with non-stick foil or a silicon baking sheet. 

Lightly oil a griddle pan with olive oil and set it over a medium/high heat. When the pan is really hot - you should see a slight haze rising - place the spiedini in to the griddle pan, buttered side down. Cook over a high heat for about 1-2 minutes, without moving.

Whilst they’re cooking, brush more of the butter mixture over the top of the spiedini. Once the underside of the cheese is turning golden, gingerly lift the ends of the skewers up with your fingers and turn them over. Cook for a further minute or so then frequently turn the spiedini thereafter until all the pieces of halloumi are attractively and lightly charred and striped with gold from the grooves in the pan. N.B. This will likely mean cooking the spiedini in two batches. An overcrowded pan causes food to release too much moisture and you don’t want steamed spiedini instead of griddled! The total griddling time for each batch of skewers should not exceed 5-6 minutes.

Transfer the griddled spiedini to the baking tray and place in the hot oven for a further 3 minutes until sizzling hot.

Arrange three Spiedini Vegetariani on each of two serving plates lined with shredded lettuce and garnish with lime halves and sprigs of bay leaves or mint.

Serve immediately. 

Spiedini Vegetariani with crisp lettuce and a squeeze of lime

Spiedini Vegetariani with crisp lettuce and a squeeze of lime

Notes

Threading halloumi on to skewers can be quite a challenge because the cheese has a tendency to split. My man watched me get quite frustrated before suggesting that maybe he could literally drill a hole in the cheese first! I told him that this wasn’t something I could specify as part of a food recipe. Nevertheless, he proceeded to find a fine metal implement (actually the end of a very fine screwdriver - clean of course!) and gently rotated it back and forth into the centre of the cheese to ‘carve’ out a small hole, which actually meant it didn’t fall apart when I pushed the skewers through. I was gobsmacked! Needless to say, he’s voted himself for the job in future!

Furthermore, it does seem to matter what type of halloumi cheese you’re using. I found that Waitrose’s Hand Folded Halloumi With Mint performed best for taste, texture and skewering.

If the halloumi does fall off the skewers whilst griddling just carry on with the cooking process - they can easily be put back together on the plate and no-one will notice! 


Carbohydrate 16g Protein 47g - per serving (3 skewers per serving)


Feeling Fruity Sweet-Hearts

by Susan Smith in ,


I know it’s Shrove Tuesday today, but with Valentine’s day in just five days time I’m playing to an audience of romantics with this stupendous, creamy, fruity dessert. That said, doesn’t everyone love cheesecake?

I am currently awash with recipe ideas, but when I was thinking out loud about what I could feature on Primal Plate’s blog to symbolise this celebrated upcoming ‘day of love’ Sarah informed me that firstly, no one in their right mind wants to cook when romance beckons and secondly, it mustn’t contain onion, garlic, spices or anything that makes you smell! Apparently, this meant my musings on Thai-inspired prawn curry was a definite no-go!

The rebel in me is now determined to cook Thai prawn curry and drink pink Champagne with my lover this Valentine’s day but, so no ‘young hearts’ be offended, I have also complied with Sarah’s brief for the perfect Valentine’s day meal (the main course will be posted on Friday). In the meantime, feast your eyes on this luscious dessert that should appeal to all lovers of good food, not just the romantically inclined.

You’ll probably need to order these heart shaped moulds straightaway if you want to surprise your Valentine with these Feeling Fruity Sweet-Hearts. My plastic cheese moulds arrived within a couple of days (whatever happened to those beautiful porcelain coeur a la crème moulds of yesteryear?), so hopefully you’ll have them in time. You then need to line them with a double layer of muslin (I obtained muslin squares from Lakeland) or a single layer of cheesecloth.

Although this sensational dessert looks like a ‘work of art’ on the plate, in accordance with Sarah’s remit, there’s no cooking involved, it takes minutes to assemble and both the ‘hearts’ and fruit coulis can be made a few hours in advance and kept refrigerated until you’re ready to serve them.

A delight to the eye and totally scrumptious to eat, I’ve deliberately put this dessert together as a generous sharing-plate for two. However, if those intimate ‘we wanna be together’ moments are likely to be hijacked by hungry longing or downright competitiveness - i.e. you or your partner has a tendency to eat more than their fair share - this recipe has enough ‘heart’ to fill two moulds! Alternatively, if you’re confident that your beloved would give you their last rolo, you can halve the cheesecake recipe and make just one - although I’d still make the full quantity of fruit coulis and have what’s left spooned over some Greek yogurt for breakfast.

Ignoring chocolate, I think Feeling Fruity Sweet-Hearts maybe one of the most ‘happy-ever-afters’ ever created!

Wishing everyone a very Happy Valentine’s, with all my love. x

Feeling Fruity Sweet-Hearts (Serves 2 + 2 people)

Ingredients - for the cheesecake hearts

200g full-fat ‘cream’ cheese (I used Longley Farm full-fat soft cheese)

200g organic, natural Greek yogurt

100ml organic double cream

2 tbsp organic raw honey

2 tsp organic lemon rind, finely grated


Ingredients - for the mango & raspberry coulis & fruit skewers

200g ready-cut fresh mango chunks (I used Waitrose own brand)

Juice of ½ lime (about 20ml)

Juice of 1 organic medium orange (about 90ml)

150g fresh raspberries 

1 heaped tbsp Sukrin icing sugar (or to taste) 

2 (or 4) strawberries, washed (with leaves intact) 

1 kiwi, peeled - 1 (or 2) slices cut from the middle of the fruit, then each slice halved 

2 (or 4) mango chunks (reserved from the above pack) 

1 (or 2) black grape(s) 

1 (or 2) mini bamboo skewers


Instructions - to make the cheesecake hearts

Line two heart shaped moulds with a double layer of muslin or a single layer of cheesecloth.

In a medium sized bowl beat the cream cheese, yogurt, honey and lemon rind together until smooth.

In a separate bowl half-whip the cream until it just begins to hold its shape, then using a metal tablespoon gently fold into the yogurt and cream cheese mixture until fully incorporated.

Divide between the two heart shaped moulds - bang them down several times on the worktop as you’re filling them to allow the mixture to settle evenly inside the moulds - then level off the tops, stand on a large flat plate, cover loosely with cling film and place in the refrigerator for 1½ hours.


Instructions - to make the mango and raspberry coulis

Place all but two (or four) of the best pieces of mango into a blender with the lime juice and half the orange juice. Blitz until completely smooth.

Scrape the mango puree into a clean bowl. The coulis should be smooth and a pouring consistency - runny enough to slowly ‘flow’ when you tilt it on the plate but not so runny that it won’t hold its shape. Cautiously add a little extra orange juice if it seems too thick. Cover and refrigerate.

Next, wash out the blender. Tip the raspberries with the rest of the orange juice and a heaped tablespoon of Sukrin icing sugar into the clean blender and blitz until amalgamated.

Pass the raspberry puree through a fine sieve into a separate bowl. Check the consistency (as above) and add a little more icing sugar if you think it is too tart. Cover and refrigerate.


Instructions - to make the fruit skewers and assemble the dish

First, prepare the fruit garnish by threading pieces of fruit onto mini bamboo skewer(s) in the following order: strawberry (leaf facing inwards), kiwi, mango, grape, mango, kiwi, strawberry (leaf facing inwards). Set aside.

Take a large flat plate and carefully pour or spoon a generous amount of the mango coulis on to one half of the plate - pick the plate up in both hands and tilt it one-way only so that it runs to the outside edge on its side of the plate.

Repeat the process with the raspberry coulis but in this case tilt the plate in both directions so that the two coulis butt right up to the edge of each other (roughly down the middle of the plate) and the raspberry coulis runs to the outside edge of the plate on its side. Do the same thing with a second plate if two couples are dining together.

Take the cheesecake heart(s) out of the refrigerator and working swiftly, carefully turn the heart(s) out into the palm of one hand, remove the muslin with your other hand and gently but swiftly place in the centre of the plate(s).

Place the fruit skewer(s) jauntily alongside (see photograph) and…

Ooh la la! Tuck in!

Notes

The origin of the word coulis is French, from couler, meaning ‘to flow’ - which should give you an idea of the consistency your fruit coulis needs to be for this dessert!

If you think it sounds too tricky tipping delicate cheesecake heart(s) directly into your hand, simply turn the hearts out onto their serving plate first and then carefully pour the coulis around them. 

If you you’re trying to lose weight you can sweeten the cheesecake cream with two tablespoons of Sukrin icing sugar instead of raw honey. This will reduce the carbohydrate grams per serving by 8.5 grams i.e. Carbohydrate 19.5g - not 28g, as shown below.


Carbohydrate 28g Protein 3g - per serving (half the sharing plate)


Poached Pears with Butterscotch Sauce and Almond Shortcakes

by Susan Smith in , ,


Pear and almond is a classy coupling, which is elevated to even greater levels of sophistication when combined with the flavours of toffee and butterscotch. Today’s recipe for Poached Pears with Butterscotch Sauce and Almond Shortcakes is the perfect make-ahead dessert for an elegant dinner party. Right on cue, it made a fantastic finale to our New Year’s Eve dinner party celebrations last night. Hello there 2016!

Pears, butterscotch, shortcake biscuits…it all sounds gloriously indulgent and a bit Fatty Arbuckle doesn’t it? However, as with all Primal Plate recipes, this dessert remains true to the healthy premise of no grains and no added sugar. The joy of eating Primal is that once you’ve reached your target weight (easily achievable it you stick to no more than 50 to 100 grams of healthy carbs each day), occasional indulgences won’t make the blindest bit of difference. No more wodgy, podgy or painful sensations from eating the wrong food, nor the post Christmas angst of feeling fat. Brilliant! The trick is to keep moving (a daily 2-3 mile walk in the fresh air should do it) and to not wander across the 150 grams of healthy carbs per day limit, which still allows you plenty of scope for sweet treats. 

Real food, sustainability and kindliness to all living creatures and the environment is my inspiration for writing this Primal Plate food blog. I hope that in 2016 more people will appreciate the benefits of a low-carb, low sugar, no grain, primarily vegetarian diet so that not only can we renew our own health and vitality but also be kind and mindful enough to allow this beautiful world in which we live the same privilege and freedom.

Wishing everyone a peaceful, healthy and Happy New Year.

Vanilla Poached Pears with Butterscotch Sauce and Almond Shortcakes (Serves 4)

Ingredients - for the poached pears

300ml filtered water

125g Sukrin:1 granulated stevia sweetener

rind of ½ organic lemon

1 dsp pure vanilla extract (I used Ndali)

4 firm, ripe pears (I used Williams)

Bay leaves, to decorate - optional


Ingredients - for the butterscotch sauce

160ml coconut cream

6 Medjool dates

25g raw cashew nut butter

1 tbsp pure vanilla extract (I used Ndali)

1 dsp brandy - optional


Ingredients - for the almond shortcakes

100g organic butter

200g organic ground almonds

60g organic tiger nut flour

50g Sukrin Gold

50g organic flaked almonds, lightly toasted            

1 tsp baking powder                

½ tsp sea salt

1 dsp pure vanilla extract (I used Ndali)


Instructions - to make poached pears

First, check the dimensions of your saucepan to make sure that it is the right size for the pears to fit snugly inside.

Bring the water, Sukrin icing sugar, lemon peel and maple syrup up to the boil then reduce the heat under the pan to a very low simmer.

Peel the pears. Leave them whole with their stalks intact, immediately placing each one into the syrup - turning it to coat - before continuing with the rest. 

Cook the pears with the pan lid on for 20 to 30 minutes or until they’re soft to the point of a skewer or sharp knife. 

Take the pan off the heat and allow the pears to cool in the syrup. When cold, store covered in a refrigerator until needed.


Instructions - to make butterscotch sauce

Remove the stones from the dates and roughly chop. Place in a high powered blender with the remaining ingredients (in the order as listed in ‘ingredients’) and process until smooth.

Serve with poached pears and almond shortcakes

Can be stored in the fridge for up to a week.


Instructions - to make almond shortcakes

Pre heat the oven to 130℃ (fan) / 150℃ / 300℉ / Gas mark 2

Melt the butter in a small saucepan over a low heat. Allow to cool for a few minutes.

Meanwhile, in a large bowl combine ground almonds, tiger nut flour, Sukrin Gold, baking soda, sea salt and flaked almonds.

Using a fork, stir in the cooled melted butter and vanilla essence to bring everything loosely together - then roll up your sleeves and with your hands squash the mixture into a ball of dough - it is a bit sticky and crumbly but don't be worried, be determined! 

Tip the dough onto a large piece of non-stick baking parchment. Place a second piece of baking parchment on top then flatten the dough out a little bit with your hands. 

Use a rolling pin to roll the dough out to about 6 to 8mm (¼ to ½ inch thick). 

Use a 7.5 cm (3 inch) plain cutter to cut out the biscuits. Once you are only left with scraps from the cutouts, bring the pieces together to create a ball, then roll it out again to the same thickness and continue cutting the biscuits out.

Place the biscuits onto a lined baking sheet, about one inch apart. Bake for 35-40 minutes until golden.

Cool on the baking tray for 5 minutes, then transfer the biscuits to a wire rack to cool completely. 

These shortcake biscuits will keep for up to a week in an airtight container.


Notes

The poached pears will keep for up to 5 days in a covered container in the refrigerator.

I love the intense toffee flavour of the Butterscotch Sauce and, when chilled, it's the perfect consistency for piping around the pears. However, if you want a simpler presentation, it can also be formed into elegant looking quenelles (oval scoops of cream formed between two dessert spoons) and served alongside the pears. Alternatively, if you're okay with diluting the butterscotch flavour, thin the sauce down with a little milk, whipping cream or even water until a pouring consistency is achieved, then spoon over or around the pears.

A list of suppliers for Sukrin sweeteners and grain-free flours can be found on Sukrin’s Home page


Carbohydrate 20g Protein 1g - per serving of butterscotch sauce

Carbohydrate 15g Protein 0g - per pear

Carbohydrate 6g Protein 4g - per shortcake biscuit


Christmas Baked Apples in Clementine Syrup

by Susan Smith in ,


Ta-dah! Here is Primal Plate’s festive finale to your Christmas lunch or dinner, which was Inspired by Michel Roux Junior’s great food demo at the BBC Good Food Show, November 2015. 

This recipe is my interpretation of Michel’s alternative Christmas dessert: Mincemeat Stuffed Apples served with Muscovado Ice Cream. Obviously, for people following a low-carb, Primal lifestyle, this meant I needed to replace the sugar-laden ice cream and traditional mincemeat with something much healthier. 

Nevertheless, Mr Roux and I were always on the same page - as referenced in my blog post dated 20th November 2015. Baked apples are a delicious, easy-to-make, classic, seasonal treat at this time of year, but when combined with the sweet spices of Christmas, it’s a ‘pud’ to die for! Better still, my baked apples are cooked in fresh clementine juice - orange juice would do just as well - which, when the apples are cooked, can be quickly made into a tangy syrup to accompany them. Served with cinnamon and nutmeg spiced Horchata Ice Cream, this is truly a marriage of festive flavours made in foodie heaven!

Quite sophisticated and not too sweet, these really yummy Christmas Baked Apples in Clementine Syrup are a much lighter option than traditional Christmas pudding. I hope you like them.

Merry Christmas everyone!

Christmas Baked Apples in Clementine Syrup

Ingredients

4 largish eating apples e.g. Cox’s, Braeburn or Granny Smith’s

180g-200g low-sugar mincemeat 

2 tsp Sukrin Gold

½ tsp cinnamon

40g unsalted butter, cut into eight pieces

Juice of 6 clementines (or 2 oranges)

Fresh bay leaves, to decorate

Instructions

Pre-heat the oven to 160℃ / 325℉ / Gas mark 3

Core the apples - sit the apples on a chopping board and push an apple corer into the centre of each one. Make sure each apple stands upright of its own volition and, if not, take a tiny sliver off the bottom to ensure it will! 

Using a small sharp knife, lightly score the apples around their circumference - this will stop them from bursting.

Stand the apples, side by side in an ovenproof dish. Using your fingers, push spoonfuls of the mincemeat tightly into each apple. Be generous - you’ll need between 40g to 50g mincemeat per apple - create a nice dome of mincemeat so it stands proud on top!

Push two wedges of butter into the mincemeat on top of each apple, then add ½ teaspoon of Sukrin Gold and a good pinch of ground cinnamon in-between the butter wedges. Pour the clementine (or orange) juice around the base of the apples.    

Place on the middle shelf of a pre-heated oven. Bake for 45 to 50 minutes until the apples are soft but not collapsed.

Remove from the oven and carefully place one apple on each of 4 serving plates.

Press the remaining juices through a small fine strainer into a saucepan and boil rapidly over a high heat until reduced down to a syrup (this shouldn’t take much more than a minute or so) 

Spoon the clementine/orange syrup over and around the apples, dividing it equally between them. Serve with a scoop of Horchata Ice Cream on the side and decorate with sprigs of bay leaves.  

Notes

If you haven’t any Horchata Ice Cream, these Christmas Baked Apples are still very good served with whipped cream flavoured with a little Sukrin icing sugar and Calvados brandy or simply a dollop of crème fraîche.  

It’s Christmas, so ’tis the season to be jolly. This means I’m not going to declare the carbohydrate count of this dessert! Suffice to say, whilst most fruit, especially dried fruits, contain a lot of natural fruit sugar, these stuffed apples have approximately 40% less carbs than a portion of luxury Christmas pudding. If you’re worried (and I wouldn’t be since this is a celebration!) opt for a dollop of almost zero-carb luxury crème fraîche rather than the Horchata Ice Cream. Above all, enjoy!


Red Pepper Rolls with Goat’s Cheese

by Susan Smith in , ,


Make a statement with this bright red and green Christmas Day starter of Red Pepper Rolls With Goat’s Cheese that looks like Christmas on a plate! Tasty and nutrient dense, I think the red pepper rolls are a luxed-up vegetarian version of smoked salmon! Though brought together with a goat’s cheese filling, a fresh tomato vinaigrette, basil pesto and watercress, I suspect this fresh-tasting, light introduction to the main event will do you more good!

Packed with the great flavours of Provence, these delicious red pepper rolls seem to hark back to warmer days. But for now, open a bottle of chilled Champagne or a crisp, grassy, Marlborough Sauvignon to cut through the flavour of the goat’s cheese, and you have a fantastic festive beginning to your foodie celebrations. 

As with the rest of Primal Plate’s vegetarian Christmas day menu, most of the preparation for this dish can be done in advance of the big day. Then just before you sit down to eat, simply bring the different components together on pure white porcelain plates. Absolutely stunning to look at, this light and flavourful starter will still leave plenty of room for what is to follow.  

Red Pepper Rolls With Goat’s Cheese (serves 4)

Ingredients - for the pepper rolls 

4 red Romano peppers (the long, pointy ones!)

140g full-fat, soft, vegetarian goat’s cheese, without rind (I used Rosary Goat’s Milk Cheese)

2 tbsp extra virgin olive oil

1 tbsp chopped fresh chives

20g pine nuts, toasted

Freshly ground black pepper

1 tbsp Nonpareille capers, well rinsed - to garnish

Watercress sprigs, washed - to garnish

Whole fresh chives - to garnish


Ingredients - for the tomato vinaigrette

120g ripe tomatoes, chopped

2 tbsp red wine vinegar

2 tbsp low sugar tomato ketchup

1 tsp tomato paste

4 tbsp extra-virgin olive oil

sea salt and freshly ground pepper, to taste

1-2 drops liquid stevia (alternatively, ½ - 1 tsp maple syrup), to taste - optional


Ingredients - for the basil pesto

50g fresh basil leaves

25g vegetarian Parmesan-style cheese

25g pine nuts, very lightly toasted (in a dry frying pan over a low heat)

4-6 tbsp extra virgin olive oil (just enough to bind everything together into a thick, slushy sauce) 

1 small squeeze of fresh lemon juice - optional (but it helps the basil to keep its green colour)

sea salt and freshly ground black pepper, to taste


Instructions for the red peppers and cheese filling

Pre-heat a grill to High. Line a large flat baking sheet or the grill pan with a non-stick baking mat or non-stick aluminium foil.

Cut the peppers in half lengthways, then remove the stalk end, seeds and any white stringy bits. 

Place the pepper halves cut side down - skin side up - on the baking tray and grill fairly close to the heat source for about 6 minutes, or until their skins blister and start to blacken. 

Remove from the grill. Lay a sheet of cling-film over the top of the peppers and allow to cool completely.

Meanwhile, in a bowl mix the goat's cheese and olive oil together with a fork until softened. Add the chopped chives, pine kernels and season with pepper. Set aside.

Carefully peel the cold peppers and place skinned side down onto a large clean plate.

If you're working in advance, the peppers and cheese can now be covered and refrigerated until needed.

Instructions - to make the basil pesto 

The easiest way to make pesto is to process the basil, cheese, toasted pine nuts and 4 tablespoons of olive oil in a food processor or blender - or use a hand-held stick blender - until it comes together into a thick, smooth, fragrant, bright-green sauce (scraping down the sides of the bowl as required). 

Tip the mixture into a bowl, stir in an extra tablespoon or two of olive oil if you think more is needed to make an oozy consistency, then season the pesto to taste with salt and pepper, adding a small squeeze of lemon juice, if liked.

Alternatively, you can pound the ingredients together in a pestle and mortar, gradually adding the olive oil until it is the right consistency.

Cover and refrigerate until needed.


Instructions - to make the tomato vinaigrette

Blend all the ingredients in a small food processor or blender, or with a hand-held stick blender, for 30 seconds until fully amalgamated.

Strain through a fine sieve into a small bowl. Taste and adjust seasoning to taste, then cover and refrigerate until needed.


Instructions - to assemble the dish

When you’re ready to serve the pepper rolls, lay the peppers out onto a cutting board - trim off any straggly edges, if necessary. 

Fill with the goat’s cheese mixture - about 1 generous tablespoon per pepper half. Spread the mixture evenly along the length of the peppers, leaving about 5mm clearance around the edges. Roll each half up into a neat roll.

Arrange the pepper rolls on individual plates. Garnish with sprigs of fresh watercress and whole chives (see picture). Drizzle the tomato vinaigrette around the edges of the plates and add 3 to 4 small dollops of the basil pesto. Finally, randomly scatter a few of the capers over and around. 

Serve with aplomb! Wowzers!  You’ve surpassed yourself!


Notes

The pesto will keep 3-5 days in a sealed jar in a fridge - it’s best to cover its surface with a little more olive oil if storing for more than a couple of days.

The tomato vinaigrette will keep for 2-4 days, in a sealed jar in a fridge. 


Make Ahead Christmas Vegetables

by Susan Smith in ,


On Christmas Day this year I don’t intend spending more than an hour of ‘hands-on’ time in the kitchen. Nevertheless, I want it to be our most delicious Christmas ever and, as much as I can know, completely cruelty-free (oh my, the dairy industry is so tricky!) 

This means much of our vegetarian food celebration has to be planned-ahead and cooked-ahead. So far so good. Writing a food blog certainly helps focus the mind! The Horchata Ice Cream is already in the freezer and by this weekend the Cranberry Sauce, Mince Pies, Port Wine Gravy and today’s recipe for Spiced Red Cabbage will all be done. I then have four days left to pre-prepare the ingredients for the starter, make the Cheese Cocktail Biscuits and assemble the Parsnip, Cranberry and Chestnut Loaf. 

Which leaves me just about enough time to blog the starter of Red Pepper Rolls With Goat’s Cheese and the dessert of Mincemeat Stuffed Baked Apples before D-day (recipes coming soon). If you’re still with me, my Christmas cooking schedule is in the Notes section below!

Meanwhile let’s get cracking on the veg. Spiced Red Cabbage and Brussels Sprouts are classic Christmas fare (red and green at this time of year is good) and both are easy, make-ahead vegetables. 

Spiced Red Cabbage (Serves 6-8)

Spiced Red Cabbage is another easy-going Christmassy recipe that can be made in advance and reheated. Perfect! 

A mixed spice combination - typically, a mixture of allspice, cinnamon, nutmeg, mace, cloves, coriander and ginger - is generally used for sweet baking such as in cakes and biscuits. It’s the sweet warmth of these spices in autumnal-inspired baked goods that invite us to gear up to the prospect of winter, and are a timely reminder of Christmas recipes to come. 

In this savoury recipe, it’s all about the interplay between sweet and sour. A wonderful mix of slow-cooked cabbage’s slight mustardy-flavour combined with the sweet, warming notes of pungent spices, the fruitiness of apples with a touch of sweetness and the sour of vinegar. Get it right and spicy braised red cabbage is one heck of a useful side dish to complement the rest of your Christmas table.

Spicy Red Cabbage doesn’t take very long to prepare; then it can be left alone to do its ‘thing’ for 1½ hours of gentle cooking. It also keeps warm without spoiling. 

This recipe actually improves with age, so it’s almost better to make it now and freeze for later. Alternatively, make it a couple of days before Christmas and store in the refrigerator. 


Ingredients

I small red cabbage (about 750g)

1 red onion, finely chopped

2 medium Bramley apples (or use Cox’s or Granny Smith’s)

zest 1 organic orange

1 tsp mixed spice

40g Sukrin Gold

sea salt and freshly ground black pepper

2 tbsp raw cider vinegar

150ml pure, no added sugar apple juice or still dry cider (I used Coldpress Granny Smith Apple Juice)

25g butter

Orange rind (without the white pith), cut into very fine strips - optional


Instructions

Peel the outer leaves from the cabbage and discard. Cut the cabbage into quarters and remove the core. Slice thinly into shreds (I used a mandolin)

Finely chop the onion. Using a fine grater, remove the zest from the orange. Peel, core and chop the apples. 

Arrange a layer of cabbage on the bottom of a large deep pan. Add a layer of onion, apple, orange zest, mixed spice, Sukrin Gold, sea salt and black pepper. Continue layering the ingredients in this way until they are all used up.

Finally, pour over the vinegar and apple juice (or cider) and dot with the butter. 

Bring to the boil, then turn the heat down to very low, cover with a tight fitting lid and allow to gently simmer for 90 minutes until tender. 

Brussels Sprouts

I’ve never had a problem with Brussels sprouts. In fact the opposite is true. When they’re In season (October through to March), I actually crave them and can happily scoff up to a dozen in one sitting. In fact, I don’t even bother weighing out Brussels sprouts in the supermarket. I simply count how many people are joining me for dinner and for each of them select 10-12 of the smallest, tightest, firmest, fresh-green sprouts I can find - though it can sometimes take ages to locate the perfect ones! If it turns out that there aren’t enough that measure up, I’ll just put them all back and choose a different vegetable for dinner! However, when they’re perfectly formed, these bright green, marble-sized globes of goodness, cooked to retain a bit of ‘bite’ and liberally doused in melted butter (sprouts love butter!) and freshly ground black pepper, are the quintessential Christmas vegetable. 

Surely the reason that beautiful Brussels sprouts have been so reviled is because many people were forced to eat stinky, soggy, bitter-tasting, ‘overblown’ sprouts as children. But there is a way to turn these mini ‘cabbages’ into desirable vegetables…don’t overcook them! 

Cooked quickly and al denté (still slightly firm to bite into), Brussels sprouts hold on to their healthy, green credentials. Overcooked, they’re really quite unpleasant - soggy, smelly and khaki-yellow - with a taste reminiscent of rotten eggs! 

Let’s not go there. My way of cooking Brussels sprouts without tears is:

  • Choose small, compact, ones - no bigger than an inch across and all the same size.
  • Take off the outer leaves (only if they’re damaged or discoloured) and trim the stalk ends. To ensure fast, even cooking, use a small sharp knife to cut a small shallow cross in the stalk end - some say it’s not necessary, but I always do!
  • Bring a large pan of salted water to the boil. Steam or boil the Brussels for 5 to 10 minutes - or perhaps only 4 minutes if they’re very tiny - with the pan lid on. After 5 minutes, check their progress by inserting the point of a small sharp knife into one of the Brussels (or just eat one if you think it’s cooked!). If they’re still too hard, you’ll need to keep checking them every 1-2 minutes until they’re done. Whatever you do, do not allow them to overcook
  • Brussels sprouts are cooked properly when they’re still bright green, have a little bit of resistance when you insert the tip of a sharp knife into them but can still be easily cut through without falling apart. If you’re taste-testing one, it should feel firm between your teeth when you first bite into it, but hot all the way through, and fully tender. If in doubt, they’re better slightly undercooked!
  • If you’re eating them straight away: drain well, then tip them into a warm serving dish with a generous knob of butter and a good grinding of fresh black pepper. 
  • If you’re preparing them in advance of your meal: drain the cooked Brussels then immediately plunge them into ice cold water to stop the cooking process (or continuously run cold water directly from the tap over them until they’re cold). This will set their bright green colour. When cold, drain well, cover with cling film and set aside.
  • To re-heat: put a large knob of butter and 2 tablespoon of water info a large frying pan. Set the pan over a medium heat. As soon as the butter starts to melt and the water bubbles to a simmer, throw in the Brussels and spread out into a single layer. Stir, shake, or agitate the contents of the pan for a couple of minutes until the water has evaporated and the Brussels are heated through and glazed in butter. Do not overcook! Season with freshly ground black pepper and serve immediately.

Bright Christmas green, fresh-tasting and good for you - what could you possibly not love?

Notes

The Spiced Red Cabbage can be stored in a refrigerator for 2-3 days or in the freezer for up to 1 month, then gently re-heated in a pan or microwaved. 

There’s a sort of rule for prettying-up a finished dish…if it’s gone in it, it should go on it! So if you want to ‘fancy-pants’ up the presentation of your Spiced Red Cabbage, use a vegetable peeler to remove long strips of orange peel from half an organic orange, then cut into very fine slivers with a small sharp paring knife and blanch in a pan of boiling water for 30 seconds. Refresh in cold water, then drain and dry on paper kitchen roll before arranging on top. Nice, but not necessary.    

Brussels sprouts stay fresher for longer if you buy them on the ‘wand’ they grow on, although you’ll only get very small ones at the top (you want small because they taste sweeter than their big brothers!)

Steaming is the easiest method of cooking Brussels sprouts because when you’re regularly having to check their degree of ‘doneness’ you don’t want to be chasing one around a pan of boiling hot water trying to stab it with a fork i.e. they’re safely and conveniently sat in the top of a steamer and easily accessible! 

Christmas is one of the rare occasions when I might use my microwave to re-heat vegetables because there’s not enough room on the hob. Prepare the Brussels in advance as directed above (cooking, blanching, draining) then tip the Brussels directly into a microwave-proof serving dish. Dot with butter, season with black pepper then cover with cling film. Don’t chill, they’ll be perfectly okay for a couple of hours at room temperature. When you’re ready to serve them, pierce the cling film covering the sprouts a couple of times to allow steam to escape, then microwave on High for about 45 - 60 seconds until piping hot. Be careful not to overcook them or burn yourself when removing the cling film - also don’t put one straight into your mouth to test! Instead, cut one of the Brussels sprouts in half on a chopping board to make sure they’re heated all the way through. If they need a little extra time, continue microwaving in 10 second cycles until really hot. 

My Christmas 2015 cooking schedule looks like this:  

2 weeks before: 

Make Horchata Ice Cream and Spiced Red Cabbage - freeze.

1 week before: 

Make Mincemeat (for mince pies & stuffed apples) and Cranberry Orange Relish - refrigerate

3-5 days before: 

Make Port Wine Sauce, Cheese Cocktail Biscuits and Mince Pies - refrigerate the gravy, store the biscuits, freeze the mince pies - to be topped and cooked on Xmas day (if required)

2 days before:

Prepare (skin) the red peppers, toast the pine kernels, make the tomato vinaigrette and basil pesto - refrigerate

Prep the Brussels sprouts - store in a freezer bag in the fridge

Christmas Eve: 

Defrost the mince pies

Make the crumble-topping for the mince pies and bake (or leave until tomorrow?)

Make Parsnip Cranberry & Chestnut Loaf - refrigerate

Defrost red cabbage

Make celeriac puree

Christmas Day: 

Cook the nut loaf

Bring cranberry sauce back to room temperature

Cream the goat’s cheese and assemble red pepper rolls

Decorate the red pepper rolls immediately before serving

Re-heat the spiced cabbage

Re-heat celeriac puree

Re-heat the gravy

Cook the Brussels sprouts

Make the sage butter

Pretty-up the nut loaf - decorate with sage, parsley and cranberries

Core and stuff the apples and bake


Cheese Cocktail Biscuits

by Susan Smith in , , , ,


Continuing the theme of keeping Christmas simple, please raise your glasses to these deliciously rich Cheese Cocktail Biscuits! Quick and easy to prepare, these grain-free, low-carb nibbles are just perfect for handing out with pre-dinner drinks. Plus, they’re so tasty, you don’t need to serve any other accompaniments with them.

To get the party started, simply pile these elegant-looking, cheesy, crispy, buttery delights onto a platter and serve with ice-cold dry martinis, chilled Champagne, Manzanilla sherry or frosty glasses of dry white wine. Talk about eat, drink and be merry!

Because they can be stored for up to a week in an airtight container, they’re also the ideal finger-food to accompany drinks when unexpected guests pop-by. 

In fact, I think they’re at their crispiest-best when ‘twice-baked’ and still warm from the oven. So if I’m not going to serve them as soon as they’re made, I just re-heat as many biscuits as I need later on. Simply lay the pre-baked biscuits out on a baking tray and bake at 180℃ for a further 5 minutes, cool briefly on a wire tray and then serve warm to your guests. Totally delicious and utterly brilliant - they must be one of the simplest and fastest party foods to make and bake ever!

Cheese Cocktail Biscuits (makes 20-24 biscuits)

Ingredients

55g butter, chilled and cut into small cubes

100g organic ground almonds

1 tsp gluten-free baking powder

50g Sukrin reduced-fat organic almond flour

80g ‘Parmesan-style’ vegetarian cheese, finely grated

¼ tsp sea salt

large pinch of cayenne 

freshly ground black pepper

1 tbsp cold water

1 small organic egg, beaten

1 dsp each of fresh rosemary and thyme leaves

Maldon sea salt flakes


Instructions

Pre-heat the oven to 180℃ /  350℉  / Gas mark 4. Line a baking sheet with parchment paper.

Put the butter, ground almonds, almond flour, baking powder, cheese, sea salt, cayenne and black pepper into the bowl of a food processor and whizz until just starting to clump together - takes about 30 seconds.

Add the tablespoon of cold water and whizz again until a soft dough starts to form - takes about 15 seconds. 

Tip the dough onto a sheet of non-stick baking parchment and knead lightly until the mixture comes together into a ball. Flatten out into a disc with the palm of your hand, then place another sheet of non-stick paper on top of the dough - this will stop it sticking to your rolling pin. Roll out the dough evenly (do quarter turns of the paper every few rolls) to 4mm-6mm (½ cm / ¼ inch) then using a 5cm plain-edged cutter, cut into rounds.

Place the biscuits on the pre-lined baking sheet - they won’t spread much. Gather up the rest of the dough and re-roll the trimmings, cutting out rounds as before until all the dough is used up - you should end up with about 24 biscuits.

Lightly brush the tops of the biscuits with beaten egg, then sprinkle over the fresh thyme and rosemary leaves. Finally, add a small pinch of Maldon sea salt flakes to each biscuit. 

Bake in the pre-heated oven for 12 to 15 minutes or until the biscuits are crisp and golden brown. You may want to turn the baking tray around half way through the cooking time to ensure the biscuits bake evenly.

Transfer to a wire baking tray and allow to cool before serving, still slightly warm, with drinks.   


Notes

The quality and flavour of the cheese you use for this recipe is vitally important to the end result. I highly recommend you track down the Gran Moravia Parmesan-style vegetarian cheese I’ve used because it is so like Parmesan in both texture and flavour that even I am hard-pressed to tell the difference. It’s a real find for vegetarians who love the taste of Parmesan but don’t want to eat Parmesan Reggiano because it contains animal rennet. This Italian-made hard cheese is truly the one I rave about every time I need a cheese to look, taste and behave like Parmesan - not only is it vegetarian and costs a lot less money, even my pernickety Parmesan-eating cat loves it! 


Carbohydrate 1g Protein 3g - per biscuit

A more-ish accompaniment to pre-dinner drinks, these simple canapés are a real crowd pleaser. If you're making them ahead of time, pop them back in the oven for 5 minutes to crisp them up, before serving them to your guests!

A more-ish accompaniment to pre-dinner drinks, these simple canapés are a real crowd pleaser. If you're making them ahead of time, pop them back in the oven for 5 minutes to crisp them up, before serving them to your guests!


Parsnip, Cranberry and Chestnut Loaf with Port Wine Sauce

by Susan Smith in , ,


In just three weeks time we’ll all be sitting down to (or feeling replete from) one of the most planned-for meals of the year; Christmas Day. I love it!  I especially love it now I’m fully committed to eating vegetarian. 

Notwithstanding that I’m not getting the goodwill vibe of the ritualistic killing of 10 million factory-farmed UK turkeys immediately before Christmas, I’m actually somewhat bewildered by people’s obsession with eating a traditional turkey dinner. If you’re not an experienced cook (and all the feedback I get tells me they’re few and far between) roast turkey has to be be one of the trickiest, most labour intensive, time consuming meals to get right. Then there’s the expense of putting a decent, organic, free-range turkey on the Christmas table (albeit, in my opinion, nothing less will do).

Putting my money where my mouth is, four years ago I blew almost an entire week’s housekeeping (£120) on a medium-sized (6kg) organic Kelly Bronze turkey for our celebration meal. To meet my self-imposed lunchtime deadline of 1pm, I set my morning alarm call for 7:30am so I could switch the oven on at 8:00am. A pre-prepared bird that size (firstly you have to stuff it and lubricate it up-to-the-nines, inside and out, in butter) takes 4.5 hours to cook, including five essential clock-watching interruptions of rather more pleasant social interactions, such as opening presents and drinking Champagne, if you want to be certain of a ‘tah-dah’ moment and gasps of appreciation when you present your perfectly roasted and dressed bird at the table. In retrospect, all the effort required now seems a bit passé and Bah Humbug for my taste! 

This year I will not be found up to my elbows in turkey early on Christmas morning, nor will I be on tenterhooks waiting for the kitchen buzzer to repeatedly call me to my basting duties. Instead, I will have pre-prepared for our delectation a leisurely, spectacular-looking, vegetarian lunch full of the flavours of Christmas, without the fuss. 

The star of the show, a Parsnip, Cranberry and Chestnut Loaf, isn’t altogether my idea. The original recipe for Parsnip, Cranberry and Chestnut Loaf first appeared in Good Food Vegetarian Christmas magazine, December 2009 and, as you can see, I’ve borrowed its presentation (sort of!). However, being a Primal-phile, my version had to be grain-free (no breadcrumbs allowed), refined sugar-free (found lurking in their cranberry sauce) and, for my taste, much more umami-savoury. Without the addition of the mature Cheddar that I’ve added to my recipe, the original seemed boringly bland. I believe that this is why many people eschew eating vegetarian, especially on special occasions, because all too often what you end up with is second-rate stodge - pastry, pasta, potato or rice and other grain-based dishes - that in their mundanity simply don’t sing-out ‘celebrate’, or entice you to eat them, even if you could. Which, being staunchly Primal I can’t - though sometimes I could kill for a decent roast potato!

In reality, vegetarians do not need to be short-changed. Even followers of the Primal/Paleo diet, who don’t eat grains or potatoes and, for compassionate reasons are reluctant to eat meat, can feast just as well, if not better than, their carnivore counterparts. This is how Primal Plate’s Christmas lunch is shaping up (although the starter and dessert may still yet be subject to further flights of fancy!): A red, green and white starter of Red Pepper Rolls with Goats Cheese, which looks like Christmas on a plate. Then, today’s amazing recipe for Parsnip, Cranberry and Chestnut Loaf with Port Wine Sauce, accompanied by Braised Red Cabbage, Creamed Celeriac and Baby Brussel Sprouts. Followed by cinnamon-laced Horchata Ice Cream with Stuffed Baked Apples in Clementine Syrup. Maybe, a platter of cheese with seasonal fruit and finally, coffee and mince pies. 

All this fabulous food with absolutely no added sugar, no grains, no legumes, no potato, no meat and, if everything goes according to my ‘get-ahead’ menu plan, definitely nothing to drive me into a cook’s frenzy on Christmas morning. In fact, I intend to spend less than an hour doing hands-on cooking on the day itself, and even that will largely involve primping the food so it looks its best on the plate! 

This should help to make Christmas everything it promises to be - a happy, food-filled celebration that everyone, including the cook, can enjoy. Almost every component of this lavish, rainbow-coloured, festive vegetarian feast can be made oven-ready and/or stashed in the fridge/freezer and ready-to-go by Christmas Eve and, in most instances, well before. By my reckoning, that means the most exacting thing I’ll have to do on Christmas day is core and stuff the apples through a Champagne-induced haze of alcohol! As much as I love cooking, not spending almost the entire day in the kitchen sounds like the best-ever Christmas to me!

Parsnip, Cranberry and Chestnut Loaf (Serves 8)

Ingredients

45g butter, plus a little extra for greasing

3 onions, finely chopped

15g pack sage, 8 leaves reserved, the rest finely chopped

180g pack cooked chestnuts

120g walnuts

100g ground almonds

1 tsp ground mace

100g good quality vegetarian Cheddar cheese, finely grated

2 eggs, beaten            

600g baby parsnips, trimmed, peeled and cut in half lengthways (or choose standard parsnips - long, thin ones if you can - peeled then halved lengthways) 

1 tbsp honey

sea salt and freshly ground black pepper

180g Low-Sugar Cranberry & Orange Relish

Fresh cranberries and flat leaf parsley - to decorate 


Instructions

Boil a kettle of water. Grease a 900g (2lb) loaf tin with some butter, line with a long strip of non-stick baking parchment to cover the bottom and the two ends of the tin.

Melt 15g butter in a non-stick pan, add the onions and gently cook with the lid on the pan for 10-15 mins over a medium low heat until very soft and just starting to turn golden. Stir in the chopped sage, cook for a further 1 minute, then tip into a large mixing bowl. 

Pulse the chestnuts in a food processor until chopped into small bits, then tip these into the bowl with the onions and repeat with the walnuts. Now add the ground almonds, cheese, mace, beaten eggs, 1½ tsp salt and a generous amount of freshly grated pepper and mix everything together well.

Pour the boiling water from the kettle into the bottom half of a steamer. Put the halved parsnips in the top of the steamer, put the lid on and steam for 3 minutes.

Tip the parsnips onto a clean dry tea towel and pat them dry. Line up the best looking halves of parsnip (you’ll need about 10 halves) and lay them widthways, cut side down, along the bottom of the loaf tin. You will need to alternate the parsnip halves ‘thick ends to thin’ and pack them tightly side-by-side, so they fit snugly in the base of the tin. N.B. If you’re using normal-sized parsnips, cut off lengths of parsnip from the thinner ends and fit across the base of your loaf tin in the same way. Keep going until you have enough parsnip halves to snugly line the base of the tin. 

Take the parsnip halves back out of the loaf tin and set aside. Chop all the leftover parsnip into small neat dice and mix into the nut mixture. 

Melt the remaining 15g of butter in a heavy based frying pan over a medium heat. When it starts to foam add the honey and the reserved parsnip halves laying them cut side down in the pan. Fry gently in the butter (on the cut side only) for about 5 minutes or until they are lightly browned - they should be just turning golden. Take off the heat and set aside to cool. 

Heat oven to 180℃ (160℃ fan) / 350℉ Gas mark 4

When the fried parsnip are cool enough to handle, fit them back into the loaf tin, as before (cut and browned side down). Top with ⅓ of the nut mixture – pack it down well and smooth the surface. 

Spread the cranberry and orange relish on top, leaving a small space around the edges. 

Top with the remaining nut mixture and pack down as before. Cover with tin foil. 

The loaf can be made up to 24 hrs ahead, then covered and chilled, before continuing. 

Bake in the pre-heated oven for 1 hour. Take the loaf out of the oven and remove the foil, then put back in the oven for a further 10 minutes. 

Remove from the oven and allow to stand for 10 minutes.

Meanwhile, melt the remaining 15g butter in a small frying pan and sizzle the reserved sage leaves for 1 minute. 

Loosen around the sides of the loaf with a round-bladed knife if you need to, then turn the loaf out onto a warm serving platter. Peel off the parchment paper. 

Brush the top of the loaf with the hot sage butter then decorate with cranberries, fried sage leaves and sprigs of flat-leaf parsley.  

Serve in slices with extra Cranberry Orange Relish and Port Wine Sauce.


Carbohydrate 30g Protein 12g - per portion

Port Wine Sauce (Serves 6)

Ingredients

2 tbsp olive oil

1 medium onion, finely chopped

600ml (1 pint) soft, fruity red wine (I used McGuigan Estate Merlot)

1 dsp Marigold organic vegetable bouillon powder

2 tsp arrowroot powder 

3 tbsp port wine

1 dsp sugar-free redcurrant jelly

sea salt and freshly ground black pepper

25g cold butter, cut into small pieces


Instructions

Heat the oil in a medium saucepan, add the onion, cover and fry over a low-medium heat for 10 minutes until it is tender but not browned. 

Stir in the bouillon powder and then pour in the wine, bring to the boil, and leave to simmer, without a lid, for about 15 to 20 minutes, or until it has halved in volume i.e. reduced to 300ml (½ pint). Take off the heat and strain through a sieve into a small clean saucepan

Put the arrowroot into a small bowl and mix to a paste with the port. Add a tablespoon of the hot wine mixture, stir, then quickly pour the slaked arrowroot into the saucepan with the rest of the wine mixture and stir briefly until it has thickened slightly (just below boiling point). 

Stir in the redcurrant jelly. Taste, then add salt and pepper, if necessary

You can make the sauce up to this point in advance. Either freeze and defrost overnight the day before you need it, or keep in the fridge until you want to serve.

Just before you want to serve the sauce, re-heat in a small saucepan to just below boiling point, then quickly whisk-in the cubes of cold butter to make it glossy.


Carbohydrate 5g Protein 0g - per portion


Horchata Ice-Cream with Chocolate Tiger Nut Splats

by Susan Smith in ,


The countdown to Christmas has begun and I have so many festive recipe ideas whizzing around my head that I am struggling to keep pace with my imagination. As for the quantity of ingredients I have to purchase for testing and tasting all of Primal Plate’s foolproof meal alternatives in readiness for the most anticipated meal of the year, they threaten to blow my housekeeping budget!

In our house, all the traditional Christmas food favourites - meat-based, grain-based, high carb and loaded with sugar - are off the menu because we find no joy in eating anything that’s going to harm us, or hurt another. We take the view that since it’s the season of goodwill, this should include all our furred and feathered friends. 

You may be thinking that without the turkey and all its trimmings, the Christmas pudding, cake, trifle and mince pies, what’s left? The answer is, probably too much deliciousness for me to have sufficient time before the big day to share all my ideas with you…but I’ll give it a go. The recipes I’ve created, tested and/or adapted to make them low-carb and primal are the answer to all your entertaining problems if you want to eat well and stay healthy. The aim is to make your festivities more delicious, more fun and less stressful. 

Today’s blog post for Horchata Ice Cream is something I conceived back in July but since the homely warmth of sweet cinnamon is so Christmassy and the exotic spiciness of nutmeg so enlivening in combination with all things sweet and creamy, I think the timing of this brilliant get-ahead frozen dessert is even more appropriate for now. And everyone can join in the fun. Gluten-free, grain-free, no eggs, no dairy or nuts (coconut cream can be substituted for cashew nuts - see note below) and no sugar added, this decadently delicious, sweet-tasting ice cream almost beggars belief. Even the Chocolate Tiger Nut Splats that accompany it are a sort of fortuitous accident. 

Peeled organic tiger nuts are an extremely moreish, nutritious, sweet-tasting tuber packed with resistant starch (the unpeeled ones are too hard for most people to chew and are best reserved for making tiger nut milk) so I now always have the organic skinned variety on hand for a quick and healthy sweet treat that can be eaten guilt-free between meals. 

However, if you try to eat more than one or two of them simultaneously they can be a bit dry, so for some time I’ve been toying with the idea of making skinned tiger nuts into an even more desirable snack by enrobing them in dark chocolate. I had in mind that I’d keep them separate (like chocolate covered coffee beans) but oh, the fiddle and the faff! Initially, I tried submerging each individual tiger nut into melted chocolate with the aid of a cocktail stick but then couldn’t get them back off the stick without pinging them across the kitchen table and splatting melted chocolate everywhere! Because I was attempting to do all of this in the time it took to make a cup of tea, I gave up and resorted to throwing all the tiger nuts into the bowl of chocolate in one go, giving the mixture a quick stir then dolloping teaspoonfuls onto a pre-lined tray and shoving the whole thing in the fridge to set. 

Fifteen minutes later I invited John to sample my now-solid chocolate-coated tiger nut ‘splats’ with his second cup of tea. Much to Sarah’s chagrin (she wasn’t around at the time), they only survived a single, brief, taste-testing session. It seems that melding tiger nuts together with dark chocolate is a recipe for gluttony! However, the sense of over-indulgence is more in the mind than an actual reality. With this dessert, everything simply comes together beautifully - cool, creamy ice cream made even more delectable with the first cold snap of chocolate melting into a silky smooth lubricating combo of dark chocolate and coconut oil that makes eating multiple raw tiger nuts effortless (less chew more swallow!). But best of all, because the resistant starch in both the Horchata Ice Cream and Chocolate Tiger Nut Splats can’t be digested by the body, this particular Christmas confection will never find its way onto your hips, so you can still stay on target for a slim and healthy start to your new year!

I think ice cream is the perfect way not to cook at Christmas. Make and freeze it the week before to save time later. This refreshing Horchata Ice Cream with Chocolate Tiger Nut Splats doesn’t really need any other accompaniment (though a baked apple or poached pear would be nice) - simply serve spiked with a mini-star sparkler to razzle-dazzle ‘em as a fabulous festive finale to Christmas lunch. 

Horchata Ice Cream (Serves 8)

Ingredients

250g organic tiger nuts, soaked in cold water for 4-6 hours (or overnight) then rinsed in fresh cold water and drained

75g raw organic cashews, soaked in cold water for 4-6 hours (or overnight) then rinsed in fresh cold water and drained

8 plump Medjool dates, stoned

1 tbsp vanilla essence

1/2 tsp organic ground cinnamon

1/2 tsp freshly grated nutmeg


Instructions

Put the tiger nuts into a heavy-duty blender with 600ml fresh, cold filtered water and blend until smooth and creamy - about 3 minutes.

Take a nut milk bag (or a double layer of muslin) and set over a deep bowl. Carefully pour the blended tiger nut mixture into the bag/muslin cloth and secure the top of the bag (or gather the ends of the muslin cloth together) to hold the liquid inside. Using your hands twist and squeeze out all of the liquid until you’re left with only dry tiger nut pulp. Rinse out the blender jug.

Tip the tiger nut milk back into the rinsed-out blender. Add the dates, cashew nuts (or coconut cream - see note below), vanilla essence, cinnamon and nutmeg and blend again until the mixture is completely smooth.

Pour the horchata cream into a bowl, then cover with cling film and chill until very cold.

Churn the cold horchata cream in an ice cream maker (according to the manufacturers instructions) until it forms a soft-set ice cream (mine took about 35 minutes to get to this stage) then spoon into a freezer-proof lidded container and put in the freezer for 2 hours to set completely.

If not serving immediately, take the ice cream out of the freezer 30 minutes before you want to eat it and put in a refrigerator to allow it to soften slightly.

Scoop the Horchata Ice Cream into glass sundae dishes, add 2 or 3 Chocolate Tiger Nut Splats and a light dusting of cinnamon, if liked. 

Chocolate Tiger Nut Splats (Makes about 12)

Ingredients

75g organic peeled tiger nuts

50g good quality dark chocolate, coarsely chopped (at least 70% cocoa solids)

1 tsp organic coconut oil


Instructions

Put the chocolate chips into a heatproof bowl and set the bowl over a pan of barely simmering water to allow the chocolate to melt slowly. Do not allow the bottom of the bowl to come into contact with the water. Stir the chocolate occasionally until it is completely melted and smooth.

Take off the heat and add the coconut oil. Stir the coconut oil into the melted chocolate, then add the tiger nuts and keep stirring until all the tiger nuts are evenly coated in chocolate. 

Spoon rough teaspoonfuls of the mixture onto a baking sheet lined with non-stick paper and refrigerate until set. Peel the cold-set Chocolate Tiger Nut Splats off the paper and store in an airtight container in the fridge until required. 

Notes

You need a decent high-powered blender such as a Vitamix to blitz the tiger nuts into a smooth creamy milk and then to completely break down the cashews and dates to make a rich smooth custard. Pass the finished ice cream mixture through a fine sieve before freezing if you’re in any doubt that your blender isn’t up to it.

An ice cream machine does make for a smoother, creamier, airier ice cream but if you don’t own one it is still possible to make decent ice cream at home as long as you plan ahead. Firstly, chill your prepared ice cream mixture over an ice bath or for several hours in the fridge. Meanwhile switch your freezer onto fast-freeze. Pour your ice cream mixture into a deep freeze-proof container and freeze for about an hour until the edges start to get solid. Take out of the freezer and stir vigorously with a fork or whisk to break up the the ice crystals completely and combine with the still liquid centre. If you have one, a hand-held blender will give the best results. Straightaway, put the mixture back into the freezer for another half-hour then take it out again and repeat the mixing and mashing. Continue doing this every half hour until the ice cream is soft-set throughout, then let it freeze solid.

I used dark chocolate chips to save myself the hassle of chopping chocolate. 

Do not take the chocolate tiger nut splats out of the fridge until you’re ready to eat them. Quite apart from the fact that you’ll be missing the satisfying ‘snap’ of cold chocolate when you bite into them, they melt really quickly in your fingers or when left out at room temperature.

The celebration star sparklers are fun but you need to have a couple of people on hand to help light them and to get your dessert to the table in time to surprise your guests - it took me three attempts to get my sparkler to light for Sarah to take the photograph and, once lit, it didn’t sparkle for very long! Frustrating! Next time I’ll try these!

If you are allergic to nuts, you can substitute the cream off the top of a 400ml can of full-fat coconut milk for the cashew nuts. Put the unopened tin of coconut milk in the refrigerator to chill overnight. When you’re ready to make the ice cream, simply scoop off the top layer of solid coconut cream from the can of chilled coconut milk and add to the blender with the cold horchata milk and the rest of the ingredients before blending until smooth and then churning in an ice cream maker. You can use the coconut water that’s left to make a curry sauce or smoothie.

10th December 2015 update: I made Horchata Ice Cream again today for our Christmas day festivities. And, because we're all-grown ups, I added 2 tablespoons of vodka to the cold cream before churning. It isn't for the sake of imbibing more booze! The idea is that adding a little alcohol should help to keep the ice cream a little bit softer (alcohol doesn't freeze) whilst it's stored for the next couple of weeks.  


Carbohydrate 34g Protein 3g - per serving ice cream made with raw cashews

Carbohydrate 12g Protein 2g - per serving (3 chocolate tiger nut splats)


Roasted Cauliflower & Mushroom Curry with Green Pea Fritters and Avocado Cream

by Susan Smith in , , , , ,


Continuing my quest to find Primal Pronto veggie-inspired meals, I discovered these delicious Green Pea Fritters at The Healthy Chef. Initially, I was just looking for an alternative to Primal Naan Bread and Cauliflower Rice to accompany a family supper of Roasted Cauliflower & Mushroom Curry because, as satisfying as Primal naan bread might sound, since posting the original naan bread recipe I subsequently found out that I need to re-invent it without tapioca flour, (which increases blood sugar even more than wheat flour) and zanthan gum. Yikes! Sorry for the oversight! Plus, cauliflower ‘rice’ and cauliflower curry have zero gastronomic appeal when eaten in combo, so I wanted something new and tasty, preferably vegetable-based, to make our curry meal more appetising. 

As it turned out, the Green Pea Fritters were such a hit that I’m including them as part of this week’s blog, so today, three recipe posts for the price of one! Whilst the Green Pea Fritters and Avocado Cream are a perfect stand-alone meal for a fast and simple supper or to serve with drinks, when brought together with Roasted Cauliflower & Mushroom Curry you have several wonderful things that make for a fresh, creative, vegetarian meal fit for entertaining friends. I think the whole thing looks mouthwatering on the plate and it tastes just as good - spicy, savoury, creamy and delicious!

The cauliflower and mushroom curry recipe is adapted from a recipe in Daniel Green’s book, The Paleo Diet but there is one notable exception - if you try to make this curry with “1 tablespoon of chilli powder (or more to taste)” as directed in the book, please do not even think of inviting me for supper! It may simply be a ‘typo’ (I think it should read 1 teaspoon of chilli!) but it would nevertheless be ruinous to the finished dish and most likely would get missed by an inexperienced cook slavishly following the recipe. Thank goodness for Primal Plate’s extensive testing and tasting of all blog featured recipes before posting! 

I have added tiger nut flour to the pea fritter recipe to enhance the sweetness of the peas and on this occasion left out the lemon zest in favour of fresh mint because a) fresh mint and peas are a classic and b) the avocado cream has a lemony ‘hit’ all of its own that more than compensates for its absence in the fritters. Plus, it saves the time and effort of grating a lemon!

The pea fritters are very quick and easy to make - it’s just a matter of mixing everything together in a bowl and dropping spoonfuls of the mixture into a hot frying pan (only a few at a time), pressing them flat with the help of a spatula and cooking (for less than a total of 10 minutes) until they’re golden brown on each side. Meanwhile the avocado and cream cheese can be quickly whizzed to a luscious pale green cream in a food processor or with a hand-held blender.  

The Roasted Cauliflower and Mushroom Curry is just as fuss-free and makes a great vegetarian low-carbohydrate option for followers of Paleo and Primal diets. 

Put it all together for warming, nourishing mouthfuls of extreme pleasure.  

Green Pea Fritters (Serves 4)

Ingredients

300g frozen peas, defrosted

2 tablespoons fresh chopped parsley (about 10g without stalks)

1 tablespoon freshly chopped mint leaves

2 large organic free range eggs, lightly beaten

100g full-fat soft cheese, softened (I used Longley Farm)

25g organic tiger nut flour

15g organic coconut flour

1½ tsp sea salt and a generous grinding of black pepper

1 small organic lemon, finely grated zest only - optional

1tbsp olive oil, for frying

Handful of pea shoots, to garnish - optional


Instructions

Crush the peas in a food processor using the pulse button. Make sure you keep the peas a coarse texture, this is not meant to be a puree.

Transfer the crushed peas to a bowl, add the parsley, mint, eggs, lemon zest (if using), tiger nut and coconut flours. The ground tiger nuts and coconut flour help to hold the mixture together during cooking. 

Season with the sea salt and freshly ground black pepper. Taste and correct the seasoning if necessary. 

Soften the cream cheese by breaking it down with a fork then add to the pea fritter batter and combine well.

Heat a little olive oil in a large heavy-based non-stick frying pan over a low heat.

Add heaped tablespoons of the pea fritter mixture to the pan -  you should get about 16 bite-sized fritters. To avoid overcrowding the pan you may need to cook them in several batches. 

Cook the pea fritters over a medium heat for 5-6 minutes without disturbing them. When they are firm and golden on the underside, carefully turn them over with the aid of a flat-ended spatula. 

Continue to cook for a further 3-5 minutes or until the fritters are cooked through and golden brown on both sides. 

Immediately transfer to an oven proof dish (or serving platter if you’re handing them out with drinks) and then into a pre-heated hot oven until you’ve cooked the rest of the fritters and you’re ready to eat.


Avocado Cream (Serves 3-4)

Ingredients

1 large ripe avocado

½ lemon, juiced

100g full-fat soft cheese, softened by breaking down with a fork (or use Waitrose Duchy Organic Soft Cheese straight out of the tub).

Sea salt

Cayenne pepper


Instructions

Peel, stone and mash the avocado with the lemon juice then mix together with the soft cheese, sea salt and cayenne pepper to taste until it is completely smooth and creamy - this is best done in a food processor or with a hand-held blender.  

Serve as a dip with Green Pea Fritters or crudités.


Roasted Cauliflower & Mushroom Curry (Serves 4)

Ingredients

1 medium head of cauliflower, broken into small bite-sized florets

1 large onion, finely chopped

3 tbsp olive oil

250g button mushrooms

1 x 2½ cm piece of fresh ginger, grated

1 tbsp ground coriander

1 tbsp ground cumin

1 tbsp garam masala

1 tsp chilli powder

1 tbsp Marigold organic vegetable bouillon powder

400ml full-fat organic  coconut milk

sea salt and freshly ground black pepper

a large handful of fresh coriander, chopped - to garnish


Instructions

Pre-heat the oven to 200℃ / 400℉ / Gas mark 7

In a large bowl, toss the cauliflower florets in 2 tablespoons of olive oil and season with freshly ground black pepper.

Tip onto a non-stick roasting tray and roast for 25 minutes, turning occasionally until the cauliflower is nicely browned. Remove from the oven and set aside.

In a wide, shallow pan set over a moderate heat, fry the onion in the remaining olive oil with the pan lid on for about 8 minutes, stirring from time to time, until softened and starting to brown.

Add the mushrooms and ginger and cook for another 1-2 minutes, stirring. Stir in the spices and bouillon powder and cook for another minute.

Add the coconut milk and season to taste. Bring to the boil then stir in the cauliflower.

Reduce the heat to low, cover the pan and cook for about 5 minutes. 

Ladle into warmed bowls and top with plenty of fresh coriander. 


Notes

I was in two minds about the Primal Pronto status of the Green Pea Fritters and Roasted Cauliflower & Mushroom Curry because both these recipes are so easy and fuss-free. In the end I decided that Primal Pronto should be defined as: a recipe with 5 or less main ingredients, or one that can be prepped, cooked and on the table within 45 minutes. The Roasted Cauliflower & Mushroom Curry didn’t quite make it on both counts (realistically it’s takes more like 50 minutes to make) but it is still wonderfully warming comfort food that’s simple to prepare. It’s also suitable for vegans.  

You can defrost the peas quickly by putting them in a heat proof jug and pouring boiling water over. Allow to stand for a few minutes, then drain well and proceed with the recipe. 

The uncooked pea fritter batter can be made well in advance and stored in the fridge overnight. The mixture will make approximately 16 small or 8 large fritters. I use a heaped tablespoon to make the bite-sized ones and a ¼ US cup for bigger ones.

Two large Green Pea Fritters per person served with a medium/soft boiled egg and a dollop of avocado cream is great for a fast and easy low-carb brunch or supper.

If you can’t get button mushrooms for the curry, use closed-cap mushrooms cut into halves or quarters instead.


Carbohydrate 14g Protein 11g - per serving (4 small or 2 large) of Green Pea Fritters

Carbohydrate 5g Protein 2g - per serving of Avocado Cream

Carbohydrate 22g Protein 8g - per serving of Roasted Cauliflower & Mushroom Curry


Chocolate Fondants

by Susan Smith in , ,


If you’ve ever watched Masterchef you’ll have seen contestant after contestant being warned by Messrs John Torode and Gregg Wallace how tricky it is to make perfect gooey-centred chocolate fondants. Some contestants go ahead anyway (let’s face it, by the time they’re being filmed, they’re already committed!) and get their timings just right so their fondants come out beautifully cooked on the outside and runny in the middle - but many don’t. Today's recipe is a sure-fire way to ensure that you can make chocolate fondants without any of the brouhaha, giving everyone the impression that you’re an absolute genius in the kitchen! (Psst! you can even make them 24 hours before you want to eat them)

Love chocolate? You’ll love these luxurious hot chocolate fondants. Better still, they’re not the ‘unhealthy' indulgence you might have pre-supposed. On the contrary, eaten in moderation, dark chocolate (at least 70% cocoa solids) is very good for you because it’s chock-full of phytonutrients (specifically cocoa flavanolds) that are scientifically proven to be beneficial for the heart, circulation and brain.

Still feeling some parental guilt about consuming chocolate? More information is available in this extensive blog post that fully explains chocolate’s effects on health, its potential benefits and downsides, and the effects of chemical components such as caffeine and theobromine. In summary, don’t gorge on chocolate, but it’s really more than okay to allow yourself to deeply appreciate its wickedly delicious allure.

As part of a Primal lifestyle, best quality dark chocolate does not make you fat. Typically, I eat 2 or 3 squares (up to 15 grams) every day with my morning Nespresso (a double-whammy for the senses which reminds me that life is really worth living) but at least one scientific study found that young people consuming 42.6g of chocolate a day had slimmer waists and lower BMIs than those eating less. 

Nice but not naughty after all, dark chocolate has finally achieved superfood status. I suggest you grab a spoon and get stuck in! 

Chocolate Fondants (Makes 4 large or 6 small fondants)

Ingredients

125g unsalted butter + extra for greasing 

3 whole large organic eggs 

2 organic egg yolks (in addition to the the eggs above)

25g raw organic ‘runny’ honey

8 drops organic liquid stevia 

125g dark chocolate - I used Callebaut Finest Satongo dark chocolate chips

25g tiger nut flour

Good quality chocolate bar, broken into squares (I used Michel Cluizel’s Maralumi dark chocolate bar)

Sukrin icing sugar, for dusting

Organic double or pouring cream, for serving


Instructions

Grease either 4 large or 6 small ramekin dishes.

Melt together the butter and chocolate in a bowl over a pan of hot (not boiling) water on the hob.

Whilst the chocolate/butter mixture is melting, whisk the eggs / egg yolks / honey and liquid stevia together for about 5 minutes until pale and very thick (it should hold its shape for a few seconds when a little of the mixture is flicked over the surface) - you really need an electric whisk for this. 

With a balloon whisk, whisk the tiger nut flour into the chocolate/butter mixture. 

Cool the chocolate mixture and then pour into the whisked egg mixture.

Using a metal spoon, fold gently to combine the two mixtures. 

Divide the mixture equally between the ramekins. 

Leave in the fridge for up to 24 hours before they are required.

Just before cooking, press a square of chocolate into the centre of each ramekin.

Cook for 12-15 minutes at 200℃ / 400℉ / Gas mark 6

Sprinkle with icing sugar and serve immediately.


Notes: 

These chocolate fondants are foolproof because you’re not relying on precise cooking times to ensure that the middle of the fondants are soft and runny - instead the melted chocolate squares create a yummy pool of hot chocolate at their centre. 

The mixture will carry on cooking in the ramekins, so eat immediately. 

Sukrin sweetener is produced via a natural fermentation process from the glucose naturally occurring in pears, melons and mushrooms. The powdered form of Sukrin I’ve used for dusting the chocolate fondants looks, tastes and behaves in exactly the same way as normal white icing sugar made from sugar beet/cane. And, I’m pleased to report, it has no bitter after taste. 


Carbohydrate 16g Protein 9g - per small chocolate fondant

Carbohydrate 25g Protein 14g - per large chocolate fondant


Grilled Hake in Tomato Herb Broth with Vegetable Tagliolini

by Susan Smith in ,


Its been said that ignorance is bliss. And yes, in the context of being innocent and unaware (like a child at play), or entering that meditative space of ‘no thought’ (as a conscious adult), your bliss is unhindered by the external reality that surrounds you. I wish I could be in that state of being more often!

The enormity of the problem with agribusiness - the mass torture and slaughter of animals and the pollution and degradation of the environment - is what is, at this point in history. But thinking about it and seeing its terrible effects on social media, sickens me. When I first started to write this food blog I simply wanted to help shift the Primal/Paleo fraternity away from their avid consumption of meat by inspiring them to eat more vegetarian meals. I would even argue that the Primal/Paleo diet was not primarily meat-based but rather a preponderance of fruit, vegetables, nuts and seeds…and that termites were probably our ancestors main source of animal protein.    

I didn't expect to subsequently be confronted with compelling evidence for not eating fish too. Stupid of me. Ego runs humanity and the collective ego is culturally conditioned into believing that, as ‘masters of the universe’, human beings have a divine right to subjugate all of nature to its will. Apparently unstoppable, greed and exploitation knows no bounds. Whilst painfully aware that overfishing currently threatens many species of fish and the importance of sustainability, I hadn’t bargained for what is really going on under the sea

It’s not that I am intrinsically opposed to eating meat or fish. It really does depend on the context. I still have to buy and prepare organic free-range chicken and pork and line-caught tuna for my cat Sushi to eat (it is a biological necessity for cats to eat meat) and, if I had the skills to skin and gut a fresh road kill, we’d probably eat that too. But ‘growing’ meat in appalling conditions on factory farms, polluting the rivers and oceans with animal excrement, cutting down acres of rain forest to grow grain for livestock to feed the privileged few whilst millions starve, to use man-made devices to harm and kill all the creatures under the sea is both heartbreaking and unnecessary. 

Already eighty-five per cent vegetarian, there’s a part of me that would like to be vegan. I just know my body wouldn't be happy with the choice. I don’t eat meat on compassionate grounds. I can’t eat grains because I’ve fully experienced their inflammatory effect in my body. I try to avoid potatoes (although I only have personal anecdotal evidence that they’re not good for me) as well as legumes (dried beans, chickpeas, lentils etc.) because they contain anti-nutrients. Instead I rely on plenty of fruit, vegetables, nuts and seeds, vegetarian cheese, organic free-range eggs, raw milk from grass-fed cows and what hitherto I thought was sustainably-sourced wild or organic fish for a healthy, low-carb, protein-packed diet. However, fish will be off the menu if eating it means I’m inadvertently supporting the super-trawler industrialised version of fishing.

I’ve asked my fabulous fishmonger Terry (contact: fishinnotts@hotmail.com), who always fetches the best of ‘today’s catch’ directly from the docks and delivers it straight to my door, if he can reassure me that the fish I’m buying is responsibly and sustainably caught. Unfortunately, sustainability won’t make overfishing disappear - to solve that problem, we all need to eat less fish. Supporting the work of organisations like Greenpeace and Compassion In World Farming also helps keep food shoppers informed. Greenpeace have named Marks & Spencer as being the best UK supermarket to buy fish from. However, some fisheries do get the MSC logo for just ‘working towards’ sustainable fishing rather than actually fishing sustainably! If you’re in any doubt, don’t buy.

So now you know that eating fish is not inconsequential, I want to mindfully share with you this tasty recipe for Grilled Hake in a Tomato Herb Broth with Vegetable Tagliolini. It is colourful, it is delicious, it is low carb. It is a beautiful looking, healthy, nutritious dish - everything that Primal Plate wants to promote for a healthier you - but is that enough?

If you think it is, Grilled Hake in Tomato Herb Broth with Vegetable Tagliolini is one of the best ways I know to healthily celebrate the fact that there are still fish left in the sea for us to eat and enjoy. I hope it doesn’t prove to be my last fishy hurrah on Primal Plate’s blog. The jury’s still out.  

Grilled Hake in Tomato Herb Broth with Vegetable Tagliolini (Serves 4)

Ingredients

4 x 200g thick, sustainably sourced (MSC) hake fillets, skin-on, pin-boned & descaled

Sea salt and freshly ground black pepper

A little melted butter - for brushing 

100ml white wine    

200ml water

1 dsp Marigold organic vegetable bouillon powder

2 dsp Clearspring tamari soy sauce

100g unsalted butter, chilled

1 tsp arrowroot

2 medium carrots

2 medium courgettes

2 medium leeks

2 vine-ripened tomatoes, skinned, de-seeded and finely diced

1 heaped tbsp finely chopped coriander


Instructions

For the grilled hake: put the fish, skin-side down, on a large shallow dish or plate and sprinkle with sea salt. Set aside for 30 minutes. 

For the broth: put the water, wine, bouillon powder and soy sauce into a pan and boil rapidly until it has reduced by a third. Strain through a fine sieve into a clean pan and set aside. 

Rinse the salt off the fish and dry the fillets on kitchen paper. Brush each piece on both sides with melted butter and put skin-side up on a greased baking tray. Season the skin with sea salt and some freshly ground black pepper. Cover lightly with cling film and set aside.

To prepare the vegetables: use only the white part of the leek, peel the carrot, trim the courgette, then spiralise the courgette and carrot into tagliolini - alternatively, use a sharp knife or mandolin to cut the vegetables down lengthways before then slicing again with a sharp knife into thin strips.  

Preheat the grill to high. 

Meanwhile, in a small bowl or mug, combine 1 tsp. arrowroot powder and 1 dsp. water to make a thin slurry. Re-heat the broth to boiling point then add a spoonful of the hot buttery broth into the arrowroot paste and combine well. Tip the arrowroot mixture back into the saucepan whilst stirring continuously. Allow the broth to cook on a very low heat until it thickens.

Remove the cling film and grill the hake for 8 minutes on one side only.

Whilst the hake is grilling, gradually whisk 75g chilled butter, cut into small cubes, into the hot broth to make a silky smooth sauce. Keep warm.

Just before the fish is ready, melt the reserved 25g butter in a frying pan. Stir-fry the prepared vegetables until just softened but still crisp. Season to taste. 

Remove the cooked hake from the grill and allow to rest for a minute or two. Bring the broth back to just below boiling point and add the finely diced tomatoes and chopped coriander leaf. 

Serve the fish on a nest of vegetable tagliolini with the tomato herb broth spooned round.  


Notes

Don’t put the fish too close to the heat source - about 15cm (6”) away from the grill will allow the fish to cook through perfectly without scorching the skin.


Carbohydrate 13g Protein 42g per serving