Creamy Avocado ‘Hummus’

by Susan Smith in ,


In this ravingly busy life, one of the best ways to improve your health is to consume lots of fresh vegetables. Abel & Cole and Riverford Organics are my lifeline because twice weekly they bring a wide variety of organic, fresh produce direct to my door. I always buy half a dozen or so avocados every week because they happen to be one of the healthiest things you can eat. They’re rich in monounsaturated fat that your body can easily burn for energy and moreover the fat they contain helps your body absorb fat-soluble nutrients from other foods you eat with them.

Actually, avocados are not a vegetable, they’re a very-low-in-fructose fruit with a buttery texture and delicious flavour that means they’re my number one go-to favourite snack when I want something quick and savoury to eat. For simplicity and satiety, I like to halve and stone them before stuffing the cavities beyond reason with prawns or tuna mayo. Prawns bound together with a spicy, tomatoey mayonnaise atop a halved avocado was the first food I ever prepared for my husband John. It was love at first sight - he’d always thought such food, simple as it is, only came out of restaurant kitchens! On a more fruity note, avocados can be transformed into a silky, delectable dark chocolate or avocado and lime mousse or used as a base for ice cream. Yum! Full of essential vitamins and minerals, including fibre, vitamins K, B5, B6 and C, folate and more than twice the potassium of a banana, you can see where I’m going with this.

avocado.jpg

Today my fancy is for avocado hummus. I love traditional chickpea hummus but can see no reason to take the anti-nutrient, high carbohydrate hit from legumes when this creamy avocado dip is a far healthier, yet comparative alternative. I first eyeballed Paleo Hacks version of Bean-Free Creamy Avocado ‘Hummus on their blog but glancing down the list of ingredients quickly assessed they were too out of whack for my taste (what’s with a teaspoon of lemon juice?). I’ve re-written the recipe to balance out the flavours and it works. Beautiful to look at and delicious to eat, it’s a really fresh, clean ‘take’ on hummus. Apologies to garlic lovers, there is none in my version of Creamy Avocado ‘Hummus’ because its whiffiness on post-consumption breath always offends me!

A quick and easy keto way to get your five a day. 

avocado hummus.jpg

Creamy Avocado ‘Hummus’ (serves 6 as a dip, serves 4 for a light lunch)

Ingredients

2 large organic courgettes, peeled and deseeded

2 large organic ripe avocados (use 3 medium if large not available) 

3 tbsp organic extra virgin olive oil

3 tbsp organic lemon juice, freshly squeezed 

100g organic light tahini

½ tsp ground organic cumin        

½ tsp Himalayan Pink salt, or to taste

¼ tsp organic cayenne pepper

a good grinding of organic black pepper

15g fresh organic coriander leaves, roughly chopped

Organic paprika and extra sprigs of fresh coriander - optional

A selection of freshly cut crudités - to serve

IMG_8672 copy.jpg

Instructions

Slice off the ends of both courgettes, peel, then lay them on a cutting board and slice them in half lengthwise.

Using the pointy end of a teaspoon run it down the middle of the courgettes, gently scooping out the seeds. Chop the courgette into rough pieces. Discard the seeds. 

Peel and de-stone the avocados, roughly chop into pieces.

Place the avocado, courgette, olive oil, lemon juice, tahini, cumin, cayenne pepper, most of the coriander leaves and salt in a food processor. 

Process on high until smooth, scraping down the sides as necessary.

Transfer to a bowl, sprinkle with paprika and the remaining coriander leaves before serving with a selection of freshly cut crudités for dipping. 


Fat 32g Protein 6g Carbohydrate 4g - per serving of ‘hummus’ only.

If you’re counting macronutrients, please add on extra grams of carbs for the crudités. N.B. Vegetables grown above ground are less carb heavy than veggies grown below ground

IMG_8682 copy.jpg

Flaxseed, Sesame & Rosemary Crispy Thins

by Susan Smith in ,


It’s now three years since I first started writing the Primal Plate food blog with the intention of sharing recipes that would fill in the perceived food ‘gaps’ when you eat low-carb. I also wanted to help steer the Primal community and others away from the insane demand for more meat, which causes unbearable suffering to millions of farm animals, and towards a more compassionate, vegetarian lifestyle.

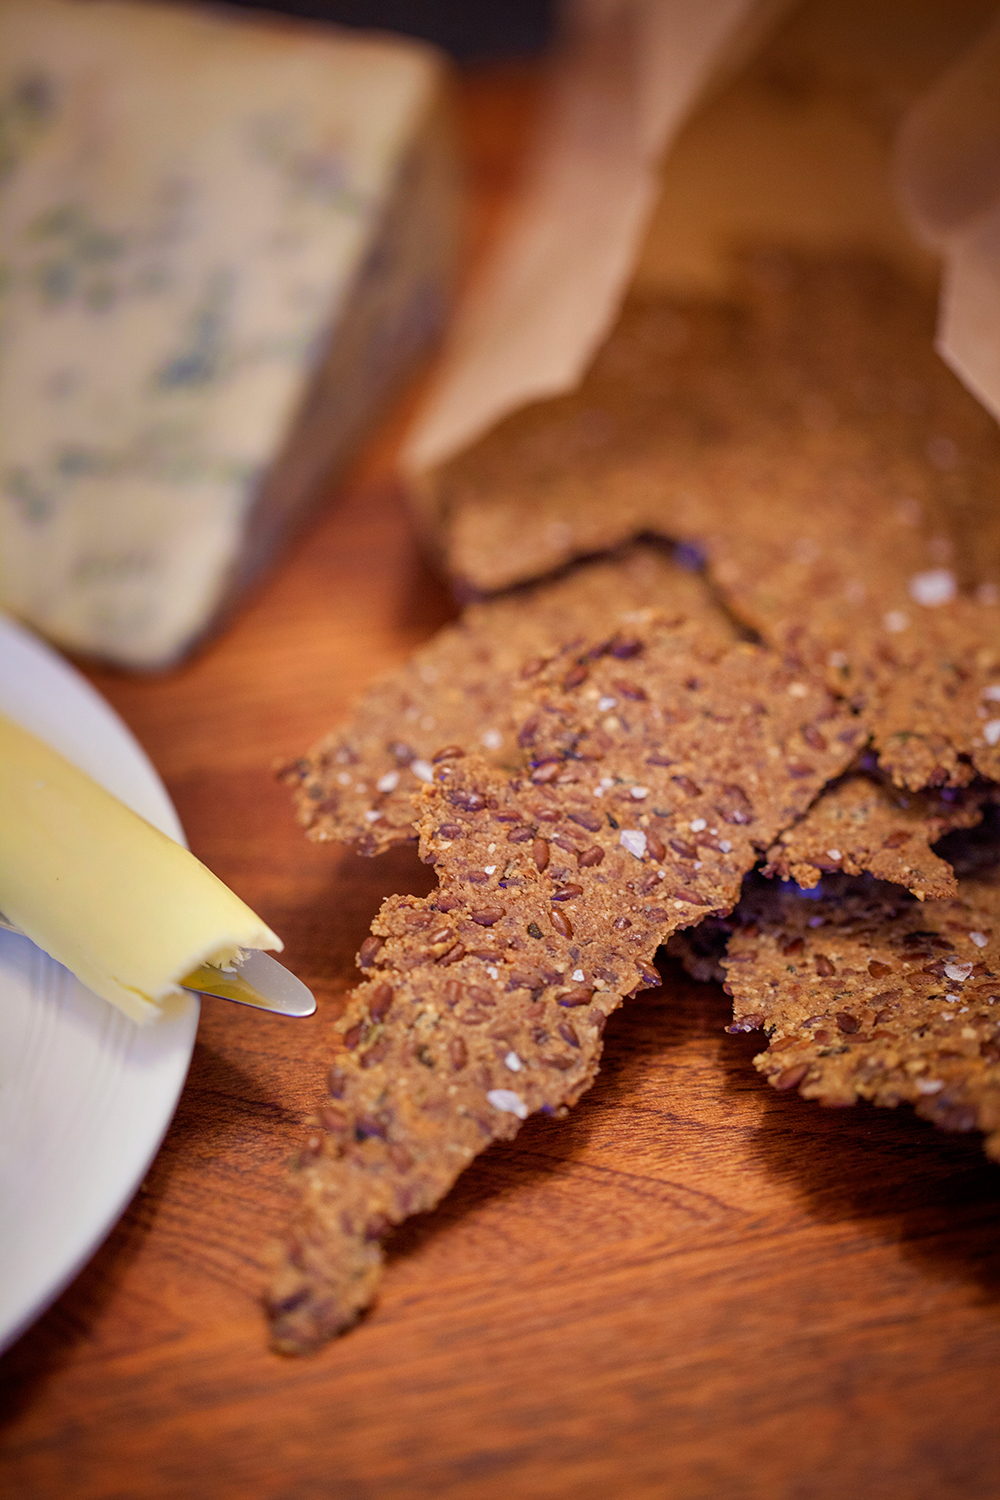
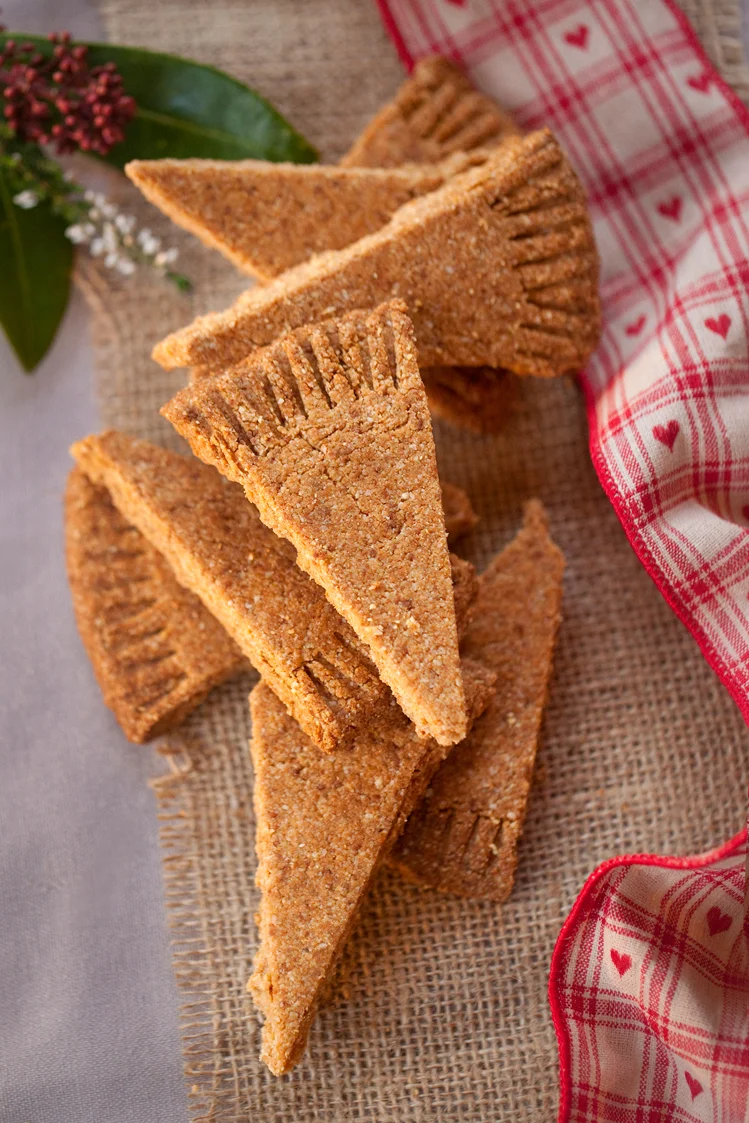
I’ve created numerous grain and sugar-free alternatives to conventional recipes for bread, biscuits, cake, pizza, pasta, ice cream and one of my latest triumphs…sugar-free meringues for goodness sake! But I’m not done yet. Whilst low-carb, like-for-like potato chips and pizza still elude me, today’s recipe for Flaxseed, Sesame & Rosemary Crispy Thins does add another surprisingly good string to Primal Plate’s bow. Finally, here is an irresistible substitute for savoury crispbread, crackers, crisps or tortilla chips to serve with cheese, dips or simply to snack on them plain for pre-dinner nibbles. With the crispy, salt-seasoned delicacy of a potato crisp and the nuttiness of wafer-thin artisan crisp bread, these ‘all-rounders’ are what we’ve been missing in our lives since going low-carb and Primal. As Sarah exclaimed when she first tried them: “Well, that’s all our parties now sorted!”.

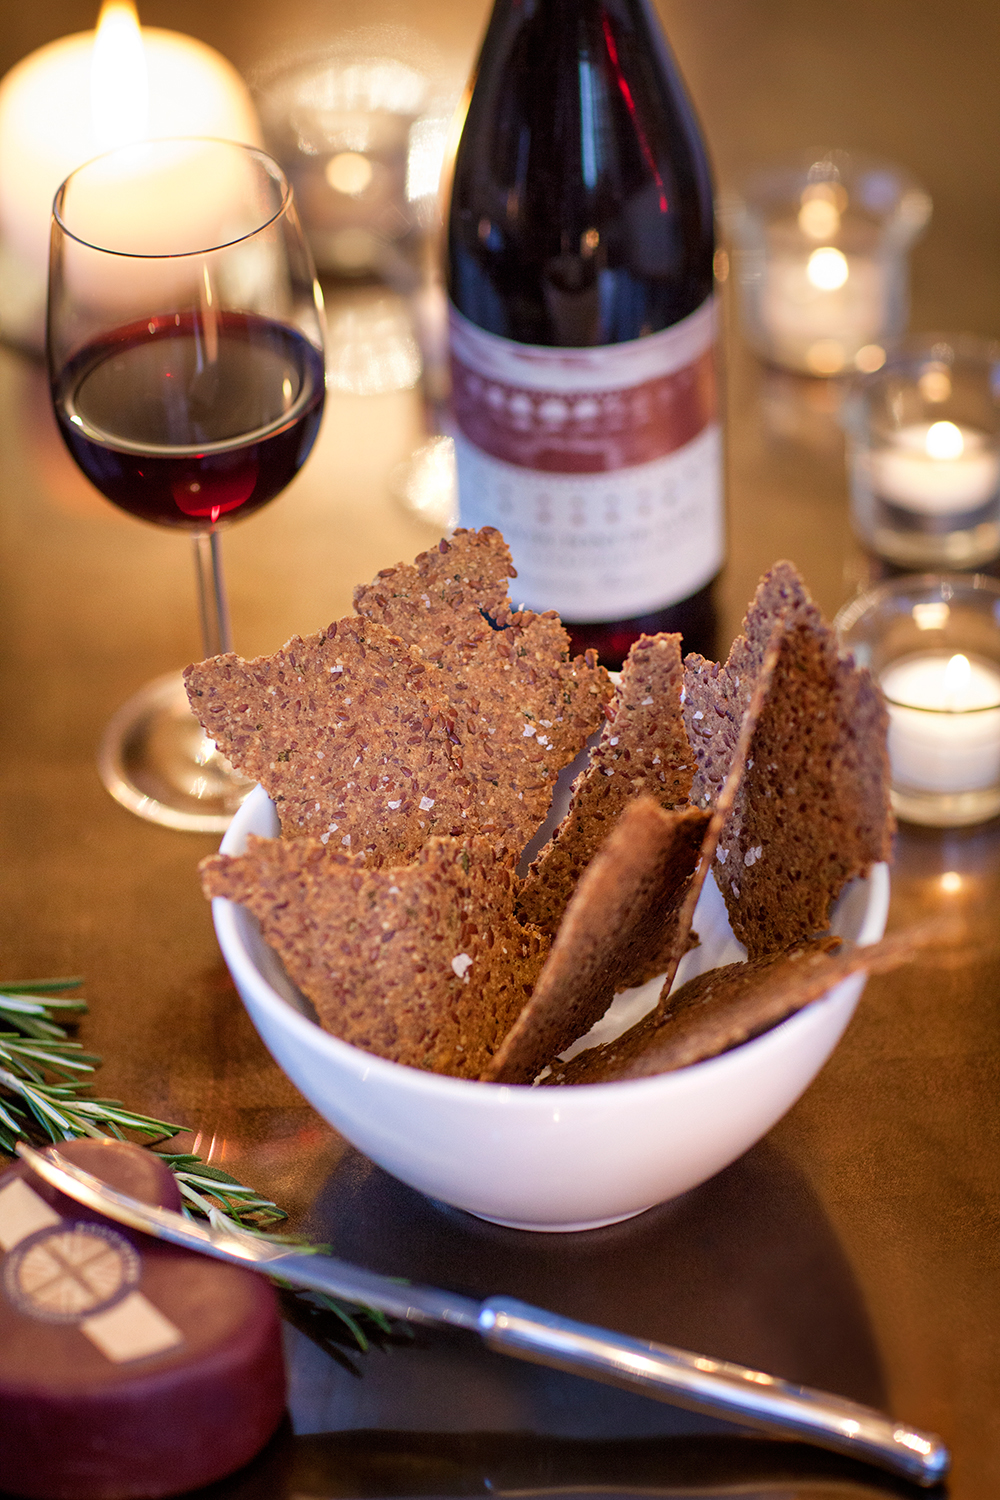
I originally baked these Flaxseed, Sesame & Rosemary Crispy Thins in a fit of pique because we’d been forced to eat a plate of cheese without any accompaniments at an expensive, highfalutin, Nottingham restaurant that couldn’t - or wouldn’t - volunteer a low-carb alternative to bread or crackers. What is it with restauranteurs and chefs that send out cheese with no biscuits whilst charging a hefty subsidy because you didn’t choose dessert? A plate of good cheese without ‘extras’ is a sorrowful affair. This, after forewarning the chef in writing of our specific dietary requirements, weeks in advance of our booking. And since we were approaching the end of our meal, there was no wine left in our glasses either! Wading through a plate of cheese without biscuits and/or wine is enough to drive you crackers. Hence these Flaxseed Sesame & Rosemary Crispy Thins are my way of making good the “Cheese please” ordering anomaly that seems to exist in the catering industry when you don’t eat grains or sugar. Head chefs take note: You could easily have your commis chef knock these up in no time at all. 

Inspired by Hugh Fearnley-Whittingstall’s recipe for Linseed & Rosemary Crackers, it has to be said, I think my Flaxseed, Sesame & Rosemary Crispy Thins are better than Hugh’s! I’ve omitted the grains, added sesame flour, extra herbs and seasoning for more flavour and used cold-pressed macadamia nut oil instead of water to bind the mixture together. You could use olive or coconut oil instead. Anyway, the addition of oil means the cooked crackers won’t stick to the baking parchment, which Hugh’s tend to do. And, you get more nutritional bang for your bucks. Flaxseeds are high in fibre, low in carbs and a primary source of omega-3 essential fatty acids. Omega-3 fatty acids help decrease inflammation, which is a trigger for heart disease, diabetes, cancer, and arthritis. Macadamia nut oil is a great addition not just for its buttery flavour but because it’s high in monounsaturated oil (boasts 10 times more MUFA’s than olive oil), it’s low in inflammatory omega-6 fats and it’s packed with nutrients like potassium, magnesium, calcium, selenium, vitamin E, niacin, and folic acid.

Crackers and cheese is my new favourite thing because I do not subscribe to even a sniff of low-carb deprivation! Totally delicious, Flaxseed, Sesame & Rosemary Crispy Thins are quick and easy to make. Just throw everything together in a bowl, divide the dough into two and roll out each half very thinly into a single large cracker - no faff or cutting-out required - then bake. When cooked and cooled, break into attractive looking shards of healthy goodness that you can munch your way through with cheese to your absolute heart’s content…quite literally!

If you’re convinced full-fat dairy is an enemy to your heart, you are not well informed. Far from being injurious to health, latest studies show that consuming whole dairy products is inversely associated with diabetes and heart disease, has no association with chronic disease or mortality and is most possibly health-protective. For vegetarians wishing to follow a low-carb or keto diet, my advice would be “Knock yourself out!”

You just need to make sure that wherever possible it’s raw, organic and grass-fed. Aged, cheese (6 months or more), such as Cheddar and Parmesan-style, is a particularly healthful addition to a keto, vegetarian diet. The higher the fat content of cheese, the better. This is because lactose is mainly drained away in the cheese making process. Ditto whole-milk that’s fermented for at least 24 hours to make lactose-free yogurt and kefir.

Low-fat, reduced fat, skimmed or heat-treated milk i.e. pasteurised and UHT (Ultra High Temperature) is not the same thing. When milk is heat treated, it destroys many of the nutrients such as vitamins and enzymes (essential for nutrient absorption) that make raw milk beneficial. Allergies and lactose intolerance is higher with pasteurised milk as well. For a supply of safe-to-drink, fresh, raw milk, I recommend you find an organic dairy that prides itself on being meticulously clean. I buy mine from Emma’s Dairy at Gazegill Organics.

Remember, your body prefers fat to glucose as its energy source because fats burn much ‘cleaner’ - the oxidation of fats takes longer and at the same time gives off more energy. Sadly, people have been brainwashed into thinking that full-fat dairy is unhealthy because of its saturated fat content (64% in butter). Saturated fat, according to public health advisers still relying on pseudo science, raises blood cholesterol levels, particularly LDL cholesterol (otherwise known as “bad cholesterol”), which puts you at higher risk for heart disease. It’s not that simple, as an episode of BBC2’s programme ‘Trust Me, I’m A Doctor’ recently found out. Researchers at Cambridge University discovered that eating 50 grams of coconut oil (90% saturated fat) every day for 4 weeks did not raise LDL cholesterol levels (the “bad cholesterol” associated with heart disease) at all. It did raise HDL cholesterol levels by an impressive 14% and HDL is the good cholesterol that helps remove the bad cholesterol. Boom! After decades of medical hullabaloo surrounding saturated fat, it turns out that high-in-saturated fat coconut oil is more heart-protective than olive oil!

What then to make of a new science advisory from the American Heart Association that recently recommended not ingesting coconut oil because it’s high in saturated fat? I say, ignore it! Perpetuating heart disease is in the AHA’s best interest because if heart disease ceased to exist they’d be out of a job. Meanwhile, real science is doing ground-breaking research that is finally forcing the medical establishment to accept that the key to reversing disease, such as type-2 diabetes, is simply an effective weight management programme. That’s bad news for the pharmaceutical and junk food industries but good news for the NHS and you - if you’ll take personal responsibility.

It’s astonishing to me that as we witness the NHS collapsing under a burgeoning demand for healthcare by an ageing, chronically diseased society, the government opts to continue to subsidise the cost of ill-health rather than promote wellness through good nutrition. They could save millions! True, it would take the political will to oppose modern farming methods with its obsession for GMO’s and toxic agro-chemicals; help restore healthy soils, insects and wildlife by subsidising sustainable farming practices and completely overhaul UK’s dietary guidelines. For that reason, I don’t imagine food utopia happening any time soon. 

Dr Aseem Malhotra, fast becoming known as one of the most influential cardiologists in Britain and a world leading expert in the prevention, diagnosis and treatment of heart disease and a senior adviser to the National Obesity Forum said:

"The change in dietary advice to promote low fat foods is perhaps the biggest mistake in modern medical history. We must urgently change the message to the public to reverse obesity and type 2 diabetes. Eat fat to get slim, don't fear fat, fat is your friend."

How much longer will you wait? Hopefully not until you inevitably find yourself one of the unfortunates being sent home by an overstretched NHS to sort out your own health issues.

I heard that “It’s easier to change a man’s religion than his diet” but here I go again…to spare yourself the indignity and suffering of disease, start cutting the carbs now, eliminate sugar and when you’ve accomplished this, begin eating more healthy fat…much more. 

To that end, Flaxseed, Sesame & Rosemary Crispy Thins topped with lots of butter and cheese will play a most enjoyable part. 

Wishing you a happy and healthy 2018.

cheese and grainfree crackers.jpg

Flaxseed, Sesame & Rosemary Crispy Thins (serves 4)

Ingredients

50g organic brown flaxseeds 

100 ml freshly filtered boiled water

25g organic ground flaxseed (see Notes below)

25g Sukrin organic sesame flour 

15g organic green banana flour - only non-organic is readily available in the UK

50g organic ground almonds

½ tsp Himalayan pink salt

a good grinding of organic black pepper 

1 tsp ground cumin

1 tbsp fresh organic rosemary, finely chopped

1 tbsp cold-pressed macadamia nut oil, + extra for oiling

Sea salt flakes

party food.jpg

Instructions

Place the flaxseeds in a heatproof bowl and pour over the boiling water. Let stand for 10 minutes.

Meanwhile, preheat the oven to 160°C / 300°F / Gas mark 3

Place the dry ingredients into a medium sized bowl. 

Take 2 sheets of baking parchment and generously brush one side of each with oil. Set aside - oiled side uppermost.

Add the flaxseeds with their soaking water, the chopped rosemary and 1 tbsp of macadamia nut oil to the dry ingredients. Use a fork to mix everything together really well, then squash the mixture together with your hands into a ball of dough.

Place half the cracker dough (about 130g) on top of the oiled side of one of the sheets of baking parchment - slap bang in the centre - then lay the other sheet of parchment paper, oiled side facing downwards, on top. 

recipe imstructions.jpg

Roll the dough out very thinly between the 2 sheets of oiled baking parchment to make one large, thin, ragged-edged cracker that’s no more than 2-3mm thick. Lift off the top piece of parchment paper and transfer the bottom parchment paper with the dough still on it onto a baking sheet. Sprinkle with half the salt flakes. 

primal plate recipes.jpg

Bake on the middle rack of the oven for 25 to 30 minutes, checking occasionally, until completely dry and the outer edges are starting to curl up.

Take out of the oven and leave to cool before removing the parchment paper.

Repeat the rolling out process with the second piece of dough and bake as before. 

When the crackers are cool and crispy, carefully break them into largish pieces. 

Spread with a generous amount of butter and eat with cheese for the ultimate low-carb cheese and biscuit experience.  

crispy thins.jpg

Notes

Because ready-ground flaxseed (also known as linseed) does not have a long shelf life it’s best to grind your own whole flaxseeds in a coffee grinder immediately before use. If you don’t have a coffee mill, buy ready-ground flaxseed in small quantities and use within the best before date. 

Raw, organic macadamia nuts and macadamia nut oil are very expensive and not easy to source. Luckily, macadamias are low in pesticides even if conventionally grown. They’re hands-down my favourite nuts both for snacking and cooking. I love them most for their light, buttery taste, which makes cold-pressed macadamia oil perfect for drizzling and homemade mayonnaise because unlike olive and avocado oil, it doesn’t overpower. Macadamia nut oil is also highly shelf-stable and resistant to heat induced oxidation. This makes it safe for sautéing, frying and baking at higher temperatures because there’s no danger of free radicals and deadly trans fatty acids forming as they do with other cooking oils at high temperatures. High-fat, macadamia nuts have more omega-3 and less omega-6 fat than any other nuts, they lower LDL blood cholesterol and being exceptionally high in fat can help to make you thinner! I think they’re worth the expense but it you prefer, use organic olive oil or coconut oil for this recipe instead. 

A non-stick silicone sheet placed under the dough before rolling out is even better than oiled baking parchment because it stays perfectly flat during baking. 


Fat 20g Protein 9g Carbs 8g - based on 4 generous servings (surprisingly satisfying!)

food and wine.jpg

Chocolate Orange & Cardamom Fat Nuggets

by Susan Smith in ,


The majority of people think my diet-led lifestyle, as documented on Primal Plate’s blog, is impossibly hard to follow. So at the risk of repeating myself, in today’s post I’m going to attempt to sort the ‘wheat from the chaff’ of excuses people give for turning a blind eye and continuing to make dietary choices that are clearly detrimental to their health. 

First up, “I’ve no time to cook”. Aside from eating raw food or at the very least throwing everything together in a blender to make nutritious soups and smoothies, if you won’t regularly cook real food at home, you’re in trouble. If you’re not willing to invest the time to eat healthy food now, you’ll almost certainly spend time later in a sickened state rueing the day you thought you had something better to do. My secret weapon in the kitchen is enlisting my husband’s help. Don’t try to go it alone, it’s much too much like hard work. I am as much a time-poor cook as you, but needs must if you want to safeguard your health and/or reverse obesity and other diseased states. 

“I can’t cook”. As someone who extrapolates information from unintelligible recipes and reconstructs them for Primal Plate’s website, I can understand that many people, having given cooking a go, have deduced from the results that they can’t cook. However, it’s not your fault if the recipe you followed is just plain wrong, which they often are! All Primal Plate recipes are throughly tested before publication and we re-visit them - oftentimes over and over again - when cooking our own meals. In my absence, both my partner John and daughter Sarah faithfully follow Primal Plate recipes on their iPhones to both shop for and then produce the same delicious results. It’s comforting to know that if anything happens to me they’ll have a volume of healthy recipes to refer to that won’t ever let them down. If you can read, you can cook.

“It’s too expensive”. Buying organic is something I’m really strict about - not just fruit, vegetables, nuts, seeds, meat, fish and dairy but also tea, coffee (made with filtered water), the wine we drink (very low sulphite) and condiments like salt, vinegar, pepper, other spices, herbs and flavourings. The same rule applies to all our personal care and household cleaning products etc. Whilst you can never avoid all the noxious chemicals man has devised in the name of profit and experimentation in this mad world (hello Monsanto/Bayer), you can at least limit your exposure by filtering out all those toxins in your food and drink, the air you breathe and what you absorb via your mouth (toothpaste etc.) and skin. What happens when you combine processed junk food, GMOs, antibiotics, agricultural chemicals, dodgy school dinners, fluoride-loaded water, chemical-based prescription medicines and toxic vaccination programmes? God only knows, but there are people and corporations that are hell-bent on de-populating the earth, and it seems to me that they have the process well in hand! Eating mostly fresh, raw, organic whole foods and going ‘green’ may cost a little more money but it is an act of defiance in support of the environment that can help prevent disease, keep you out of hospital and extend life. What price good health? You decide. 

A high fat diet makes you fat”. No it does not. Eating foods that are high in healthy fats fills you up and makes you want to eat less, which aids weight loss. Just don’t combine high-fat food with high-carbohydrate foods or too much protein. If you eat high carbohydrate foods and more protein than your body requires, it will simply convert most of those calories to sugar (glucose) and then fat. Increased blood sugar levels from whatever source also fuels cancer cell growth. Since reading Fat For Fuel, my goal, which I track most days via myfitnesspal.com, is to eat a diet high in healthy fat with medium amounts of protein and low amounts of carbohydrate. The ratio looks something like this: 94g fat, 65g protein and 49g carbohydrate per day. Anyone who wants to lose weight, combat disease, slow down ageing, boost their brain power and have more energy, needs to get onboard with the principles of Fat For Fuel and quit thinking that the body needs carbohydrates (glucose) for energy, or that eating low-carb means replacing carbohydrates with excessive amounts of protein (also glucose forming!) as subscribed to by followers of Atkins, Paleo and Primal.

One of the concerns I had whilst making the adjustment to our family meals was how to keep up with John and Sarah’s requirement for the extra calories that I don’t need (ah, the joys of ageing!). To get our calorific needs more in alignment, I now practice intermittent fasting i.e not eating solid food for 16-18 hours in every 24 hours. However, these Chocolate Orange & Cardamom Fat Nuggets - little calorific nuggets made primarily from coconut and almond butter (generally referred to by ketogenic dieters as “fat bombs”) have been a real game-changer for us all. 

There will be many more keto-inspired (LCHF) recipes coming soon on Primal Plate’s blog, but for now these Chocolate Orange & Cardamom Fat Nuggets are the most enjoyable way I could think of to satiate your appetite for something sweet, provide bags of energy and to ease the process of switching your body from its reliance on burning glucose for energy to fat burning instead.

Standing in for luxury truffles, after dinner petits fours, semifreddo, mini chocolate parfaits or - in its unformed state - a delicious spoon-from-the-jar chocolate spread, the sophisticated flavour combo of chocolate, orange and cardamom tastes like really expensive chocolate. Better than any chocolates I’ve ever tasted, these little nuggets of goodness are what you might call “happy superfood”. Pure gold for keto-dieters and also the health conscious, sports people and keep fit fanatics, these easy-to-make Chocolate Orange & Cardamom Fat Nuggets should help convince you that if you want to look good on the outside and feel good inside, fat is your new best friend. 

Half this recipe will make 30 chocolates, the other half a ready-to-eat chocolate spread. Very yummy, very moreish, Orange & Cardamom Chocolate Fat Nuggets are no longer a dietary stop-gap for John and Sarah but have earned their place in our house as a daily ‘must-have’ nutritional necessity. 

Chocolate Orange & Cardamom Fat Nuggets (Makes 30 x 10g nuggets plus approx. 200g chocolate spread)

Ingredients:

100g organic coconut butter

100g organic almond butter

200ml organic full-fat coconut milk

50g organic pasture-fed unsalted butter

1 tsp pure vanilla extract

4 tbsp raw organic cacao powder

15 drops organic liquid stevia

1 tbsp raw organic honey

20 organic cardamom pods crushed in a pestle and mortar, husks removed and seeds finely ground

2 organic oranges, zest only


Instructions:

Boil a kettle of water.

Place all the ingredients into a large glass heatproof bowl. 

Pour the boiling water from the kettle into a saucepan large enough to accommodate the bowl of ingredients. 

Place the bowl of ingredients on top of the saucepan of water to create a double-boiler i.e. the base of the bowl should not be in direct contact with the water. Set over a medium-low heat.

Stir the ingredients together until everything melts into a smooth, creamy, pourable mixture that easily drops from a spoon. As soon as the ingredients are well combined take the pan off the heat. N.B. It’s important not to let the mixture get too hot as this will cause it to separate into an oily mess! 

To make a batch of professional-looking, individual fat nuggets, immediately spoon half of the melted mixture into a silicone chocolate mould (I used this one from Lakeland). 

Pour the remaining mixture into a Kilner/mason jar whilst it’s still warm. Cover and set aside to cool.

Meanwhile, open-freeze the individual fat nuggets in their chocolate mould until solid. When completely frozen, unmould them and store in a lidded freezer-proof container in the freezer until you’re ready to eat them. Take them out of the freezer to soften about 10 minutes before serving. Tip: I place each frozen nugget on a dinky, decorative spoon to ‘come-to’ in readiness for serving; this means they melt in your mouth, not on your fingers!    

If posh presentation isn’t your thing, simply pour all of the mixture directly into a 500ml Kilner/mason jar and when it’s cooled down, store in the fridge. You can then spoon it out of the jar as required - i.e. eat it straight off the spoon, add to dairy or nut milk and whizz together in a blender to make chocolate milk, or use as a delicious chocolate spread on hot toast or bread. 

Notes

If the mixture overheats during the melting process causing it to separate, it can be saved by quickly whisking-in a couple of ice cubes.  

To fully enjoy these healthy Chocolate Orange & Cardamom Fat Nuggets, please ignore the recent attack made on saturated fat by the American Heart Association. In my view, it's no more than the death rattle of a desperate organisation that’s lost its credibility and should be defunct. Still, I enjoyed the furore they caused on social media last week! Most people know from experience that public health guidelines encouraging you to eat a diet low in fat and high in carbohydrate and to substitute natural saturated fats for processed, polyunsaturated vegetable oils, simply doesn’t work. It is a dietary formula that makes you sick and fat. Specifically, there never was, and still isn’t, a single shred of scientific evidence to support the demonisation of saturated fat as the root cause of heart disease, high cholesterol, clogged arteries or myocardial infarction. It’s all a big, fat lie! To read more, click here.


Fat 3g Carbohydrate 1g Protein 1g - per nugget or 10g serving of chocolate spread


Courgette Polpette

by Susan Smith in ,


I’ve rifled today’s recipe for Courgette Polpette (the Italian name for meatballs, which you pronounce pohl / PET / teh) from Hugh Fearnley Whittingstall’s River Cottage Baby and Toddler Cookbook. He in turn, adapted his recipe from the Italian cookery writer Ursula Ferrigno.

Unabashed, Primal Plate has adjusted the recipe again to convert it into very tasty, grain-free, low-carb finger food for grown-ups and children alike. Sarah and I have trialled these on the run between venues at Mirror Imaging weddings over the past two weekends and, it’s official, we both think these vegetarian nuggets of goodness are picnic fare extraodinaire! Piled into individual lunch boxes alongside sweet, organic cherry tomatoes and cubes of feta cheese, with a bamboo stick to spear them directly into our hungry mouths, it is the most delicious and sustaining, no-mess, packed lunch I’ve ever eaten!  

Easy to make and really, really yummy, these little nibbles would also be great served-up as canapés or as a vegetarian main course served straight out of the oven with homemade tomato sauce. Alternatively, serve them hot, warm or cold with a fresh Tomato Salad and/or our Speedy Seedy No-Grain Soda Bread.

In addition to being healthy and Paleo/Primal friendly, Courgette Polpette are a fantastic way to use up a glut of home-grown courgettes. In fact, if you don’t own an allotment, this is the time of year to make friends with someone who does! Demand for these moreish morsels could well outstrip the seemingly endless bounty of easy-to-grow courgettes that beleaguers most gardeners at the height of the growing season, which just happens to be now. 

In fact, I could happily eat Courgette Polpette ad infinitum for breakfast, lunch or supper. They will keep for several days in the refrigerator and as a stand-by treat for summertime get-togethers - and for busy wedding photographers - they’re an absolute winner. 

Courgette Polpette (makes about 24)

Ingredients

2 tbsp olive oil

2 organic shallots, finely chopped 

500g organic courgettes, cut into small dice

Grated zest of an organic lemon

1 medium organic egg, lightly beaten

30g finely grated parmesan-style cheese (or other well-flavoured hard cheese)

½ ball of vegetarian mozzarella, drained, dried and cut into small dice

50g organic pine nuts, lightly toasted

100g organic ground almonds

1 tbsp Sukrin reduced-fat coconut flour

1-2 tbsp chopped parsley

Sea salt and freshly ground black pepper

Olive oil or melted butter - for greasing

Instructions

Line a large baking sheet with non-stick tin foil and then brush over the surface of the foil with a little olive oil or melted butter.

Heat the oven to 200C / 390F/ Gas mark 6.

Dice the courgettes and chop the shallots. 

Whilst you’re preparing the vegetables, lightly toast the pine nuts in a small dry frying pan over a low heat - keep your eye on them, they can quickly turn from golden to burnt! When they're lightly toasted, take the pan off the heat and set aside to cool.

Heat 2 tablespoons of olive oil in a large frying pan over medium heat. Add the shallots and cook for 2-3 minutes until soft but not browned. Add the courgettes to the pan and continue to fry over a medium heat for a further 10-12 minutes until tender and golden. Drain on kitchen paper and set aside to cool. 

In a large bowl, combine the cooled courgette mixture with the rest of the ingredients, season well, then form into small balls the size of a walnut (you’ll need approximately 25g for each polpetta). 

Place on the baking sheet and bake for 15 minutes, until golden brown. 

Serve hot, warm or cold.


Carbohydrate 13g Protein 15g - per serving (approx. 2g carbohydrate per polpetta)


Lucky's Nut Truffles

by Susan Smith in ,


As I write this blog I’m sat at the end of my hallway with my computer balanced on top of a pile of books, hemmed in by displaced furniture and various bits of office paraphernalia (phase 3 of our annual home improvement and re-decoration schedule has been going on for what seems an interminable 4 weeks already) whilst my man stands next to me with his computer resting on a still unwrapped furniture delivery, trying to research plant variants that have sprouted in our garden, which we don’t recognise.

We’re not green-fingered, but we do like to try and make sense of our green space without destroying all life within it. You only have to look up to see that we’re unusual in this respect. It seems that the majority of people are hell-bent on ‘managing’ nature, particularly when it comes down to so-called tree maintenance a.k.a. the ceaseless year-round topping, lopping and felling of trees. Question: When is a tree not a tree? Answer: When some idiot has butchered all its magnificent branches back to stubs and spindly, finger-like projections have grown in place of the beautiful tree-shaped canopy that once was…or cut it down completely to an ugly stump. 

Stupid is as stupid does. I’m convinced the obsessive compulsion to mess with trees is a form of egocentric behaviour that satisfies man's craving for power and control. With big tool in hand - I mean chain-saw - I believe the power rush they get from hacking, sawing and destroying a living entity is an addiction that feeds on itself. Not only do they spoil the look of the trees that still stand, the resulting pitiful, topped and disfigured specimens are left with open wounds that are vulnerable to attack from invading pathogens (fungi and bacteria). Cutting back, thinning out and removing branches destroys a tree’s natural defences - the tree bark that protects the underlying tree tissue. It also threatens its life support system - the loss of leaves that are every tree’s source of food. Exposed to the sun, the cuts are in effect death wounds and the removal of a large percentage of leaf-bearing branches, starvation.

If a starving tree has enough energy, it will send out multiple shoots beneath the cuts to try and replace its leaves as quickly as possible. These new shoots will never be as strong as the original branch they emerge from and can easily snap off even years after they’ve grown back to the size that the tree was before it was attacked. Furthermore, trees can’t heal - they try to defend themselves by closing off their wounds with a tough, woody substance called wound wood. A tree’s ability to seal off its wounds depends on many variables; its age, species, health and vigour, the size and shape of the wound and the time of year. If a tree can’t respond quickly to its injury it falls prey to rot, insect infestation and wood decay, which in turn leads to a loss of vitality and vigour that results in the tree’s inevitable decline, dieback and structural failure.

It is of course a cunning way for tree cutters to future-proof their industry. If you didn’t need the services of a tree surgeon before, you most certainly will when your decayed and dying trees become a health and safety issue for you and your neighbours!

Despite all the ugliness surrounding them, people still have embedded in their sub-conscious that regular tree felling and pruning is both necessary and good. "It lets in more light; it prevents tree root damage to property; it stops the mess trees create (have they not heard of a broom?); wet leaves are dangerous; tall trees block TV/Sky/Broadband reception; it spoils my view; I can’t see the sky (!); I need the space for off-road parking…" are just some of the excuses given. Then there are the unqualified tree surgeons stalking the neighbourhood for mature trees that they can cash-in on, knocking on doors and persuading homeowners that their trees are an imminent threat unless they are cut-back. I give them short thrift, but many folk are convinced.

What these people don’t seem to know or appreciate is:

  • Trees give us oxygen and oxygen helps us breathe - a mature tree in season produces as much oxygen as ten people inhale in a year!
  • Trees give birds and animals shelter so if you cut them down you’re messing up their homes.
  • Trees help clear the air of heat and pollutant gases. 
  • Trees clean the soil - trees filter dangerous chemicals and pollutants out of the soil, which helps assure our food security. 
  • Trees absorb carbon dioxide and help stop global warming.
  • Trees help conserve rain (to prevent drought) and reduce the likelihood of flooding. They fight soil erosion by protecting the soil from surface flooding - binding soil to sloping land with their roots.
  • Trees help control noise pollution.
  • Trees mask ugliness and keep unsightly structures from view.  
  • Trees save energy. In winter they act as wind breaks - breaking the force of cold, blustery winds and reducing the cost of heating your home. In summer, strategically planted trees around your home shield your property from UV rays and reduce the need for air conditioning.
  • Trees give us food - e.g. nuts and fruits.
  • Trees improve human health and well-being. As well as offering cooling shade and protecting us from the sun’s harsh rays, they are aesthetically pleasing to look at. Full of life, strong and magnificent, their beauty is more than skin deep. Exposure to trees and nature calms the mind and uplifts the soul. Being in a natural environment surrounded by trees can lower blood pressure and heart rate. Hospital patients who have a view of trees from their window heal quicker, take less drugs and have fewer post surgical complications than those who don’t. Even babies born to mothers that live near to trees are less likely to be underweight. 
  • Trees increase property values significantly - they not only beautify your property and the surrounding area, there is less fear and violence in well-planted, green spaces than there is in and around homes in barren neighbourhoods. Houses surrounded by trees sell for 15-25 percent higher than houses with no trees. 

Since trees do so much to benefit humans, we think it’s best to leave them alone to do their job. No radical pruning of healthy trees is required or allowed! Our reward is a semi-wild garden that nature has developed into something quite Disney-like. As well as owls, doves, pigeons, innumerable songbirds, hedgehogs, mice, frogs, bats, the occasional pheasant seeking refuge from the local Sunday shoot, and a hungry female sparrowhawk that knows for sure there are rich pickings to be had, we live harmoniously alongside a small army of grey squirrels that are accidentally planting more trees.

Because humans have destroyed so much of the natural landscape, squirrels have been forced to adapt to a more urban environment to survive. Grey squirrels have adapted more successfully than their red squirrel counterparts, but that doesn’t excuse the widespread racism against grey squirrels, which vilifies them with exaggerated claims that they damage/kill trees by bark stripping and excuses the culling of them because, according to urban myth, grey squirrels are deemed pests that destroy property and cause a decline in red squirrel populations. As with the obsession for tree-pruning, it’s all a load of twaddle. Both red and grey squirrels strip tree bark to build their dreys (squirrel nests) and to get to the underlying wood as a source of nutrition when times are hard but, unlike human crime against trees, the damage they cause is minimal and it doesn’t kill the trees. Here are the facts about the demise of red squirrels and, as you might expect, it’s mostly down to humans!

Given that the natural habitat of squirrels is now disappearing at a rate of knots, they make their dreys in any tree-like structure they can find. Four years ago, around the time our next door neighbour cut down an entire copse of eighteen mature trees, one beautiful, dedicated, mamma squirrel sought shelter on our roof under the solar panels, where she built her drey and tried to raise her kittens (baby squirrels). Sadly, it was not meant to be. Somehow, mum sustained a fatal injury to her back and later that day (Friday 13th April 2012) two kittens fell out of their nest and slid straight off the roof - three storeys high - directly onto the solid concrete path outside our back door. What to do? Tiny, helpless and with their eyes still closed, we had no choice but to take on the immediate squirrel care challenge in front of us! 

In the first few weeks of life, baby squirrels don’t do much more than eat, sleep and grow. However, it wasn’t long before our two little boys became gorgeous handfuls of wriggly, noisy, messiness that took over our lives completely. Active during daylight hours, they lived right next to my desk in our home office. Despite the immense parental responsibilities thrust upon us, we soon discovered what a life-affirming joy these intelligent, industrious, characterful and acrobatic critters are. With the help and support of Clarissa Summers we loved and cherished little Kipp and Lucky 24/7, until they were about six months old and ready to be released back into the wild. Our boys may be long gone, but our love and respect for squirrels lives on.

Whether chasing each other from tree branch to tree branch, jumping around in the tops of our trees, sitting perfectly still in the classic squirrel pose with their tail arched over their back, pausing in front of us to munch on a nut or cheekily peering through the window to get our attention, squirrels are without doubt the cutest, most entertaining of all the wildlife species living in our garden, and we happily pay the price to secure their allegiance. Not only do we make executive-style squirrel boxes to keep them warm and safe, we’re also their most reliable food source - namely, an all-year-round supply of best-quality walnuts (their favourite), hazelnuts and, when in-season, acorns too. It’s part of a deliberate plan. The squirrels have learned how to exploit our generosity by approaching us with charming gestures that signal their need for more nuts, and we know that large quantities of these will be stored in the ground. As squirrels don’t always remember where they’ve buried their nuts, there’s always the potential for some of their cache to take root and grow into new trees.

Helping squirrels survive and thrive in captivity very much depends on what you feed them. As well as whole nuts, fruit and veggies, I used to make my two boys nutritious seed and nut balls that helped them grow strong and kept them noisily bouncing around their cage for hours. It seems timely that today’s recipe for Lucky’s Nut Truffles (no prizes for guessing why I’ve called them that) are an energy ball equivalent for humans. These blissful little bombs of goodness mix protein, vitamins, fibre, minerals and essential fats and are a chocolatey, nutty delight to enjoy any time you need an energy boost. Sweetly satisfying and sustaining, Lucky’s Nut Truffles are ideal for a pre or post workout snack, yet still dainty enough for some after dinner indulgence. Incredibly moreish, I suggest you squirrel away a plentiful stash for yourself in the refrigerator, where they could (but I predict won’t!) last a couple of weeks.

Lucky’s Nut Truffles (make about 22)

Ingredients

100g organic raw walnuts

100g organic raw hazelnuts, unskinned

15g raw cacao powder

100g Medjool dates, pitted (about 6)

1 ½ shots (60 ml) freshly brewed espresso-strength coffee

1 tbsp smooth almond butter

3 tbsp coconut butter

2 tsp organic ground cinnamon

2 drops organic liquid stevia

2 tsp pure vanilla extract

50g organic shredded coconut, for coating

Instructions

Pre-heat the oven to 180℃ / 350℉ / Gas mark 4. 

Put the pitted dates into a bowl and pour over the hot coffee. Set aside.

Place the walnuts and hazelnuts together on a baking tray and toast for 8-9 minutes. 

Place the shredded coconut on a separate baking sheet and toast at the same temperature for 5-6 minutes, or until a deep golden brown. Leave on the tray to cool.

Tip the toasted nuts - it doesn’t matter if they’re still warm - into a food processor bowl and blitz until finely chopped. Don’t allow all the walnuts and hazelnuts to become totally smooth as some slightly larger, crunchy pieces in the mix adds texture. Empty the ground nuts into a bowl and set aside.

Add the dates, coffee, cacao powder, almond and coconut butters, ground cinnamon, vanilla extract and liquid stevia to the now empty processor bowl (no need to wash it first) and process until the mixture clumps together into a sticky, gooey paste. You may need to scrape down the sides of the bowl a couple of times to ensure an even mix.

Add the toasted nuts to the paste and pulse everything together until the nuts are evenly distributed.

Using a dessertspoon, scoop the dough into individual bite-sized portions (approximately 17g each) and roll anti-clockwise between the palms of your hands into smooth, round balls.

To finish, roll the truffles in the toasted coconut. 


Carbohydrate 6g Protein 2g - per truffle


Cheese Cocktail Biscuits

by Susan Smith in , , , ,


Continuing the theme of keeping Christmas simple, please raise your glasses to these deliciously rich Cheese Cocktail Biscuits! Quick and easy to prepare, these grain-free, low-carb nibbles are just perfect for handing out with pre-dinner drinks. Plus, they’re so tasty, you don’t need to serve any other accompaniments with them.

To get the party started, simply pile these elegant-looking, cheesy, crispy, buttery delights onto a platter and serve with ice-cold dry martinis, chilled Champagne, Manzanilla sherry or frosty glasses of dry white wine. Talk about eat, drink and be merry!

Because they can be stored for up to a week in an airtight container, they’re also the ideal finger-food to accompany drinks when unexpected guests pop-by. 

In fact, I think they’re at their crispiest-best when ‘twice-baked’ and still warm from the oven. So if I’m not going to serve them as soon as they’re made, I just re-heat as many biscuits as I need later on. Simply lay the pre-baked biscuits out on a baking tray and bake at 180℃ for a further 5 minutes, cool briefly on a wire tray and then serve warm to your guests. Totally delicious and utterly brilliant - they must be one of the simplest and fastest party foods to make and bake ever!

Cheese Cocktail Biscuits (makes 20-24 biscuits)

Ingredients

55g butter, chilled and cut into small cubes

100g organic ground almonds

1 tsp gluten-free baking powder

50g Sukrin reduced-fat organic almond flour

80g ‘Parmesan-style’ vegetarian cheese, finely grated

¼ tsp sea salt

large pinch of cayenne 

freshly ground black pepper

1 tbsp cold water

1 small organic egg, beaten

1 dsp each of fresh rosemary and thyme leaves

Maldon sea salt flakes


Instructions

Pre-heat the oven to 180℃ /  350℉  / Gas mark 4. Line a baking sheet with parchment paper.

Put the butter, ground almonds, almond flour, baking powder, cheese, sea salt, cayenne and black pepper into the bowl of a food processor and whizz until just starting to clump together - takes about 30 seconds.

Add the tablespoon of cold water and whizz again until a soft dough starts to form - takes about 15 seconds. 

Tip the dough onto a sheet of non-stick baking parchment and knead lightly until the mixture comes together into a ball. Flatten out into a disc with the palm of your hand, then place another sheet of non-stick paper on top of the dough - this will stop it sticking to your rolling pin. Roll out the dough evenly (do quarter turns of the paper every few rolls) to 4mm-6mm (½ cm / ¼ inch) then using a 5cm plain-edged cutter, cut into rounds.

Place the biscuits on the pre-lined baking sheet - they won’t spread much. Gather up the rest of the dough and re-roll the trimmings, cutting out rounds as before until all the dough is used up - you should end up with about 24 biscuits.

Lightly brush the tops of the biscuits with beaten egg, then sprinkle over the fresh thyme and rosemary leaves. Finally, add a small pinch of Maldon sea salt flakes to each biscuit. 

Bake in the pre-heated oven for 12 to 15 minutes or until the biscuits are crisp and golden brown. You may want to turn the baking tray around half way through the cooking time to ensure the biscuits bake evenly.

Transfer to a wire baking tray and allow to cool before serving, still slightly warm, with drinks.   


Notes

The quality and flavour of the cheese you use for this recipe is vitally important to the end result. I highly recommend you track down the Gran Moravia Parmesan-style vegetarian cheese I’ve used because it is so like Parmesan in both texture and flavour that even I am hard-pressed to tell the difference. It’s a real find for vegetarians who love the taste of Parmesan but don’t want to eat Parmesan Reggiano because it contains animal rennet. This Italian-made hard cheese is truly the one I rave about every time I need a cheese to look, taste and behave like Parmesan - not only is it vegetarian and costs a lot less money, even my pernickety Parmesan-eating cat loves it! 


Carbohydrate 1g Protein 3g - per biscuit

A more-ish accompaniment to pre-dinner drinks, these simple canapés are a real crowd pleaser. If you're making them ahead of time, pop them back in the oven for 5 minutes to crisp them up, before serving them to your guests!

A more-ish accompaniment to pre-dinner drinks, these simple canapés are a real crowd pleaser. If you're making them ahead of time, pop them back in the oven for 5 minutes to crisp them up, before serving them to your guests!


Roasted Cauliflower & Mushroom Curry with Green Pea Fritters and Avocado Cream

by Susan Smith in , , , , ,


Continuing my quest to find Primal Pronto veggie-inspired meals, I discovered these delicious Green Pea Fritters at The Healthy Chef. Initially, I was just looking for an alternative to Primal Naan Bread and Cauliflower Rice to accompany a family supper of Roasted Cauliflower & Mushroom Curry because, as satisfying as Primal naan bread might sound, since posting the original naan bread recipe I subsequently found out that I need to re-invent it without tapioca flour, (which increases blood sugar even more than wheat flour) and zanthan gum. Yikes! Sorry for the oversight! Plus, cauliflower ‘rice’ and cauliflower curry have zero gastronomic appeal when eaten in combo, so I wanted something new and tasty, preferably vegetable-based, to make our curry meal more appetising. 

As it turned out, the Green Pea Fritters were such a hit that I’m including them as part of this week’s blog, so today, three recipe posts for the price of one! Whilst the Green Pea Fritters and Avocado Cream are a perfect stand-alone meal for a fast and simple supper or to serve with drinks, when brought together with Roasted Cauliflower & Mushroom Curry you have several wonderful things that make for a fresh, creative, vegetarian meal fit for entertaining friends. I think the whole thing looks mouthwatering on the plate and it tastes just as good - spicy, savoury, creamy and delicious!

The cauliflower and mushroom curry recipe is adapted from a recipe in Daniel Green’s book, The Paleo Diet but there is one notable exception - if you try to make this curry with “1 tablespoon of chilli powder (or more to taste)” as directed in the book, please do not even think of inviting me for supper! It may simply be a ‘typo’ (I think it should read 1 teaspoon of chilli!) but it would nevertheless be ruinous to the finished dish and most likely would get missed by an inexperienced cook slavishly following the recipe. Thank goodness for Primal Plate’s extensive testing and tasting of all blog featured recipes before posting! 

I have added tiger nut flour to the pea fritter recipe to enhance the sweetness of the peas and on this occasion left out the lemon zest in favour of fresh mint because a) fresh mint and peas are a classic and b) the avocado cream has a lemony ‘hit’ all of its own that more than compensates for its absence in the fritters. Plus, it saves the time and effort of grating a lemon!

The pea fritters are very quick and easy to make - it’s just a matter of mixing everything together in a bowl and dropping spoonfuls of the mixture into a hot frying pan (only a few at a time), pressing them flat with the help of a spatula and cooking (for less than a total of 10 minutes) until they’re golden brown on each side. Meanwhile the avocado and cream cheese can be quickly whizzed to a luscious pale green cream in a food processor or with a hand-held blender.  

The Roasted Cauliflower and Mushroom Curry is just as fuss-free and makes a great vegetarian low-carbohydrate option for followers of Paleo and Primal diets. 

Put it all together for warming, nourishing mouthfuls of extreme pleasure.  

Green Pea Fritters (Serves 4)

Ingredients

300g frozen peas, defrosted

2 tablespoons fresh chopped parsley (about 10g without stalks)

1 tablespoon freshly chopped mint leaves

2 large organic free range eggs, lightly beaten

100g full-fat soft cheese, softened (I used Longley Farm)

25g organic tiger nut flour

15g organic coconut flour

1½ tsp sea salt and a generous grinding of black pepper

1 small organic lemon, finely grated zest only - optional

1tbsp olive oil, for frying

Handful of pea shoots, to garnish - optional


Instructions

Crush the peas in a food processor using the pulse button. Make sure you keep the peas a coarse texture, this is not meant to be a puree.

Transfer the crushed peas to a bowl, add the parsley, mint, eggs, lemon zest (if using), tiger nut and coconut flours. The ground tiger nuts and coconut flour help to hold the mixture together during cooking. 

Season with the sea salt and freshly ground black pepper. Taste and correct the seasoning if necessary. 

Soften the cream cheese by breaking it down with a fork then add to the pea fritter batter and combine well.

Heat a little olive oil in a large heavy-based non-stick frying pan over a low heat.

Add heaped tablespoons of the pea fritter mixture to the pan -  you should get about 16 bite-sized fritters. To avoid overcrowding the pan you may need to cook them in several batches. 

Cook the pea fritters over a medium heat for 5-6 minutes without disturbing them. When they are firm and golden on the underside, carefully turn them over with the aid of a flat-ended spatula. 

Continue to cook for a further 3-5 minutes or until the fritters are cooked through and golden brown on both sides. 

Immediately transfer to an oven proof dish (or serving platter if you’re handing them out with drinks) and then into a pre-heated hot oven until you’ve cooked the rest of the fritters and you’re ready to eat.


Avocado Cream (Serves 3-4)

Ingredients

1 large ripe avocado

½ lemon, juiced

100g full-fat soft cheese, softened by breaking down with a fork (or use Waitrose Duchy Organic Soft Cheese straight out of the tub).

Sea salt

Cayenne pepper


Instructions

Peel, stone and mash the avocado with the lemon juice then mix together with the soft cheese, sea salt and cayenne pepper to taste until it is completely smooth and creamy - this is best done in a food processor or with a hand-held blender.  

Serve as a dip with Green Pea Fritters or crudités.


Roasted Cauliflower & Mushroom Curry (Serves 4)

Ingredients

1 medium head of cauliflower, broken into small bite-sized florets

1 large onion, finely chopped

3 tbsp olive oil

250g button mushrooms

1 x 2½ cm piece of fresh ginger, grated

1 tbsp ground coriander

1 tbsp ground cumin

1 tbsp garam masala

1 tsp chilli powder

1 tbsp Marigold organic vegetable bouillon powder

400ml full-fat organic  coconut milk

sea salt and freshly ground black pepper

a large handful of fresh coriander, chopped - to garnish


Instructions

Pre-heat the oven to 200℃ / 400℉ / Gas mark 7

In a large bowl, toss the cauliflower florets in 2 tablespoons of olive oil and season with freshly ground black pepper.

Tip onto a non-stick roasting tray and roast for 25 minutes, turning occasionally until the cauliflower is nicely browned. Remove from the oven and set aside.

In a wide, shallow pan set over a moderate heat, fry the onion in the remaining olive oil with the pan lid on for about 8 minutes, stirring from time to time, until softened and starting to brown.

Add the mushrooms and ginger and cook for another 1-2 minutes, stirring. Stir in the spices and bouillon powder and cook for another minute.

Add the coconut milk and season to taste. Bring to the boil then stir in the cauliflower.

Reduce the heat to low, cover the pan and cook for about 5 minutes. 

Ladle into warmed bowls and top with plenty of fresh coriander. 


Notes

I was in two minds about the Primal Pronto status of the Green Pea Fritters and Roasted Cauliflower & Mushroom Curry because both these recipes are so easy and fuss-free. In the end I decided that Primal Pronto should be defined as: a recipe with 5 or less main ingredients, or one that can be prepped, cooked and on the table within 45 minutes. The Roasted Cauliflower & Mushroom Curry didn’t quite make it on both counts (realistically it’s takes more like 50 minutes to make) but it is still wonderfully warming comfort food that’s simple to prepare. It’s also suitable for vegans.  

You can defrost the peas quickly by putting them in a heat proof jug and pouring boiling water over. Allow to stand for a few minutes, then drain well and proceed with the recipe. 

The uncooked pea fritter batter can be made well in advance and stored in the fridge overnight. The mixture will make approximately 16 small or 8 large fritters. I use a heaped tablespoon to make the bite-sized ones and a ¼ US cup for bigger ones.

Two large Green Pea Fritters per person served with a medium/soft boiled egg and a dollop of avocado cream is great for a fast and easy low-carb brunch or supper.

If you can’t get button mushrooms for the curry, use closed-cap mushrooms cut into halves or quarters instead.


Carbohydrate 14g Protein 11g - per serving (4 small or 2 large) of Green Pea Fritters

Carbohydrate 5g Protein 2g - per serving of Avocado Cream

Carbohydrate 22g Protein 8g - per serving of Roasted Cauliflower & Mushroom Curry


Primal Pronto Energy Bars

by Susan Smith in ,


Fast, no-bake Primal Pronto Energy Bars will keep everyone coming back for more. And why not? Full of energy-boosting nutrients and resistant starch, these grain-free, gluten-free, naturally sweet nibbles can be enjoyed at any time you feel yourself flagging, or when you just fancy something sweet to eat, because they don’t contain refined sugar. 

Great for kids as a Bonfire Night treat, to take on long autumnal walks or as a pre or post-workout snack, these energy bars will revive and sustain you with delicious fudgy, chocolatey goodness.

With only 5 ingredients, they should only take about 15 minutes to bring together (plus 30 minutes to chill). But be warned, they’re more-ishly yummy and can disappear faster than you can make them! 

Primal Pronto Energy Bars (makes 12)

50g coconut oil

150g organic Medjool dates, stoned weight (about 8 dates)

150g milled tiger nuts

50g raw organic cacao powder

1 tbsp organic pure vanilla essence


Instructions

Boil a kettle of clean water.

Remove the stones from the dates then put them in a small heavy based saucepan with enough boiling water from the kettle just to cover. On the hob, bring the water back to the boil then reduce the heat to very low and simmer the dates for 5 minutes to soften. Drain well.

Place the coconut oil in a small saucepan over a low heat until just melted, take off the heat and allow to cool slightly.

Put the softened dates, milled tiger nut flour, cacao powder, vanilla essence and coconut oil into a blender or food processor and process until all the ingredients are fully combined.

Transfer the mixture into a shallow dish or baking tin, pressing it down well and spreading it out evenly. Smooth the surface with a flat edge spatula (or the back of a metal spoon) and mark into even pieces. 

Put the mixture into the freezer for 30 minutes, then refrigerate until you’re ready to serve.


Notes

Cut into small squares and decorated with edible flowers or flower petals these make elegant petits fours to serve with an espresso coffee as a grand finale to a special meal. 

I used a small Waitrose (24.5cm x 17.5cm / 9½ x 7”) non-stick baking tray, which was the perfect size for these energy bars.


Carbohydrate 19g Protein 2g

Although they're an ideal portable outdoor snack, they're also a real after-dinner treat served with coffee. 

Although they're an ideal portable outdoor snack, they're also a real after-dinner treat served with coffee. 


Chocolate Tiger Nut Stollen Bites

by Susan Smith in , ,


If you had a go at making Tiger Nut Horchata last week, you might be thinking that despite the tiger nut pulp leftovers (I just feel guilty for throwing it away), horchata is such a delicious, healthy drink it deserves to be a ‘keeper’. If so, today’s recipe for Chocolate Tiger Nut Stollen Bites answers the need for thrift by transforming tiger nut pulp into a superfood energy bite that’s as enticing as tiger nut milk itself.

On the other hand, if you haven’t yet tried homemade horchata, this week’s recipe might just be the means to an end…

Chocolate Tiger Nut Stollen Bites are simply yummy - chocolatey, fudgy, fruity and nutty all at the same time - but they won’t cause your blood sugar levels to spike. A really healthy option when you’re craving something sweet, these chocolate-coated balls of fibre-rich goodness are packed full of  vitamins, minerals and protein and are perfect to enjoy anytime you feel the need for an energy-boosting snack. I find them seriously addictive with my favourite morning Nespresso, so the next time I make a batch of Tiger Nut Horchata, I’ll be using up all the residual tiger nut pulp in one go and doubling up the recipe below for these irresistible, no-added sugar sweeties!

They’re also dainty and elegant enough to serve as after-dinner petits fours.

Chocolate Tiger Nut Stollen Bites (Makes 32 ‘bites’)

Ingredients

50g whole almonds

50g pecans

100g tiger nut pulp (left over from making horchata)

100g (about 6-8) Medjool dates, with stones removed

50g organic Goji berries

30g coconut butter

45g dark chocolate chips

¼ tsp sea salt

For chocolate coating (optional)

75g chocolate chips, melted

Extra Goji berries, for decoration (optional)


Instructions

Put half the almonds and pecans into a food processor and pulse together until they are coarsely chopped into small pieces (the texture should be slightly coarse with some bigger pieces, to add ‘bite’ to the final mixture). Tip the chopped nuts out into a bowl and set aside.

Add the remaining almonds and pecans to the bowl of the food processor and whizz until very finely chopped. Add the tiger nut pulp and whizz some more until everything is well combined.

Add the pitted dates to the mixture and whizz again until the mixture becomes sticky and starts to form a dough. 

Add the Goji berries and coconut butter and process again until well incorporated. Keep whizzing until you have a thick smooth paste (the texture of almond paste/marzipan).

Add the chocolate chips, sea salt and the reserved chopped nuts and pulse (minimally) several times to ensure that the chocolate and nuts are evenly distributed throughout the mix whilst still retaining their texture.

Roll the mixture into small balls between the palms of your hands (10g per ‘bite’ is just the right amount) and store in the refrigerator.

For chocolate coating, melt 75g of chocolate chips in a heatproof bowl set over a barely simmering pan of hot water (do not allow the bottom of the bowl to touch the surface of the water).

When the chocolate is melted, stir with a metal spoon until it is smooth and glossy then remove from the heat. 

Using a couple of teaspoons to help you, carefully drop the tiger nut stollen balls one at a time into the melted chocolate and turn them over and around until evenly coated. Allow any excess chocolate to drip back into the bowl before placing each coated bite onto a baking tray lined with waxed paper. Leave alone until completely set. Decorate each with a single Goji berry, if liked.

Store in an airtight container in the fridge for up to a week - though they’re highly unlikely to last that long!

Notes:

You don’t have to cover Chocolate Tiger Nut Stollen Bites in melted chocolate but I think the chocolatey-taste-hit and ‘snap’ of the cold chocolate shell surrounding a soft, fudgy centre makes for a decidedly more decadent experience.

Dark chocolate can develop a whitish-grey ‘bloom’ on its surface when kept in the fridge. Although blooming may make the chocolate look less appetising it is still perfectly safe to eat. I deliberately didn’t ask Sarah at Mirror Imaging to photograph my tiger nut stollen bites until they were four days old and, as you can see, they look fine - not as glossy as chocolate kept at room temperature but still looking good. 

I coined the name ‘Stollen’ (a traditional German Christmas cake) for these little bites because that’s what their taste and texture remind me of, though I didn’t want to wait for next Christmas to share the recipe! When the time is right, a dash of ground cinnamon added to the mix would certainly make for a distinctly Christmassy treat.

The Goji berry is a nutritionally rich, dried red fruit from Tibet, Quinghai Province that is packed full of minerals, including zinc, calcium, selenium and iron. Goji Berries contain more than 11% protein, including 18 amino acids and all 8 of the essential amino acids. They’re also very rich in beta-carotene and supply up to 500 times more vitamin C than oranges! 


Carbohydrate 7g Protein 1g - per bite


Primal Carrot Hummus

by Susan Smith in , ,


This delicious Primal-friendly carrot hummus (without a chickpea in sight!) is just right for a light lunch or snack with crudités, served as part of a mezze (a selection of small dishes), as a sandwich filling or, as we ate it last night, simply dolloped on top of a sweet potato, goats cheese and spinach frittata.

It will keep covered in a refrigerator for up to a week. 

Primal Carrot Hummus (V)

Ingredients

1 tsp cumin seeds

1 tsp coriander seeds

6 tablespoons olive oil

1 tsp raw clear honey

500g (1lb 2oz) organic carrots, peeled (prepped weight about 460g/1lb)

Juice of 1 organic lemon

3 tbsp smooth almond butter

2 tbsp raw organic sesame tahini

Sea salt and freshly ground black pepper


Instructions

Pre-heat the oven to 200℃ / ℉ / Gas mark 6

In a small dry frying pan (i.e. do not add oil) over a medium heat, toast the cumin and coriander seeds until they’re fragrant - this only takes about a minute, do not let them scorch! Tip into a pestle and mortar (or use a small bowl and the end of a rolling pin) and grind to a fine-ish powder. 

In a large bowl whisk 4 tablespoons of olive oil with the honey and toasted spices.

Cut the carrots into 4-5 cm (about 2”) chunks and add to the dressing. Season with salt and pepper and toss to coat. Tip into a small roasting tin and roast for 35 minutes. 

Remove from the oven and allow to cool slightly. Then scrape everything into a food processor (or use a hand-held blender) Add the lemon juice, the almond butter and tahini with the remaining 2 tablespoons of olive oil and blitz to a smooth puree. 

Taste, adjust the seasoning and blend again to incorporate if necessary. 

Refrigerate until required. 


Ratatouille with Roast Cod and Parmesan Crisps

by Susan Smith in , , , , , ,


In my book, ratatouille made from multi-coloured Mediterranean vegetables is probably one of the best vegetarian meals ever invented!

I was first introduced to this classic dish in the 1960’s through A Book of Mediterranean Food by Elizabeth David. Up until then, fresh, sun-ripened ingredients such as aubergine, courgettes and bell peppers were relatively unheard of, and virtually impossible to source in the UK. Thankfully, food shopping has come a long way since then!

Originally, an ancient French peasant dish made from coarsely chopped fresh summer vegetables (the word ratatouille comes from the French touiller, which means to stir), this iconic vegetable stew made from onions, tomatoes, courgettes, sweet peppers and aubergines is now an all-year-round favourite - although in the depths of winter I think you would be well advised to use tinned plum tomatoes instead of the seemingly non-existent fresh ripe ones!

There are numerous modern interpretations of this dish but it seems to me that this simple version, which is made on top of the stove rather than in the oven, is the most authentic and thus ratatouille at its basic best. I’ve loosely based it on Raymond Blanc’s recipe in Cooking For Friends.

For this blog post, I’ve suggested taking ratatouille into dinner party territory by partnering it with Roast Cod and Parmesan Crisps - although, as French peasants obviously knew, it is equally good for every day eating. Keep it simple, serve with our grain-free bread still warm from the oven and a salad for a main course, or as a side dish. It really comes into its own served cold the next day too. I also like to use it in ratatouille omelette. In fact, serve it hot, serve it cold, serve it any way you like! This low carb medley of vegetable goodness will remind you of summer. 

Ratatouille (V) with Roast Cod and Parmesan Crisps (Serves 4)

Ingredients - for the ratatouille 

50ml (2fl oz) extra virgin olive oil

25g (1oz) butter

150g (5oz) onion, finely chopped

1 large red pepper

1 large yellow pepper

1 medium aubergine

1 large courgette

2 ripe plum tomatoes (I used Mr Organic tinned plum tomatoes)

1 sprig of fresh thyme, leaves only

Sea salt and freshly ground black pepper


Instructions

Cut the stalk end off the aubergine then cut it into 1cm (½ inch) dice. Layer the aubergine dice into a colander liberally sprinkling them with salt as you go. Put a plate underneath the colander (to catch the juices) and another plate on top, weighted down with something heavy (I use a kettle filled with water) Set aside to drain for 30 minutes.

Meanwhile, cut the top and bottom off the courgette and remove the stalks and seeds from the peppers. Cut all the vegetables (courgette, peppers and tomatoes) into 1cm (½ inch) dice. Keep the vegetables separate at this stage. If you’re using tinned tomatoes remove any core, skin or daggy bits before roughly dicing.

In a large deep frying/sauté pan heat the oil and butter together over a medium heat. Add the finely chopped onion and thyme leaves to the pan and cook for 5 minutes, stirring from time to time. Do not let the onion brown.

Dry the aubergine on paper kitchen towel, then add the aubergine and pepper dice to the onion and cook for a further 5 minutes.

Meanwhile, boil 1 litre (1¾ pints) water in a kettle. Pour the boiling water into a separate pan, add some salt then blanch the diced courgettes for 3 minutes. Drain and refresh under cold water.

Add the courgettes to the rest of the vegetables and cook for another 5 minutes until they are turning golden, then add the tomatoes. Give everything a good stir, cover with a lid and continue to cook for a further 10 minutes until all the vegetables are meltingly tender. 

Taste, then  season with sea salt and freshly ground pepper.


Ingredients - for the roast cod

4 x 225g (8oz) sustainably sourced cod fillets, skinned

1 tbsp Clearspring organic sunflower frying oil

15g (½ oz) unsalted butter

Sea salt & freshly ground black pepper

Lemon juice, to serve


Instructions

Preheat oven to 200℃/ 400℉/ Gas mark 6. Skin and bone the cod fillets (if this hasn’t already been done for you by your fishmonger).

Heat the oil and butter together in a large non-stick frying pan over a medium heat. When the butter has stopped foaming place the cod fillets into the pan, presentation side down i.e. skinned side uppermost.

Pan fry the fish until lightly browned (about 5 minutes). Season with salt and pepper.

Carefully turn the fish fillets over and transfer to a non-stick baking tray (now skinned side down) and cook in the oven for 8-10 minutes.

Finish with a little more sea salt and a squeeze of lemon juice. 


Ingredients - for the Parmesan crisps (makes 8) 

150g freshly grated Parmesan cheese


Instructions

Preheat oven to 200℃/400℉/Gas mark 6 

Place a 7cm ring or cutter onto a large non-stick baking tray.

Sprinkle 2-3 teaspoons of Parmesan into the middle of the ring and use your fingers or the back of a spoon to compact the cheese down. 

Remove the cutter and repeat - leaving sufficient space in-between so that the crisps don’t merge into each other when cooking.

Cook for 4-6 minutes or until lightly golden. Remove from oven and allow to cool completely on the baking tray. 

Remove from the tray with a palette knife and store in an airtight container. 

Use within 7 days. 


Notes

It is always best to get organised by preparing all the ingredients listed in a recipe before you actually launch into cooking or bringing everything together. Professional chefs call this “mise en place” (putting in place) and it is a very effective way of staying on top of the situation when you’re cooking at home too. 

The ratatouille and the Parmesan crisps can be prepared well in advance - several days ahead, if needs be!

You can re-heat the ratatouille or serve it cold as an hors d’oeuvre.

Parmesan crisps are also great served as no-carb nibbles with pre-dinner drinks.


Carbohydrate 15g Protein 4g - per serving of ratatouille

Carbohydrate 1g Protein 38g - per serving of cod

Carbohydrate 0g Protein 12g - per parmesan crisp


Sweet Potato Chips with Homemade Mayonnaise

by Susan Smith in , , , ,


I like the convenience of always having a jar of good quality mayonnaise in my refrigerator. Unfortunately, even the best organic mayonnaise I can buy has corn syrup, corn starch and agave syrup in its line-up of ingredients. So, as far as eating a Primal diet is concerned, it doesn’t cut the mustard.

However, if you commit to making your own mayo, there’s still the problem of deciding what is the healthiest and the best-tasting oil to use. The choice is bewildering!

For health reasons I’d choose an organic, unrefined, cold-pressed oil such as extra virgin olive oil, avocado oil or macadamia oil. Unrefined oil, which usually means the oil is cold-pressed (mechanically extracted by pressure rather than heat) is much better for you because it retains all its nutrients and flavour.

On the other hand, for the non-overpowering taste and pale look of shop-bought mayonnaise, a refined oil would produce something that’s much more like Hellman’s, which is what most people think is the ‘real deal’ of mayonnaise.

The issue is, I do not want to use refined oils in my cooking because the likes of rapeseed oil (90% of the world’s rapeseed crop is genetically modified!), canola oil (canola oil is extracted from rapeseed), rice-bran, grape-seed, sunflower or pure and light olive oils are subjected to chemical solvents, de-gumming and neutralisation (doesn’t even sound healthy does it?) and this processing removes some of the oil's nutrients and essential fatty acids, as well as their natural flavour and colour.

Consequently, when it came to making mayonnaise for this blog post I found myself having a “Daddy or chips?” moment!

I’ve previously tried making mayonnaise using the best quality organic cold-pressed olive oil (the classic ingredient used for making homemade mayo) and believe me it tastes downright nasty! Its flavour profile is just far too bitter and overpowering for a salad dressing, to be lathered on top of a sandwich, to make a self-respecting egg mayonnaise or as a complement to chicken, meat or fish and, as far as I’m concerned, it would be absolutely ruinous to chips!

I’ve also tried avocado oil, which wasn’t much better. Furthermore, both unrefined olive and avocado oils impart a dark greenish hue to the finished mayonnaise, which I find unattractive. I really just want my mayo a pale-ish golden colour, please!

I still have a bottle of macadamia nut oil waiting in the wings, but for now I’ve decided it’s just a bit too pricey for another culinary mistake, so I decided to use a hybrid version of cold-pressed organic sunflower oil today and…whoop-de-doo-da! Third time lucky!

The reason the Primal community usually tries to avoid sunflower seeds and sunflower seed oil is because they are really high in omega 6 oil. Not that there’s anything wrong with this per se, it’s just that most people are already into omega-6 fat overload (especially if they eat grains and grain fed meat) so the healthy balance between omega 3-6-9 fatty acids, which should be in the ration of 2-1-1 is all out of kilter with good health.

But wait, not all sunflower oil is high in omega-6. There is an alternative high-oleic sunflower oil that’s organic, cold pressed, very stable at high temperatures (as in, suitable for deep fat frying) and has the same monounsaturated fat found in olive oil and your very own adipose tissue. It’s totally tasteless too, which makes it a really good oil for Primal mayonnaise.

So now you know what all the fuss is about, please try this recipe at least once in order to appreciate its enticing balance of velvety smoothness and precisely seasoned piquancy. This homemade mayonnaise can only ever make a Chicken Salad Sandwich (recipe coming soon) or in this case, Sweet Potato Chips even nicer! I promise you, shop-bought mayo doesn’t come anywhere close to the real thing.

Sweet Potato Chips with Homemade Mayonnaise (V) (Serves 4)

Ingredients - for the sweet potato chips

4 orange-fleshed organic sweet potatoes

2 tbsp organic extra virgin olive oil (or Clearspring organic sunflower frying oil)

Celtic sea salt


Instructions

Pre-heat the oven to 200℃ / 400 ℉ / Gas mark 6

Cut the sweet potatoes into even-sized chunky chips (thick wedges) 

Put the chips into a large bowl with the olive oil and sea salt, mix thoroughly together with your hands so that the chips are evenly coated in the oil and salt.

Spread the sweet potato chips out onto a lipped baking tray in a single layer. Roast in the oven for 20 minutes, then take the tray out of the oven and turn the chips over to ensure even browning. Return to the oven for a further 10 to 15 minutes until they are nicely crisp and brown.

Remove from the oven, and tip on to plate lined with a paper towel. Sprinkle over a little more sea salt, if liked and serve immediately with homemade mayonnaise.


Ingredients - for the mayonnaise

2 large organic egg yolks

Sea salt and freshly ground black pepper

1 tsp raw cider vinegar 

½ tsp English mustard powder

240ml Clearspring organic sunflower frying oil

10ml organic extra virgin olive oil

1-2 drops liquid steviaoptional

Lemon juice or extra vinegar, to taste

1-2 tbsp warm water to thin down, if liked


Instructions

Make sure that all the ingredients are at room temperature before starting.

Combine the oils in a drip-free jug.

Whisk the egg yolks, salt, pepper, mustard power and cider vinegar in a bowl for a a minute or so. 

Gradually and slowly start to add the oil to the egg yolk mixture a drop at a time, keep whisking all the time after each addition of oil to ensure it is properly incorporated before adding more oil. Do not try to rush things at this stage otherwise the mayonnaise will split. Keep adding the oil drop by drop. As the mixture thickens, you can then start to add it more quickly. 

By the time all the oil is added you will have a thick stable mayonnaise that holds its shape. Taste it, adding more salt and pepper, mustard, lemon juice or vinegar and a drop of liquid stevia, only if you think it needs it. You can also add other flavourings such as chopped herbs. If you would prefer a thinner mayonnaise, add a little warm water (1-2 tablespoons) as well. 

Keep the mayo refrigerated until you’re ready to eat it. 


Notes

This quantity of mayonnaise makes enough for 8 people. Halve the recipe if this is too much for your family to get through within 3 days - it needs to be eaten within that time due to the inclusion of raw eggs. 

In spite of us being in the midst of a 21st century obesity epidemic, many people still believe conventional wisdom, which says calorie counting and a low-fat diet is the key to weight loss. The reality is, if you’re trying to lose weight and stay that way, it’s sugar in all its forms that you need to seriously restrict, not healthy fats. 

Remember, essential fatty acids are just that. They are ’essential’ because the body needs them, it can’t make them and they must be obtained from the food you eat, so please don’t try to omit healthy fats from your diet. It’s worth noting that unrefined oils, such as Coconut Oil, is 100% fat but is said to aid in weight loss! 

I personally take daily supplements of fish and butter oil to ensure I get enough of the omega-3 fatty acids. These are associated with many health benefits including protection from heart disease and stroke. New studies are identifying potential benefits for a wide range of other conditions including cancer, inflammatory bowel disease and other autoimmune diseases such as lupus and rheumatoid arthritis.


Carbohydrate 21g Protein 4 g - per sweet potato (100g weight)

Carbohydrate 2g Protein 4g -  per serving of mayonnaise


Wild Smoked Salmon & Prawn Pâté

by Susan Smith in , , ,


The deliciously deep rosy colour of this Wild Smoked Salmon & Prawn Pâté with its soft texture and sweet flavours that hint of the sea, is food to fall in love with. Quick and easy to make, it is a truly indulgent starter for any special occasion.

Spread it lavishly on slices of crisp crostini (see the recipe for perfect crostini here) and serve with a glass of chilled Champagne and I think you could literally have your lover eating out of your hand!

I specifically chose wild Alaskan smoked salmon for this recipe because by going wild you get a firmer less fatty fish with a natural intense colour. Besides, it just doesn’t seem very loving to feed my man farmed fish that’s been fed on pellets containing antibiotics, growth hormones and artificial colour!

To make this seafood pate even more luxurious (and a little less salty) I combined the smoked salmon with some big juicy Canadian cold water prawns.

If this little number doesn’t impress your Valentine, I don’t know what will!

Wild Smoked Salmon & Prawn Pâté (Serves 2)

Ingredients

50g (2oz) wild Alaskan smoked salmon 

25g (1oz) large Canadian cold water prawns, defrosted

100g (3½oz) full-fat soft cream cheese

50g (2oz) unsalted butter, melted and cooled

½ small lemon, juiced

Large pinch cayenne pepper

2 lemon slices

8 whole prawns, defrosted

Flat leaf parsley 


Instructions

Cut the salmon and the prawns into small pieces (I used kitchen scissors). Place the salmon and prawns in a blender with the cream cheese, melted butter, cayenne pepper and lemon juice.

Pulse the ingredients until mixed together well but not completely smooth - you need to retain a little texture. Taste the pâté and add a little more lemon juice if needed.

Spoon the mixture into two small ramekin dishes. Level the surface, cover with cling film and chill for 2 hours.

When you’re ready to serve, cut a thin slice from a whole lemon, cut it into two halves (remove any pips) then slice each half from its centre to the rind (don’t cut through the rind) then turn both ends in opposite directions to make a ‘twist’ and place one lemon twist on top of each pâté. Arrange two prawns on each side of the lemon slices (4 prawns per person) and garnish both with a small sprig of flat leaf parsley.


Notes

Wrapped tightly in cling film, this pâté will keep for for several days stored in a refrigerator.

Don’t add any salt as the smoked salmon has enough salt to sufficiently flavour the pâté without.

If you don't have time or don't feel confident enough to make crostini, whole red Belgian chicory leaves are a fresh and flavourful accompaniment to the pâté. They're also virtually carb-free and the pale red leaves look very pretty!

You could also add some finely chopped fresh chives or dill to this pâté but I much prefer its unadulterated rosy pink colour. For the same reason, I used cayenne pepper rather than freshly ground black pepper because I think black flecks running through the mix would spoil its appearance. 


Carbohydrate 2g Protein 10g - per portion


Primal Perfect Shortbread

by Susan Smith in ,


These Primal Perfect Shortbread biscuits are wonderful with a cup of tea but when I was making them I transported myself in my mind to a quintessential Best of British afternoon tea party, where they could be rightfully celebrated dolled up with the first strawberries of the season and cream. No doubt this idea will manifest as a future recipe on Primal Plate!

For now, they are a simple pleasure to share and enjoy without spiralling into a sugar and starch overload. Classic shortbread contains just three ingredients: flour, white sugar and butter. Grains and refined sugar are both strictly off-limits for low carbers, so I’ve fiddled and diddled around with various ingredients (good quality butter is still compulsory!) and I think that this Primal Perfect Shortbread comes very close to the real thing.

True, it is much darker in colour than the pale gold of Scottish shortbread due to the coconut palm sugar (my shortbread is only that pale gold before it goes into the oven!) but at the same time it’s this coconut sugar that gives a slight gritty texture, synonymous with shortbread recipes that suggest adding polenta for extra crunch. Also, coconut sugar combined with my ‘secret’ ingredient Ndali vanilla essence makes for a truly scrumptious butterscotch flavour to this shortbread, which in our house has proven to be quite addictive.

You might think, judging by the recipes I’ve posted to date, I have a sweet tooth, which in fact I don’t. What I want to demonstrate is that eating no grains, no refined sugar and low carb foods does not mean missing out. Nor does it mean that if you indulge yourself sensibly, you’re going to get fat or sick.

I get a buzz from sharing these delicious, nutritionally sound, low-carb versions of everyone’s favourite foods, knowing that they are the key to effortless weight loss and better health. Equally, I like to confound expectations that something, somehow, must get lost in translation if you’re eating low-carb, relatively high fat food (no hydrogenated/trans fats here please!) and baking without flour and refined sugar!

In my view, you can forget about Walkers because nothing comes close to a real-food version of plain home-baked shortbread. Not too naughty, just very, very nice.

Primal Perfect Shortbread Recipe (V) (Makes 12 pieces)

Ingredients

90g (3 oz) salted butter (if you’re not using salted, add a pinch of salt)

160g (6 oz) ground almonds 

40g (1½ oz) raw coconut palm sugar

25g (1oz) organic coconut flour

15g (½ oz) arrowroot powder

½ tsp baking powder

1 tsp vanilla extract


Instructions

Preheat your oven to 130℃/ 250℉/ Gas mark ½

In a small saucepan, melt the butter over a low heat.

In a medium bowl, mix together the ground almonds, coconut sugar, coconut flour, arrowroot and baking powders (and pinch of salt, if using).

Make a well in the centre of the dry ingredients and add the melted butter and vanilla essence. Stir thoroughly so everything is mixed together really well. Then using your hand, squash it together into a soft, cohesive dough. 

Lay a sheet of non-stick baking parchment on top of a baking tray then put the dough directly on top of the paper and pat it down flat. 

Continue to pat or lightly roll it out until it’s an even 1 cm thick round circle (I use an 8 inch cake tin liner placed under the parchment paper to get the right size and shape and a piece of cling film laid on top to save my hands or the rolling pin getting too greased up) - if the dough splits or tears just press it back together with your fingers but don’t overwork it, the less you handle it, the better.

Once it’s the shape you want, use the prongs of a fork to mark the outside edge and score lines across the shortbread so it can be broken into individual biscuits later. Rest the dough by chilling in the fridge for 15 minutes. 

Put the baking tray in the oven and cook for about an hour.

Let it cool completely before serving. These biscuits will be delicious for several days stored in an airtight tin or container, though I suggest you hide the tin if you want them to last that long!

Notes

I make the coconut sugar a little bit finer for this recipe by grinding it down in a pestle and mortar. If you don't have one of these you could try passing the sugar through a coarse metal sieve instead.


Carbohydrate 6g Protein 3g - per  biscuit

IMG_4035 copy.jpg

Little Ham and Egg Pies

by Susan Smith in , , , ,


Unusually, for someone who embraces Primal living, I don’t eat much meat. When I do it’s a) because 'fast' meat dishes like steak and salad are my go-to easy option when I'm just too busy or b) I believe it’s the best or only option available to me when I’m eating out. Either way, in spite of enjoying the taste of meat and knowing that it can in fact be a nutritionally sound choice, I’m usually at odds with my decision. 

I was in fact vegetarian for over a decade because I believe that the animal cruelty involved in factory farming of around two in every three farm animals today (that’s over 50 billion animals a year!) is an abomination; a testament to man's stupidity. Not only is our insatiable appetite for cheap food causing so much suffering to farm animals, it’s trashing the environment and fuelling climate change too. Quite apart from the stress and disease that cramming farm animals together causes, it seems obvious to me, and somehow only fair in the face of ‘farmaggedon’, that human health is also at risk. By eating meat from animals that have been routinely injected with drugs such as antibiotics and growth hormones and animals given unnatural animal feed - grains grown with pesticides, herbicides and fungicides - we’re exposing ourselves to disease too. So if you want to protect your health, the answer is to only eat pasture raised meat - namely, meat from animals that have been allowed to roam freely on lush grass. I recommend Green Pastures Farm

That said, these Little Ham and Egg Pies (original recipe from Simple Food by Jill Dupleix) have been a life-saver when I’m on the move and I’ve needed something quick and easy to eat. Tasty and sustaining, they really come into their own when we’re working flat-out at a Mirror Imaging wedding. Travelling between venues, Sarah drives whilst I feed these little protein packed morsels into both our mouths at the same time!

Also handy for a school lunch box, picnic fare, a high protein snack after a work-out, breakfast on the run, to serve with drinks, or served warm for a light supper or brunch. I’ve even converted the recipe into making ‘tiny’ ham and egg pie canapés using quails eggs and Parma ham! Little Ham and Egg Pies are all-rounders. They’ll keep for up to three days in a refrigerator. 

Little Ham and Egg Pies (Makes 12)

Ingredients

1 tsp olive oil or butter

12 slices best quality ham

12 large organic free range eggs, preferably pastured

2 tbsp double cream

Sea salt 

Freshly ground black pepper

2 tbsp chopped parsley

4 tbsp Parmesan Reggiano, freshly grated


Instructions

Heat the oven to 180℃ / 350℉ / Gas mark 4

Lightly oil a 12 hole muffin tray with melted butter or olive oil

Line the base and most of the sides of each mould with a slice of ham. Break an egg into each hollow.

Drizzle a little cream over each 'pie' and scatter with sea salt, pepper, parsley and parmesan.

Bake for 15 to 20 minutes until the egg is just set and starting to shrink away from the sides of the tin.

Leave to cool for 5 minutes, then run a small knife around the mould to loosen the ham and egg. Remove to a wire tray.

If there are any straggly pieces of egg white left on the bottom of the ham just wipe away for a neater appearance.

Eat warm or at room temperature.


Notes

Buy the best quality ham you can afford, preferably organic and free-range.

Your average slice of processed meat does not come from a grass-fed pastured animal so don’t base your diet around cured meats such as bacon, ham charcuterie etc.  A little eaten occasionally is okay but treat cured meats as an adjunct to vegetables, fruits and fresh meat.

Also, go easy on the salt when you’re seasoning these ham and egg pies because often processed ham is heavily salted already. 


Carbohydrate 0g Protein 13g - per serving


Smoked Salmon & Cream Cheese Canapés

by Susan Smith in , ,


I like cheese and biscuits but unfortunately most of the crisp-breads and crackers you can buy are made from grains and therefore totally incompatible with Primal eating. Here is an excellent alternative to starch-based crackers that we actually prefer to anything shop-bought. 

The starch-free, gluten-free, melt-in-the-mouth almond pastry used for today’s recipe is the brainchild of Jackie Le Tissier, author of Food Combining For Vegetarians. It has become almost legendary in our household. 

Using ground almonds instead of starch-based flour makes for an almost no-carb pastry that really is a brilliant substitute when making savoury or sweet tarts, canapés and crackers for cheese.

There are many variations of nut and seed pastry you can bake using different ground nuts and seeds - walnuts, pecans, poppy, caraway and sunflower seeds are some alternatives. However, this is our favourite ‘combo’.

Sarah is a dab hand at making these moreish mouthfuls and, since she espied some smoked salmon and Champagne in my fridge this morning, volunteered to get cooking. There is method in her madness, after photographing them for Primal Plate, she hopes to get to eat some of them later with a customary glass of fizz!  

It’s Burn’s night tonight, so why not? I’ll happily forego ‘neeps and tatties’ in favour of these traditionally peat-smoked Scottish salmon delicacies.

Smoked Salmon & Cream Cheese Canapés - Makes 20 canapés (with approx 30 crackers-for-cheese leftover)

Ingredients

200g (7oz) ground almonds

1 tsp baking powder

½ tsp almond essence

25g (1oz) butter, melted

2-3 tbsp diluted milk (to dilute the milk, mix 2 tbsp milk & 2 tbsp water together) 

200g cream cheese (I like Waitrose’s Organic Creamy Cheese because it’s soft enough to use it straight from the fridge)

150g best quality smoked salmon 

Fresh dill

Freshly ground black pepper


Instructions

Pre-heat the oven to 190℃ / 375℉.

Combine the ground almonds, baking powder and almond essence in a bowl.

Mix in the melted butter and diluted milk, stir everything in together with a fork. 

Bring the mixture together with your hand to achieve a firm but moist dough (the warmth of your hand will help to do this by releasing the oil in the nuts).

To stop the pastry from sticking to your work surface or rolling pin, roll out half the dough thinly between two sheets of cling film to 2-3mm thickness. Cut into rounds with a 1½ inch scone cutter and lift carefully onto a non-stick baking sheet. Gather up the offcuts and add them to the rest of the mix. Roll out the remaining dough and repeat as above.

Bake the biscuits for 8-12 minutes or until golden and firm in texture. Some of the crackers may be ready before others so remove these first onto a wire cooling rack, then put the rest back into the oven for another minute or two until they are all lightly and evenly browned.

Transfer to the wire rack and allow to cool completely. 

When you are ready to serve the canapés, pipe or spoon about 1 tsp of cream cheese onto each cracker. Divide the smoked salmon into 20 even pieces and top each canapé with a twirl of smoked salmon. For a final flourish garnish with a sprig of fresh dill and a twist of freshly ground black pepper.

Serve immediately with drinks.


Carbohydrate 1g Protein 3g - per canapé


Nut & Seed Granola à la Paleo Trail-Mix

by Susan Smith in , ,


The headlines in yesterday’s papers caught my eye. A lack of exercise could be killing over 600,000 people a year in Europe and, according to the 12 year study by Cambridge University researchers, inactivity is proven to be twice as deadly as obesity! Furthermore, inactive thin people have a higher risk of health problems,  which suggests to me that obese people who exercise are in a better state of health than thin people who do not!

Don’t panic! You simply need to put on a pair of walking shoes and go for a walk! Walking became an integral part of my ‘get well soon’ strategy just over a year ago, which was when I first discovered Mark Sisson’s Primal Blueprint.

I believe that it’s the little things done often that can have the most impact on your life. Last year, walking at a moderate pace for 30-40 minutes five times a week on average, I clocked up 626 miles (1000 kilometres), which is the equivalent of walking from Penzance to Dundee! And I burned 39,500 calories in the process! How fabulous is that for minimal effort? Fat or thin, regular walking at a moderate pace (not the same as a gentle stroll!) is the easiest way to keep yourself fit.

Anyway, my husband is already ahead of the game. Even before this latest scientific revelation from Cambridge University, he had upped the anti for my exercise regime to 800 miles in 2015. Sounds good to me.

Probably one of the most frequent questions I’m asked about my diet is “What do you have for breakfast?” I assume what they mean is that most people choose cereal or toast, if only for convenience. If this is true for you, the recipe today is a breakfast ‘cereal’ without the cereal. Namely, a Paleo version of granola that is made entirely from nuts, seeds, raw honey and coconut oil.

I like mine for breakfast with raw milk, which I buy from Gazegill Organics. But it’s also great to eat by the handful when you’re on the move. Pack some into a ziplock bag when you’re going to be out and about and you don’t know where your next meal’s coming from. It is a satisfyingly crunchy, sweet and healthy snack, which eaten on its own boasts a mere 14 grams of carbohydrate per adult serving.

You can use any combination of nuts and seeds you like but we find this recipe particularly pleasing…

Nut & Seed Granola à la Paleo Trail-Mix (18 servings) (V)

Ingredients

55g Brazil nuts, chopped into rough pieces
75g raw whole almonds
100g flaked almonds
110g cashew nuts
150g raw pistachio nuts
75g pecan nuts
70g walnuts
70g macadamia nuts
50g hazelnuts
30g chia seeds
70g sunflower seeds
70g pumpkin seeds
75g flaked coconut

25g coconut oil
50g organic honey


Instructions

Pre-heat the oven to 140℃ Gas Mark 1.

Line two large baking trays with a silicon baking mat or non-stick baking parchment.

Weigh out all the dry ingredients into a large mixing bowl - you should have a total weight of 1 kg of nuts and seeds.

Melt the coconut oil and honey in a small saucepan over a low heat until just liquid.

Pour the liquid coconut oil and honey over the nuts and seeds and mix together well with a large spatula.

Spread the nuts and seeds out evenly between the two baking trays - they should be in a single layer.

Bake in the oven for 15 minutes. Take both trays out of the oven and, using a couple of flat wide spatulas turn the nuts and seeds over and around to ensure even cooking.

Return to the oven for another 15 minutes. Repeat the above process, making sure the more golden coloured nuts are moved to the centre of the tray and the less so to the outer edge.

Return to the oven for a final 15 minutes cooking time. Take out of the oven (total cooking time 45 minutes) and allow the mixture to cool on the trays.

When the granola is cooled, break up any big clumps into smaller pieces with your hands.

Store in an airtight container.


Carbohydrate 14g Protein 10g - per serving


Tangy Mushroom Crostini

by Susan Smith in , , ,


One of my best childhood memories was foraging for mushrooms with my Dad. Both field mushrooms and my father’s favourite, field blewitts, with their blue-lilac stems that we often found clumped together in ‘fairy rings’, used to be quite common in the pastureland and meadows of yesteryear. However, for me, nothing quite beat the excitement of finding pure white domes of edible goodness peaking out from under dew-laden grass, even if it meant the occasional slug finding it’s way inside my shoe! We even called our family cat “Gilly” because his fur was an unusual pinkish brown - almost the exact colour of the gills of a young mushroom.

 Chemical spraying and loss of habitat has all but destroyed the opportunity to discover, cook and enjoy the more flavourful wild mushrooms and most people now rely on cultivated mushrooms found on supermarket shelves instead. I suppose there is some compensation for the less than mushroomy flavour of cultivated mushrooms insofar that, alongside the more common white or chestnut varieties, more exotic looking fungi, Oyster, Shitake, Enoki, Crimini, Portabello and Beech Mushrooms, are all readily available too.

To add more flavour to sauces and soups, you can reconstitute dried mushrooms by soaking or simmering them in water before adding them to your chosen dish. For Vegetarians, the umami deliciousness of mushrooms can help fill the savoury flavour gap of vegetables and other non-animal based foods. Mushrooms are also officially recognised as a Superfood. Hence I reasoned that the next two Primal Plate recipes should both be for mushrooms on toast!

To prepare, don’t peel or soak mushrooms. If you soak mushrooms they absorb the water like a sponge and will then turn mushy when cooked. A quick light rinse under the tap is okay but ideally, if they’re not too grubby, simply cut off the bottoms of the stems and wipe them clean with a damp paper towel. Many herbs work well with earthy flavour of mushrooms but I particularly like the grassy accent of anise (tarragon) and parsley.

Tangy Mushroom Crostini is first up. This is an elegant interpretation of mushrooms on toast, suitable for entertaining. Coming soon... Creamy Mushrooms on Toast is more down-to-earth and makes for a relaxed breakfast, light lunch or filling snack at anytime.

Tangy Mushroom Crostini (Makes 8) (V)

Ingredients

1-2 day old refrigerated Grain-Free Bread, cut into 8 thin slices (no more than ½ cm thick)

4 tbsp olive oil

15g (1 tbsp) organic butter

225g (2 cups) mushrooms, wiped. I used a selection of chopped chestnut mushrooms and exotic mushrooms, either chopped or hand-teared into individual fronds.

1 tbsp brandy

1 generous tsp Dijon mustard

160ml (⅔ cups) crème fraiche

Sea salt and freshly ground black pepper

Handful of flat leaf parsley, finely chopped


Instructions

Pre-heat oven to 200℃ Gas Mark 6

Brush the bread slices on both sides with 2 tablespoons of olive oil. Put the slices of on a baking sheet - actually, I prefer to use the wire rack of my oven grill to get lovely looking professional griddle stripes!

Bake for 12-15 minutes until golden brown. Allow to cool.

Heat the remaining oil together with the butter in a large non-stick frying pan.

Cook the mushrooms for 4 minutes over a high heat until golden.

Add brandy and cook for a few seconds more. Remove from the heat.

Mix the mustard and crème fraiche together and stir into the mushrooms. Season well with salt and pepper.

Spoon the mushrooms onto the crostini and sprinkle with parsley


Carbohydrate 5g Protein 3g - per crostini