Raw Sugar-Free Raspberry Jam

by Susan Smith in ,


What to say about this jammy delight? Simply that it’s a healthy alternative to regular jam that can be made in less than 5 minutes flat. I recommend you keep a pot of it in your fridge to slather on toasted Vegan Paleo Nut & Seed Bread - trust me, there are few better ways to start the day than with freshly brewed coffee and pure raspberry jam spread thickly on buttered toast! 

Also delicious served with Grain-Free Scones, for making into smoothies, as a topping for yogurt or ice cream and for sandwiching together Primal Plate’s Vegan Victoria Sandwich Cake.

Raw Sugar-Free Raspberry Jam

Ingredients

200g organic frozen raspberries, defrosted

2 tbsp organic white chia seeds (white chia seeds are nutritionally identical to black chia but are visually more appealing! You can use either)

1½ tsp organic psyllium husks

1 tbsp organic lemon juice

30g Sukrin 1

1 tsp pure vanilla extract


Instructions

Place all the ingredients into a blender or food processor and pulse gently until just smooth. 

Taste and add a little more Sukrin:1 (or a couple of drops of liquid stevia) if you would like a sweeter jam.

Transfer the mixture to a glass container with a lid (I used a mason jar) and allow to set in the fridge.

Notes

This jam is veering towards the tart, which is how I like it! If you want it to taste more like regular jam (sweeter) and you’re not keeping to a keto (very low carb) diet, a tablespoon of raw, organic ‘runny’ honey or maple syrup (for vegans) would be a better choice.


Carbohydrate 36g Protein 8g - per whole pot of jam! 


Almond Apricot & Lemon Cake

by Susan Smith in


Whilst fresh, ripe apricots are a metaphor for summer, I couldn’t wait to bring the clocks forward by making this very useful, springtime Almond Apricot & Lemon Cake. All light and lovely - almonds and apricots are a fabulous pairing - I decorated my cake with a top layer of no-sugar almond paste and fresh wild violets from the garden in readiness for an Easter Sunday teatime treat.

The fact is, I’m not brilliant at cake decorating, so homemade almond paste, edible flowers, which smell divine by the way, and a pretty ribbon does the job. The result is a really moist, light, golden cake studded with small pieces of fruit, which isn’t a million miles away from traditional Simnel cake, but looks prettier. 

Gorgeous as this cake is, if you want something less fussy, simply top with a sifting of icing sugar and serve with coffee or, better still, mint tea. You can also try your own homemade Lavender Mint Tea.

The cake is then easily transformed into an ‘after dinner’ dessert by serving with poached apricots, rhubarb, plums or pears. Or you can substitute an orange for the lemon in the recipe and serve with a fresh orange salad and whipped cream. In my imagination, the cake eating possibilities for this simple, delicious cake are endless.

Easy to make, it keeps like a dream.  

healthy baking.jpg

Almond Apricot & Lemon Cake (Serves 12)

Ingredients - for the cake

1 organic lemon

100g organic sun dried apricots

6 organic eggs - preferably at room temperature

100g raw organic runny honey (raw acacia honey resists crystallization so retains its runny consistency without heating)

50g Sukrin:1

250g organic ground almonds

Sukrin Icing - for sifting over


Ingredients - for the almond paste, optional

125g organic ground almonds

25g Sukrin Gold

25g Sukrin icing sugar

1 tsp fresh organic lemon juice

1-2 tsp organic maple syrup

1 organic egg yolk


Ingredients - to assemble, optional

3 tbsp organic no sugar apricot jam

Edible flowers

Organic flaked almonds, lightly toasted

Ribbon


Instructions - to make the cake

Wash the lemon, then put it in a small saucepan and cover with cold water. Bring to the boil and simmer gently until soft (about 45 minutes). Take off the heat, add the dried apricots to the pan. Leave to cool.

Grease a loose-based 8” cake tin (preferably springform) and line the sides and base with non-stick baking parchment.

Pre-heat the oven to 150℃ / 300℉ / Gas mark 2.

Drain the lemon and apricots. Cut the lemon into quarters and remove any pips. Dry the apricots on kitchen paper then cut each one into several pieces. Put the lemon quarters and apricots into a food processor or blender and whizz together until very finely chopped into almost - but not quite - a smooth puree i.e. it needs to retain some texture.

Using an electric whisk, whisk the eggs, honey and Sukrin:1 together for about 6 to 8 minutes until they are pale and thick and until the mixture holds its shape for a few seconds when it’s flicked across the surface of the rest of the mix.

Whisk in the lemon and apricot puree. Then, using a large metal spoon or rubber spatula, gently fold in the ground almonds.

Pour into the prepared tin and bake for 1¼ hours, or until a cocktail stick inserted into the centre of the cake comes out clean. N.B. To prevent the cake from getting too brown, cover the top of the cake lightly with a circle of non-stick baking parchment after the first 45 minutes baking time. 

After you take the cake from the oven, leave it to cool completely in the tin, then turn out carefully and remove the paper. 

Dust the cake with Sukrin Icing just prior to serving.

gluten-free cake recipe.jpg

Instructions - to make the almond paste, optional

Put the ground almonds, Sukrin Gold and Sukrin Icing into a food processor and pulse to combine.

Add the egg yolk, lemon juice and 1 teaspoon of maple syrup and process until a soft, dry paste forms (takes about 1 minute). If it doesn’t come together into a malleable paste (test by squeezing a little of the mixture between two fingers to see if it holds together), add another teaspoon of maple syrup and whizz again. It’s a fine balance. The longer you process the almonds the more oil is released, which helps bind the mixture together. However, it you over-process it, the paste becomes too oily and sticky to handle.  

Form the almond paste into a ball then place between two sheets of cling film or baking parchment. Flatten slightly with the palm of your hand, then roll out evenly into an 8 inch (20 cm) circle. N.B. You can either draw a circle on the back of the bottom sheet of baking parchment to guide you or use a cake tin liner placed under the bottom sheet of cling film.


Instructions - to assemble the cake

Invert the cake onto a serving plate so that the bottom side of the cake becomes the top i.e. you have a completely flat surface to work on. 

Heat the jam slightly in a small saucepan and brush it over the top of the cake.

Remove the top sheet of parchment or cling film from the rolled out circle of almond paste, then with the help of the paper or cling film still underneath, lift the almond paste onto the top of the cake. Press down lightly with your hands, then peel away the remaining paper/cling film.

Crimp the edge of the almond paste with your fingers or alternatively create a pattern around the top edge of the cake by light indenting with the prongs of a fork or wooden skewer. Decorate with organic edible flowers, toasted flaked almonds and a matching ribbon (see photo).

Just prior to serving, sift a little Sukrin Icing over the top of the cake.  


Carbohydrate 13g Protein 9g - per serving of plain cake

Carbohydrate 16g Protein 11g - per serving of cake with almond paste

primal recipe cake.jpg

Sarah’s Taleggio, Broccoli & Leek Tart

by Susan Smith in


I am never one to say “No” to an invitation to dinner and last week Sarah surprised me by inviting us over to her’s…twice! It just so happens that’s she’s become a dab hand at making today’s recipe for Taleggio, Broccoli and Leek Tart - although after years of perfecting the art, neither of us can remember where her original inspiration came from. As with all things Primal, there have been enough modifications to allow me to confidently call this deeply delicious, satisfying tart “Sarah’s Taleggio, Broccoli & Leek Tart.” 

Firstly, being Primal, there are no grains allowed and secondly, she’s confidently upped the ante on the eggs and cheese to make this a really luxurious and filling family dinner - albeit it’s not unknown for us to eat the whole of this tart, which is supposed to feed six, between the three of us. 

As it turns out, it was much trickier to get the recipe out of Sarah’s head and into written form than it is for her to bake it! It took her a couple of hours to write the recipe down and me twice as long as that to decipher what she’d written before it could make an appearance on Primal Plate’s blog! Nevertheless, as you can see from the picture of my serving of tart, it is very worthy of its honorary place.

Taking on the ‘huff and puff’ of food blogging is very much akin to photographing the finished food on the plate. From time to time, this strong mother-daughter team, of which I am so proud, will attempt to walk a mile in each other’s shoes. Sometimes Sarah passes me her camera, but on this occasion she volunteered for a day in the life of a food blogger. This is what workplace equality is all about and as I write, epitomises the spirit of today’s ‘International Women’s Day’ (8 March 2017) but more than this, it is always a privilege to have Mirror Imaging Photography create such beautiful images to bring to life all of Primal Plate's recipes. 

This one is an absolute winner. It’s also much easier to make than a conventional tart because the nut-based pastry behaves itself so much better than a normal wheat flour pastry does. Sarah learned this lesson very early on in life from Mrs Bainbridge, her home economics teacher at secondary school, who thought that the way to get a crumbling flour pastry mix under control was to bash it around on the worktop until it surrendered itself up as a pliable piece of dough, which then cooked out to something resembling a brick. Did I miss my vocation? Is this why so many of Sarah’s generation have given up on cooking their own food? Over-handling or adding too much water to normal flour is the sure-fire way to achieve pastry disaster. This can’t happen with nut-based pastry. Provided that you add the diluted milk judiciously - just enough to bring the mixture together (see instructions below) - you cannot help but achieve a crispy, golden, melt-in-the-mouth almond pastry because, without gluten, it’s impossible to overwork. Perfect for the novice cook and, without any grains or gluten, it's much healthier for you too.

Sarah’s Taleggio, Broccoli & Leek Tart (serves 6)

Ingredients - for almond pastry

400g organic ground almonds

2 teaspoons gluten-free baking powder 

50g organic butter, melted + a little extra for greasing

4-6 tbsp diluted whole organic milk (to dilute the milk, mix 3 tbsp milk & 3 tbsp fresh filtered water together)


Instructions - to make the pastry case

Preheat oven to 190℃ / 375℉ / Gas mark 5 

Grease a 25cm / 10inch round, fluted, non-stick, loose-bottomed pastry case with a little melted butter, then line the base with a round piece of non-stick baking parchment for good measure.

To make the almond pastry - sieve the baking powder into the ground almonds and mix together well. 

Stir the melted butter into the almond mixture, then add the diluted milk - one tablespoon at a time - and stir everything together with a fork. N.B. We’ve found that 4 tablespoons of diluted milk is usually enough to bind the mixture without the pastry becoming too wet.

When it starts to clump together, abandon the fork and use your hand to bring the mixture together into a firm but moist dough (the warmth of your hand will help to do this by releasing the oil in the nuts). Shape into a ball.

Lay out a large sheet of clingfilm onto a work surface (you may need two sheets overlapped), then place your smooth ball of pastry in the middle and flatten it out slightly.

Lay a second sheet of clingfilm over the top of the pastry (this will stop it from sticking to your rolling pin) and roll out evenly to about 3mm-5mm thickness. As you roll, turn regularly to achieve an even round shape that is approximately 2½cm/1” larger than the circumference of your tart tin (this allows for the sides of the tart). 

Carefully peel off the top layer of clingfilm, then loosely wrap the pastry around your rolling pin removing the bottom layer of clingfilm as you do. Then using the rolling pin to support the pastry, lift it in one piece directly into the tart tin. If it splits or breaks in transition (as it often does!), don’t worry, just patch it back together by pressing it firmly and evenly into the base and up the sides of the tin with your hands. You can add smaller pieces of pastry to fill any gaps and particularly to reinforce the top edge - just press any seams together with your fingers so there are no gaps and it’s as even as you can make it. N.B. Since almond nut flour is gluten-free it’s easier to handle than normal shortcrust pastry, because it doesn't get harder and tougher when you re-work it.

Once it’s settled in the tart tin in an even thickness, prick the base with the prongs of a fork, then lift the pastry tin into the air and, rotating the tin with one hand, use a sharp knife to trim any raggedy bits of pastry off the top edge to create a neat finish. Form any leftover pastry into a ball, cover in clingwrap and store in the fridge for up to a week. You can then re-roll and make into almond biscuits, which are perfect served with cheese after dinner, or as a base for pre-dinner smoked salmon canapés.

Bake the pastry case blind i.e. place a large piece of baking parchment on top of the pastry - it needs to be big enough to cover the entire pastry case - and weight down with ceramic baking beans (rice grains, dried peas or dried beans will do just as well) then bake in the pre-heated oven for about 8-10 mins. 

After this first baking, remove the baking beans and parchment and cook for a further 5-6 minutes - you’re looking for an evenly baked, pale golden case without any wet pastry showing in the middle. N.B. Keep a careful eye on it to ensure that the top edge doesn’t get too brown - nut-based pastry can scorch easily and if it’s over-browned at this stage it will be too dark after it’s filled and re-baked. 

When cooked, remove from the oven and set aside. 

Ingredients - for filling

Head of organic broccoli (about 350g)

200g taleggio cheese

6 tbsp organic whole-fat milk

2 tsp English mustard powder

6 organic eggs

120ml organic double cream

sea salt and freshly ground black pepper

1 tbsp organic butter, melted (or organic olive oil)

2 organic medium-sized leeks

1 tbsp organic fresh thyme leaves, chopped 


Instructions - to make filling

Reduce the oven temperature to 170℃ / 325℉ / Gas mark 3

Cut the broccoli into small florets. Steam for about 4-5 minutes or until just tender. Drain and put straight into ice cold water (or run under the cold tap) to stop the cooking process and to keep their colour.

Trim off the roots and coarse dark green tops of the leeks, then with a sharp knife slice them lengthways halfway through i.e. from top to root without actually cutting them in half. Wash under a running tap, fanning the layers out with your fingers to rinse away any grit or soil trapped between them. Drain thoroughly and then slice across into 1cm thick rings. 

Place the leeks and the olive oil into a large saucepan, give the leeks a quick stir to make sure that they’re evenly coated in the oil, then cover with a circle of greaseproof paper cut to fit the pan and the pan lid. Cook over a gentle heat for about 8-10 minutes until the leeks are soft and tender but not coloured. 

Remove the paper lid and stir in the broccoli and thyme then, whilst continually stirring, turn up the heat to cook off any excess liquid. You need to make sure the mixture is as dry as possible without browning the vegetables. Season with salt and pepper and set aside.

Prepare the taleggio cheese by removing its wrapping and cutting off any of the rind as thinly as you can (it will have a mould-like bloom, which you don’t want in the tart). Slice into thin pieces, and set aside.

In a Pyrex jug or bowl, first whisk the mustard powder into a little of the milk until smooth, then add the rest of the milk, cream, eggs and season to taste with salt and pepper. Whisk the mixture until the eggs are broken up and all the ingredients are well combined. Set aside.


Instructions - to assemble the tart

Lay a sheet of tin foil on a flat baking sheet, then place your pastry case, still in its tin, on the sheet. Scrunch the tinfoil up a little around the base of the tin because if your pastry has any gaps at all, this will prevent the filling running out all over your oven!

Evenly distribute the vegetables in the base of the pastry case. 

Give the egg custard mixture a quick stir (sometimes the mustard settles at the bottom) and carefully pour into the pastry case over the vegetables. Lay the slices of taleggio cheese evenly over the top. 

Bake immediately in the pre-heated oven for about 25 minutes, or until the custard is lightly set and the surface of the tart is nicely golden.

Remove from the oven and let the tart cool for 5-10 minutes. Then, using a small sharp knife, loosen around the top edge of the tart before releasing from its tin.

Slice and serve warm or cold. 


Notes

Sarah doubles up on the quantity of Primal Plate’s original almond pastry recipe to make sure there is plenty to roll out without scrimping; this means that there will be about a third left over for almond biscuits etc. The remaining raw dough can be stored in a refrigerator for up to a week. 

Taleggio cheese is made from non-vegetarian rennet, strict lacto-vegetarians could substitute a soft-melting cheese such as Duchy’s organic brie.


Carbohydrate 12g Protein 33g - per serving


Red Velvet Cupcakes

by Susan Smith in


All you need is love, but these little cupcakes ain’t half bad at making the point! Primal Plate’s Red Velvet Cupcakes are the sweetest-tasting, sexiest-looking, Valentine’s day indulgence to share with your sweetheart. For all the world you might think that one bite into one of these aggressively pink, attitudinal cupcakes would be enough to send Primal sugar phobes into a state of apoplexy… but their good looks deceive. 

These light-as-a-feather cupcakes are in fact a nutritious health food made from organic grass-fed butter, organic tiger nut flour, raw cacao and fresh beetroot. No added sugar, no grains, no artificial food colour. Talk about share the love!

Over the past few weeks Sarah seems to have been really cake-hungry because she’s frequently been asking “When are you going to make more cake?” As it turns out Valentine’s day is just the right time because, after waiting for so long, she was only too happy to help me by patiently making little ‘love notes’ out of greaseproof paper and ribbon hearts to decorate these bad boys! Gloriously chocolatey and dressed to kill for the occasion, they taste every bit as good as they look. 

As for the not so sweet-toothed or love-struck, they’re just yummy little everyday cakes to eat plain with a really good cup of tea or coffee. 

Red Velvet Cupcakes (makes 18)

Ingredients - for the cupcakes

250g organic premium tiger nut flour

3 tbsp organic raw cacao powder

1 tsp organic ground cinnamon

2 tsp gluten-free baking powder

½ tsp bicarbonate of soda

200g organic unsalted butter, softened to room temperature

150g Sukrin Gold

3 organic eggs, at room temperature

2 tsp pure vanilla extract

120 ml organic milk or other milk of choice - e.g. almond, cashew or coconut milk 

2 medium-sized organic beetroots, finely grated


Ingredients - for the buttercream (enough to decadently decorate 8 cupcakes)

200g Sukrin Icing

100g organic unsalted, preferably raw, grass-fed butter

2 tbsp fresh organic beetroot juice (or use milk if you don’t have a juicer)

½ tsp pure vanilla extract


Instructions - for the cupcakes

Pre-heat the oven to 180℃ / 350℉ / Gas mark 4

Place 18 paper cupcake cases into two 12 hole muffin trays

Combine the tiger nut flour, cacao powder, cinnamon, baking powder and bicarbonate of soda in a medium size mixing bowl. Fork through to get rid of any lumps.

Fix the double-bladed ’S’ shaped knife into a food processor and place the softened butter, Sukrin Gold, the bowl of dry ingredients, vanilla extract and eggs into the processor bowl. 

Process for about 30 seconds until well mixed. You may need to scrape down the sides of the of the bowl once or twice to make sure everything is incorporated. Add 100 ml of the milk and process again for another 10 seconds. You’re aiming for a creamy (not too runny) consistency. Add the remaining 20ml of milk and process for a few more seconds if the mixture still seems a little too thick.  

Scrape the mixture out of the processor bowl into a clean mixing bowl and stir in the grated beetroot until evenly incorporated.

Using a small ice cream scoop fill each paper case with approximately 50g-55g of the cake mixture.  

Bake in the middle of the oven for 18 - 20 minutes.

Allow the cupcakes to cool briefly in the baking tins before removing them and cooling completely on wire racks.

Instructions - for the buttercream icing

Place all the ingredients in a medium sized bowl and whisk together with an electric beater until light and fluffy. 

Place a large star shaped nozzle into a disposable piping bag. Cut the end of the bag off so that the end of the nozzle is not covered. Twist the bag immediately behind the back of the nozzle to prevent the icing coming out until you’re ready. 

Place the bag into a large tall glass and fold the top of the bag over the edge of the glass. Alternatively, get someone else to hold the bag open whilst you fill it.

Carefully fill the bag with the prepared buttercream. Close the top of the bag by twisting it tightly - you can secure it with a rubber band to make sure the buttercream can’t ooze back out of the top - then push the buttercream down inside the bag to remove any air-locks. 

Starting at the outer edge of the cupcake, slowly squeeze the piping bag to allow the buttercream to gently fall onto the cupcake. Keep going around the cupcake in increasingly smaller circles until you reach the middle. N.B. the nozzle needs to stay slightly raised above the surface of the cake so you don’t drag the icing as you go. 

Decorate with fresh berries or edible flowers - organic rose petals would be nice - if you don’t want the fiddle and faff of making Sarah’s fabulously conceived love notes!

cupcake decorations.jpg

Notes

If your oven shelves are not large enough for both baking trays to fit side by side on the middle shelf, then swap them over after about 12 minutes cooking time - no earlier because the mixture needs time to set. If you have a double oven, you can use them both to ensure these cupcakes bake evenly to perfection - much easier than swapping the trays over during baking.

 Carbohydrates 7g Protein 3g - per cupcake

Carbohydrate 1g Protein 0g - per serving of buttercream


Celebration Carrot Cake

by Susan Smith in


I’m not cut out to be a landlady. I used to think that renting out property in an era of low interest rates would be a savvy way to create a retirement income. I’ve changed my mind. Firstly, I don’t get to retire because owning rental property isn’t so much an investment as a business. Secondly, the reason there aren’t many, if any, beautiful, immaculately maintained houses ‘To Let’ is because the majority of tenants, no matter how well you vet them, will trash rental property rather than treat it as their own. Worse still, in our namby pamby society legal ‘rights’ favours the tenant over the landlord, so if your ex tenant is willing to lie through their teeth to avoid paying for the damage they’ve caused, you’re forced into a dispute that takes weeks of wearisome effort pulling all the evidence together in order to prove your loss. It’s such stuff and nonsense that has kept me from posting Primal Plate recipes for the past couple of months. The good news is that I’ve finally been afforded some time and respite to get my blog back on track before seeing my ex-tenants in court! And, on a happier note, we’ve now appointed Sarah to be the sole custodian of a fabulously refurbished property. Lucky, lucky girl!

Accordingly, this wonderfully tasty, nutritious carrot cake made its star debut at a family get-together last week to celebrate Sarah moving to her new home, to mark a milestone birthday, to wish “bon voyage” to someone special fulfilling his lifetime ambition to visit Australia and not least for me to honour some creative time back in the kitchen. Everyone unanimously agreed that it was “The best cake you’ve ever made!” I concur. Enhanced by orange zest and warming spices, Celebration Carrot Cake has an autumnal feel that’s made extra special with the most delicious Cream Cheese Frosting and Caramelised Pecans. With more than a passing nod to the 1960’s, Primal Plate’s Celebration Carrot Cake is an updated, healthy version of classic carrot cake. It’s the perfect expression of all that I love about eating Primal. A delicious, seemingly indulgent cake that’s impossible to resist but with no grains, no gluten, no refined sugar and less carbs than a small banana! For the sweet-toothed and health conscious, I think that’s something to celebrate in its own right.

Celebration Carrot Cake (Serves 12)

Ingredients for the cake

80g unsalted organic butter (or coconut oil), melted + extra for greasing

3 tbsp organic maple syrup            

200g organic ground almonds 

100g organic tiger nut flour

1 tsp organic nutmeg, freshly grated            

1 tbsp organic ground cinnamon    

1 tsp gluten-free baking powder

¼ tsp Celtic sea salt    

5 large organic eggs, room temperature            

2 tsp pure vanilla extract                     

3 large organic carrots, peeled & finely grated (you should end up with about 250g prepared carrot)

75g raw organic pecans, chopped

Finely grated zest of 1 large organic orange


For the Cream Cheese Frosting

200g organic cream cheese

3 tbsp organic maple syrup

1 tbsp Sukrin icing sugar

1 tbsp vanilla extract

185 ml organic double cream


For the Caramelised Pecans - optional

40g raw organic pecans (or walnuts)

1 tsp organic maple syrup

½ tsp organic coconut oil


Instructions - to make the cake

Pre-heat the oven to 190℃ / 375 ℉ / Gas mark 5

Grease well and base line 2 x 7 inch loose-bottomed sandwich tins (to save time, I use Lakeland’s baking parchment ready-cut liners)

In a small saucepan over a low heat melt the butter (or coconut oil) and maple syrup together. Take off heat and allow to cool for 5 minutes.

In a large bowl, combine the ground almonds, tiger nut flour, sea salt, baking powder, cinnamon, and nutmeg

In a separate bowl, with an electric whisk, beat together the eggs, vanilla extract & melted butter/maple syrup mix until frothy and well combined.

Stir the carrots, orange zest and chopped nuts into the wet ingredients

Stir the wet ingredients into the dry ingredients

Divide the mixture equally between the cake tins, spreading it out evenly and levelling off the top

Bake in the centre of pre-heated oven for 35 minutes

Cool in their tins for two hours before turning out onto a wire cooling tray and removing the paper discs.

Instructions - to make the Cream Cheese Frosting

Beat the cream cheese, maple syrup, vanilla essence, Sukrin icing sugar together in a large bowl with a handheld electric whisk until well combined and light and fluffy. 

In a separate bowl, whip the double cream until it stands in medium peaks. N.B. Don’t over whisk your cream at this stage because it will solidify even more when you try to incorporate it into the cream cheese mixture, which means you might end up with lumpy rather than smooth cream cheese frosting. 

With a rubber spatula, gently fold the whipped cream into the cream cheese mixture until evenly combined. 

Instructions - to make Caramelised Pecans

Heat a small non stick frying pan over a medium-low heat. 

Add the coconut oil, maple syrup and pecans to the pan (in a single layer) and cook for 4-5 minutes, stirring and turning the nuts over occasionally, until caramelised and golden. 

Turn onto a plate to cool. 

Instructions - to assemble and decorate Carrot Cake

Transfer one of the sandwich cakes onto a serving plate or cake stand. Spread one half of the Cream Cheese Frosting on top and using a flexible metal spatula level out to just within the outermost edges to create the sandwich cake filling. 

Place the second sandwich cake directly on top of the first cake. Dollop the remaining half of Cream Cheese Frosting on top, spreading it out evenly before gently swirling the surface into a simple, decorative-looking finish. 

Decorate with caramelised pecan (or walnut) halves, if liked 


Carbohydrate 16g Protein 9g - per slice


Flourless Lemon & Raspberry Swiss Roll

by Susan Smith in


I have to say, this light and airy, low-carb, grain-free, refined sugar-free and fat-free Swiss roll cake mix is probably the best Primal/Paleo cake I’ve ever made! Rightly so, because I made it for my daughter Sarah’s birthday on 4th July, and she is most definitely worth it. 

The night before her birthday, I was slightly panicked as to how I was going to bake a birthday surprise at such short notice. I’d bought in a stack of fresh summer fruits - just in case I could conjure up something fabulous - but the idea for this impressive looking, light-as-a-feather cake didn’t come to me until about ten 'sleep-hours' before Sarah was due to come over the following morning to unwrap her presents.

Baking an impromptu, untried, made-up recipe for a special occasion isn’t normally my bag, but since only cake will do when there’s a birthday to celebrate I got up early the next morning with my fingers crossed. I am so glad I did. This beautiful cake is not nearly as daunting to make as it looks and the finished result is so light in texture and tastes so fresh that it cannot fail to delight anyone lucky enough to share it. In fact, it is so good, four of us couldn’t restrain ourselves from eating the whole cake in one sitting. Furthermore, as Sarah’s elder sister hadn’t been there for the birthday party itself, it was a great excuse to bake two of these cakes on consecutive days! Once you try this light and lovely treat, you’ll understand why we find this delicious lemon and raspberry Swiss roll totally irresistible.

On the face of it, I should probably consider myself ‘caked-out’ for now, however the truth is, I’m actually motivated to seek out more people whose birthday is imminent! As there’s nothing unhealthy about this Flourless Lemon & Raspberry Swiss Roll, you really don’t need an excuse to indulge. If you love someone enough to want to bake them cake, this one’s gorgeous good looks and lemony, raspberry goodness is all you need to impress.

Flourless Lemon & Raspberry Swiss Roll (makes 12 slices)

Ingredients - for the Swiss roll

4 large organic free-range eggs, separated

40g Sukrin:1 granulated sweetener

40g organic ‘runny’ honey (I actually used raw unpasteurised honey and gently heated it to make it runny)

Zest of 1 organic lemon, finely grated

75g organic ground almonds                            

25g organic tiger nut flour

½ tsp baking powder

1 tbsp Sukrin icing sugar - for dusting top of cake


Ingredients - for the raspberry sauce

150g fresh raspberries

75g no added sugar raspberry spread


Ingredients - for the lemon cream

125ml organic double cream

1 tbsp Sukrin icing sugar

Zest of 1 organic lemon, finely grated


Instructions

Butter and line a 22.5 cm x 32.5 cm (approx. 9” x 13”) Swiss roll tin with non-stick baking paper. 

Preheat the oven to 180°C / 350℉ / Gas mark 4

Sift the tiger nut flour and baking powder together into a bowl and then add the ground almonds. Stir to combine.

If using ‘set’ honey, place in a small saucepan over a very gentle heat until it liquefies. Take off the heat and allow to cool down for a couple of minutes.

In a medium/large bowl, whisk the egg whites until stiff. In a separate large bowl, whisk the egg yolks, the lemon zest, Sukrin:1 and 'runny' honey until light, airy and mousse-like i.e. very pale and thick – this will take about 3 minutes using an electric whisk on high speed.

Stir the ground almonds and tiger nut flour into the egg yolk and lemon zest mixture. 

With a rubber spatula, gently fold in the egg whites, a third at a time, until completely mixed in.

Pour the mixture out onto the lined baking tray and bake for 10-15 minutes until golden, firm and springy (mine took exactly 13 minutes).

Remove from the oven and leave in the tray to cool, covered with another piece of baking paper and a damp tea towel.

To make the raspberry sauce: In a small saucepan set over a low heat, cook 75g fresh raspberries with the raspberry spread. Bring to a gentle simmer, then using the back of a fork, crush the raspberries down into a sauce. Take off the heat and set aside to allow the sauce to cool down completely.

To make the lemon cream: Whip the cream with 1 tablespoon of Sukrin icing sugar and the lemon zest until almost thick i.e. stiff but still speadable. Cover and keep in the refrigerator until you’re ready to assemble the cake. Cut the remaining raspberries in half.

When the cake is cool, remove the tea towel and parchment paper and lay them down flat onto a work surface - with the non-stick paper sat on top of the tea towel. 

Generously dust the top of the sponge with Sukrin icing sugar then flip it out onto the parchment paper with one of the short edges facing you. Carefully peel the baking parchment off the cake.

With a small sharp knife score a line 2 centimetres in from the short edge nearest to you - making sure you only cut about halfway through the depth of the sponge. 

Next, spread the raspberry sauce all over the top of the cake to within about 2 centimetres of the edge. Then layer the whipped lemon cream on top of that - again leaving a 2 cm edge all the way around. Finally, dot the raspberry halves evenly on top of the cream. 

Start rolling the cake up tightly from the short end where you scored a line. Using the parchment paper to help you, keep rolling tightly until you get to the end. Carefully lift the Swiss roll onto a plate with the seam side down.

Chill for 30 minutes before serving.


Notes

Aside from Sukrin’s stevia/erythritol sweetener, the best natural alternative sweetener for baking is organic maple syrup because it is not chemically affected by heat. However, whilst testing this cake recipe out I didn’t want to risk maple syrup’s distinctive taste coming through, so I chose to use honey.

Using half honey and half Sukrin:1 to sweeten this delicate sponge minimises the potential aftertaste when using stevia alone. Whilst the vast majority of honey available in the shops has already been subjected to heat - so it makes no difference whether you decide to heat it or cook with it at home - this is not true of Na’vi’s wonderful, raw, unpasteurised honey. Heating Na’vi’s honey is sacrilege! It destroys many of its beneficial effects, killing off its ‘superfood’ status. If you’re going to buy Na’vi honey - and I recommend that you do - simply enjoy its health-giving benefits spooned straight from the jar. It was Hobson’s choice that I used it for my cake because it’s the only honey I ever keep in my store cupboard! 


Carbohydrates 8g Protein 4g - per slice


Primal Pronto Drop Scones

by Susan Smith in , , ,


Light, versatile and so quick to make, these little fluffy cushions of loveliness can be served with either sweet or savoury dishes whenever you fancy something bready to eat. I like them for breakfast - either topped with a little raw honey, maple syrup, fresh berries or 100% fruit spread - though my real ‘soft-spot’ is for old fashioned marmalade, because it brings back memories of my childhood. 

Sent off to boarding school at five years old, I could never seem to get enough food to eat! It was here that I was introduced to Robertson’s Golden Shred marmalade with their (now politically incorrect) Golliwog branding, which included beautifully made enamel brooches to collect and pin to the lapel of my school blazer. Overly sweet and unsophisticated it may have been, but back then, much like Paddington Bear, marmalade was my hunger monster’s saviour! 

School breakfasts were usually our choice of pre-packaged cereal (Sugar Puffs for me please!) followed by plates stacked high with yesterday’s scantily ‘buttered’ (with Stork margarine, I fear), pre-sliced white bread. It seemed to me that magic marmalade could transform these half-stale offerings into something rather nice that temporarily filled me up. Teatimes were similarly skewed in favour of high carb foods. Bread with jam or chocolate spread, a banana and soft, sticky buns - the sort topped with glacé white icing. We didn’t mind! These are sweet treats as far as children are concerned and, for me, also a real source of comfort that helped me deal with the stress of being away from home.

Unfortunately, overloaded with wheat, gluten and sugar, young children are particularly vulnerable to tummy bloating, clogged-up systems and chronic constipation. Our guardians must have had an inkling because every morning they would check to see if we were ‘regular’ by keeping a 'poo log'! The ‘little me’ thought it most prudent to try and save face when asked the question, so I’d always answer in the affirmative. Unfortunately, I didn’t realise that no amount of toilet paper rammed down the loo would disguise the fact if I’d lied! I’d only know I’d been rumbled when I was given All-Bran for breakfast instead of my favourite cereal. My blushes weren’t spared either. An uninteresting bowl of roughage foisted on a child lets everyone know where their bowels are at. I was embarrassed and ashamed - as if it was my fault! Scarred by this early life experience, I was still eating what I thought was a mandatory bowl of All-Bran every morning up until my thirty-eighth birthday! 

Being regularly fed massive amounts of refined, processed, high carbohydrate foods not only caused my digestive discomfort, but also nagging hunger too. I was part of an experimental dietary disaster promulgated by the food industry in collusion with public health advisers, which in my view was, and still is, tantamount to child abuse because… 

Normally when you eat some food your blood sugar goes up and your insulin levels rise to get the nutrients into your body cells. Once this work is done, your blood sugar goes back to normal. All is as it should be and you’ll only get hungry again when you need more energy. However, when you eat certain foods that contain a lot of sugar and carbohydrates, your blood sugar sky-rockets. In response, your body releases inordinately high amounts of insulin to get the sugar inside your cells. Once your blood sugar spikes, the excess insulin, which is far more than your body needs, continues affecting your blood sugar way and beyond just normalising it. Consequently, your blood sugar continues to plummet much lower than it’s supposed to. At which point, your brain then tells you you’re still hungry! Unbelievably, as a child, in an attempt to satisfy these constant hunger cravings I resorted to eating Germolene after dormitory lights out! By the time I was eleven I was, unsurprisingly, quite porky!

Fast forward almost sixty years, and today’s recipe for Primal Pronto Drop Scones served with orange fruit spread is my idea of heaven. This is bread and marmalade revisited in satisfyingly good taste with no nasty consequences. As warm and as soft as a hug, these high protein, low-carb, nutritious Primal Pronto Drop Scones a.k.a Scotch pancakes served straight from the pan, showcase all the comfort factor of freshly baked or toasted bread with the crunch of pumpkin seeds. Grain-free and gluten-free, and loaded up with tangy, low-carb, organic orange ‘marmalade’ served with a plentiful supply of freshly brewed coffee, they are one of the things I most love about being a grown-up. Oh, and they are really filling too!  

Primal Pronto Drop Scones (make about 16)

Ingredients

150 g organic ground almonds

50 g organic tiger nut flour

2 tbsp organic coconut flour               

2 tsp baking powder

½ tsp sea salt

250 ml raw organic full-fat milk (or homemade, unsweetened almond milk)

3 eggs, beaten 

30 ml organic tiger nut oil (or coconut oil, melted)

2 drops organic liquid stevia

50 g organic pumpkin seeds

1 tbsp organic tiger nut oil (or coconut oil) - for frying

Instructions

In a large bowl, combine the ground almonds, tiger nut flour, coconut flour, baking powder and sea salt together with a whisk.

Measure out the milk into a jug then add the beaten eggs, liquid stevia, and tiger nut oil.

Make a well in the centre of the dry ingredients and slowly pour in the wet ingredients, whisking the mixture as you go. Keep whisking until the mixture becomes a thick, but still pourable, smooth batter - no lumps please! 

Set aside for a minute or two to allow the coconut flour to fully thicken out the mixture. If the batter then seems too thick to pour thickly from a spoon or ladle, add a little filtered water. When you’re satisfied that the batter is of a thick ‘dropping’ consistency, stir in the pumpkin seeds. 

Place a smidge of oil in a large, shallow non-stick frying pan and set over a medium heat. When hot (takes about 2 minutes), spoon small pools (heaped tablespoons) of the batter into the pan, spacing them well apart - no more than 2 or 3 pancakes at a time - making each pancake about 6 centimetres (2.5 inches) in diameter. 

Cook for about 1½ - 2 minutes until the underside is golden brown, then using a flexible, thin-edged silicon spatula to help you, carefully turn them over and cook for 1½ - 2 minutes on the reverse side. 

Turn onto warmed plates and serve immediately with either no-added-sugar 100% fruit spread, fruit puree, fresh berries, a drizzle of honey or maple syrup. 


Notes

Primal Pronto Drop Scones are every bit as good served alongside a cooked breakfast, a bowl of soup, or curry. Alternatively, spread lavishly with savoury toppings e.g. Carrot Hummus or a feisty tomato and avocado salsa for a filling snack or starter. Or, make them into small ‘blini-sized’ canapés and serve with drinks.  

Whilst these drop scones are very quick and easy to make, you may find you need to cook several batches before you get fully acquainted with the optimum temperature (medium/low not medium/high) and exact cooking times (keep checking their doneness' after 1½ minutes) to get them light, fluffy and perfectly golden on both sides. N.B. Let the drop scones firm up just enough for you to turn them over without the uncooked batter running off the top surface when you do. It takes a little practice!  


Carbohydrate 3g Protein 4g - per pancake


Low-Carb Breakfast Buns

by Susan Smith in , ,


I couldn’t resist the challenge of coming up with something new for National Breakfast Week! Unbelievably, these delicious, light-textured, incredibly moreish, vegan, Low-Carb Breakfast Buns are dairy-free, gluten-free, grain-free, egg-free and refined sugar-free. No slight-of-hand ‘natural’ sweeteners are added to the mix either…even if you don’t have my fave zero-carb Sukrin Gold to hand (although I think you should!), just one single tablespoon of pure organic maple syrup will sweeten the whole job lot nicely!

These really healthy Breakfast Buns are so fast and easy to make that my man thinks I should add another category to Primal Plate…”Not so much Primal Pronto, more like Instant!” 

If you suffer from a nut allergy, you can substitute whole organic pumpkin seeds for the chopped walnuts. The buns still retain the same satisfying ‘crunch’ and with or without nuts both versions are equally as good.  

So good in fact that you don’t need to reserve them for breakfast. I’d be happy having mine at teatime too! Lovely served warm from the oven with a drizzle of maple syrup, you can almost feel these resistant-starch packed beauties doing you good! Definitely something worth getting out of bed for!

Low-Carb Breakfast Buns (Makes 12)

Ingredients

150g organic tiger nut flour 

25g Sukrin reduced-fat organic almond flour 

25g organic cold-milled golden flaxseed

2 tsp gluten free baking powder

40g organic walnuts, finely chopped (if you are allergic to nuts, use whole pumpkin seeds instead)

40g organic sunflower seeds

90g organic coconut oil, melted (or 6 tbsp organic cold-pressed tiger nut oil )

1 tbsp Sukrin Gold (or 1 tbsp organic pure maple syrup)

1 tbsp pure vanilla extract (I use Ndali)

225ml unsweetened almond milk, preferably homemade (or 225ml full-fat, raw, organic cow’s milk)


Instructions

Pre-heat the oven to 200℃ / 400℉ / Gas mark 6

Line a 12-hole bun tin with 12 paper bun cases

Weigh all the dry ingredients directly into a medium sized bowl and, using a fork, mix together well.

Add the maple syrup (if not used Sukrin Gold) and the oil and combine.

Pour in the milk and continue to mix with a fork until the mixture comes together into a thick batter-like consistency.

Spoon into the bun cases (you’ll need a smidgeon over 50g of batter per case) and bake in the pre-heated oven for 15-20 minutes, or until a cocktail stick inserted into the centre comes out clean.

Serve warm from the oven with a little maple syrup drizzled over, if liked. 


Carbohydrate 9g Protein 4g - per breakfast bun (made with maple syrup & cow’s milk)

Carbohydrate 7g Protein 3g - per breakfast bun (made with Sukrin Gold & almond milk)


Poached Pears with Butterscotch Sauce and Almond Shortcakes

by Susan Smith in , ,


Pear and almond is a classy coupling, which is elevated to even greater levels of sophistication when combined with the flavours of toffee and butterscotch. Today’s recipe for Poached Pears with Butterscotch Sauce and Almond Shortcakes is the perfect make-ahead dessert for an elegant dinner party. Right on cue, it made a fantastic finale to our New Year’s Eve dinner party celebrations last night. Hello there 2016!

Pears, butterscotch, shortcake biscuits…it all sounds gloriously indulgent and a bit Fatty Arbuckle doesn’t it? However, as with all Primal Plate recipes, this dessert remains true to the healthy premise of no grains and no added sugar. The joy of eating Primal is that once you’ve reached your target weight (easily achievable it you stick to no more than 50 to 100 grams of healthy carbs each day), occasional indulgences won’t make the blindest bit of difference. No more wodgy, podgy or painful sensations from eating the wrong food, nor the post Christmas angst of feeling fat. Brilliant! The trick is to keep moving (a daily 2-3 mile walk in the fresh air should do it) and to not wander across the 150 grams of healthy carbs per day limit, which still allows you plenty of scope for sweet treats. 

Real food, sustainability and kindliness to all living creatures and the environment is my inspiration for writing this Primal Plate food blog. I hope that in 2016 more people will appreciate the benefits of a low-carb, low sugar, no grain, primarily vegetarian diet so that not only can we renew our own health and vitality but also be kind and mindful enough to allow this beautiful world in which we live the same privilege and freedom.

Wishing everyone a peaceful, healthy and Happy New Year.

Vanilla Poached Pears with Butterscotch Sauce and Almond Shortcakes (Serves 4)

Ingredients - for the poached pears

300ml filtered water

125g Sukrin:1 granulated stevia sweetener

rind of ½ organic lemon

1 dsp pure vanilla extract (I used Ndali)

4 firm, ripe pears (I used Williams)

Bay leaves, to decorate - optional


Ingredients - for the butterscotch sauce

160ml coconut cream

6 Medjool dates

25g raw cashew nut butter

1 tbsp pure vanilla extract (I used Ndali)

1 dsp brandy - optional


Ingredients - for the almond shortcakes

100g organic butter

200g organic ground almonds

60g organic tiger nut flour

50g Sukrin Gold

50g organic flaked almonds, lightly toasted            

1 tsp baking powder                

½ tsp sea salt

1 dsp pure vanilla extract (I used Ndali)


Instructions - to make poached pears

First, check the dimensions of your saucepan to make sure that it is the right size for the pears to fit snugly inside.

Bring the water, Sukrin icing sugar, lemon peel and maple syrup up to the boil then reduce the heat under the pan to a very low simmer.

Peel the pears. Leave them whole with their stalks intact, immediately placing each one into the syrup - turning it to coat - before continuing with the rest. 

Cook the pears with the pan lid on for 20 to 30 minutes or until they’re soft to the point of a skewer or sharp knife. 

Take the pan off the heat and allow the pears to cool in the syrup. When cold, store covered in a refrigerator until needed.


Instructions - to make butterscotch sauce

Remove the stones from the dates and roughly chop. Place in a high powered blender with the remaining ingredients (in the order as listed in ‘ingredients’) and process until smooth.

Serve with poached pears and almond shortcakes

Can be stored in the fridge for up to a week.


Instructions - to make almond shortcakes

Pre heat the oven to 130℃ (fan) / 150℃ / 300℉ / Gas mark 2

Melt the butter in a small saucepan over a low heat. Allow to cool for a few minutes.

Meanwhile, in a large bowl combine ground almonds, tiger nut flour, Sukrin Gold, baking soda, sea salt and flaked almonds.

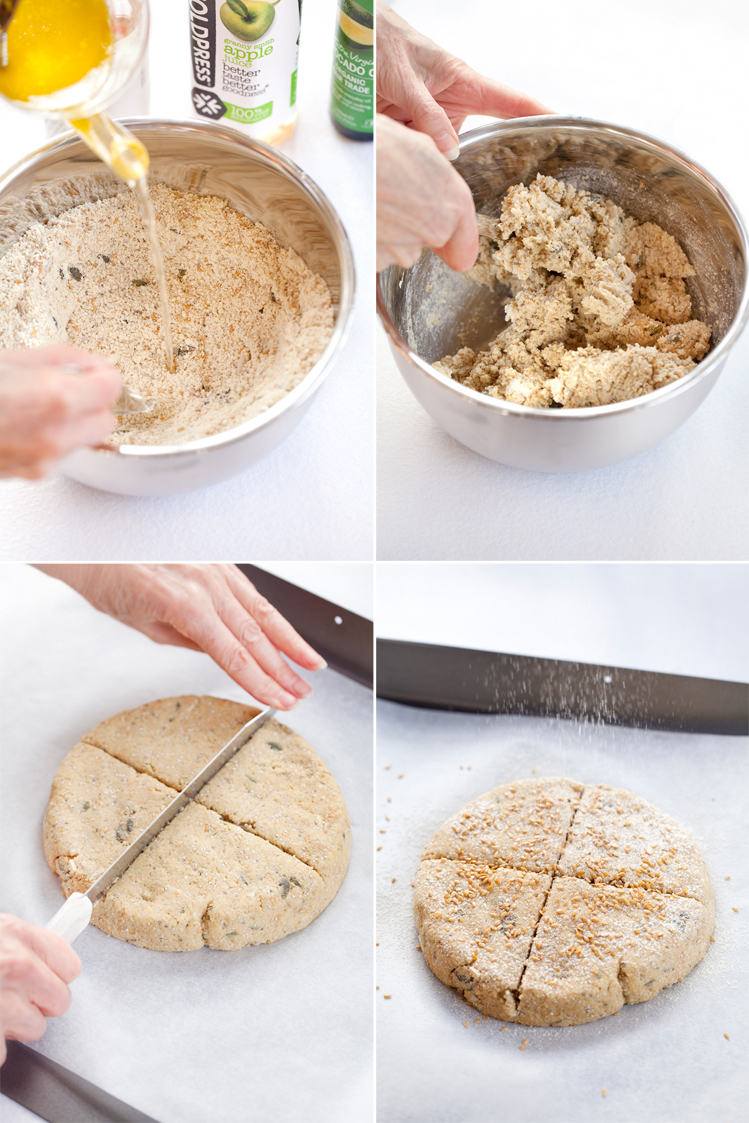
Using a fork, stir in the cooled melted butter and vanilla essence to bring everything loosely together - then roll up your sleeves and with your hands squash the mixture into a ball of dough - it is a bit sticky and crumbly but don't be worried, be determined! 

Tip the dough onto a large piece of non-stick baking parchment. Place a second piece of baking parchment on top then flatten the dough out a little bit with your hands. 

Use a rolling pin to roll the dough out to about 6 to 8mm (¼ to ½ inch thick). 

Use a 7.5 cm (3 inch) plain cutter to cut out the biscuits. Once you are only left with scraps from the cutouts, bring the pieces together to create a ball, then roll it out again to the same thickness and continue cutting the biscuits out.

Place the biscuits onto a lined baking sheet, about one inch apart. Bake for 35-40 minutes until golden.

Cool on the baking tray for 5 minutes, then transfer the biscuits to a wire rack to cool completely. 

These shortcake biscuits will keep for up to a week in an airtight container.


Notes

The poached pears will keep for up to 5 days in a covered container in the refrigerator.

I love the intense toffee flavour of the Butterscotch Sauce and, when chilled, it's the perfect consistency for piping around the pears. However, if you want a simpler presentation, it can also be formed into elegant looking quenelles (oval scoops of cream formed between two dessert spoons) and served alongside the pears. Alternatively, if you're okay with diluting the butterscotch flavour, thin the sauce down with a little milk, whipping cream or even water until a pouring consistency is achieved, then spoon over or around the pears.

A list of suppliers for Sukrin sweeteners and grain-free flours can be found on Sukrin’s Home page


Carbohydrate 20g Protein 1g - per serving of butterscotch sauce

Carbohydrate 15g Protein 0g - per pear

Carbohydrate 6g Protein 4g - per shortcake biscuit


Crumble-topped Mince Pies

by Susan Smith in ,


Healthy, Primal, vegetarian mince pies (or vegan, if you substitute coconut oil for butter) without added sugar, wheat flour or other grains? Yes please! 

This recipe is my adaptation of an original recipe I found in Good Food Magazine, Christmas 2007. However, Primal Plate gluten-free mince pies are made with tiger nut and almond flour pastry encasing dollops of delicious homemade mincemeat that has no sugar or fat added. So in spite of them tasting like the best mince pies you’ve ever eaten, you can have all of the pleasure with none of the guilt. I should warn you, even if you’re stuffed to the gunnels with other Christmas food, you’re still going to want to find room for more when you espy these sweet delights! 

But that’s okay, because you can’t really ‘fall off the wagon’ when you’re substituting nutritious, low-carb ingredients for grain flour and only using half the pastry of normal mince pies! Plus, these Crumble-Topped Mince Pies are so meltingly delicious, and look so winter wonderland with their crunchy ‘snow-capped’ topping, that it just won’t seem right to let Christmas day pass you by without one!

They disappear fast in our house, so blogging the recipe seemed sort of compulsory in the run up to Christmas - my fella thinks that eating at least two a day will help keep you in the festive spirit! They’re a much lighter and healthier alternative to the ‘heavy-weights’ found stacked on supermarket shelves (since last September!) and those endorsed by baking traditionalists, and happily, given the demand by my nearest and dearest, they are also ridiculously easy to make. 

Essentially, the mincemeat and the tiger nut pastry both only need a quick ‘whizz’ in a food processor and they’re made. And, since the mince pies can conveniently be cut, pre-assembled and frozen in their tins, you can always have a batch 'at the ready’ for when you need them. Once defrosted, making the crumble and topping the pies takes less than 5 minutes. 

If you like mince pies, these extra special mince pies can’t fail to impress. You won’t like them...you’ll love them! 

Crumble-topped Mince Pies (V)

Ingredients - for the mince pies

1 medium/large ripe banana

100g organic raisins

100g organic sultanas

100g organic currants

50g organic dried cranberries, no added sugar

60g Medjool dates (about 3), stoned and chopped                        

50g flaked almonds

Finely grated zest of 1 organic orange, juice of ½ orange

25g Sukrin Gold

½ tsp grated cinnamon                        

½ tsp ground nutmeg                            

½ tsp ground ginger                            

3 tbsp brandy


Ingredients - for the pastry

125g unsalted butter, chilled and cut into small cubes + a little extra for greasing (or to convert to vegan use coconut oil)

150g organic tiger nut flour

50g Sukrin reduced-fat organic almond flour

1 tbsp Sukrin icing sugar

Finely grated zest of 1 organic orange

1tbsp cold water


Ingredients - for the crumble topping

25g butter, melted (or use coconut oil if you don’t eat dairy)

25g organic ground almonds

25g flaked almonds

¼ tsp ground cinnamon

25g Sukrin Gold


To serve

A little Sukrin icing sugar


Instructions - to make the mincemeat

Simply mix everything together in a food processor until well combined and the texture of mincemeat. Done!


Instructions - to make the pastry

Put the tiger nut flour, almond flour, butter (or coconut oil), icing sugar and orange zest into the bowl of a food processor and whizz together until the mixture starts to clump together.

Add the tablespoon of water and briefly whizz again.

Tip the mixture out onto a sheet of non-stick (parchment) paper. Press it together into a ball, flatten into a disc with the palm of your hand then cover with another piece of non-stick pastry. 

Pre-heat the oven to 180℃ / 350℉ / Gas mark 4. Lightly grease a shallow bun tin.

Roll the dough out between the two sheets of non-stick baking parchment to a 2-3mm thickness. Using a 7½ cm (3 inch) fluted round cutter, stamp out discs from the pastry. Gently place the discs of pastry into each section of the bun tin. 

Press any pastry trimmings back together, re-roll and continue cutting out more discs until you have as many pastry cases as you want, or the pastry is used up - this quantity of pastry dough should make about 16 mince pies. 

Fill each pastry shell with 1 heaped teaspoon mincemeat and spread out to smooth.

At this point, the mince pies can be frozen, uncooked in trays for up to 1 month    


Instructions for the crumble-topping

When you’re ready to cook the mince pies, melt the butter over a low heat, allow to cool slightly, then combine all the crumble ingredients in a small bowl and sprinkle a little on the top of each mince pie. 

Bake on the middle shelf of the oven for about 15 minutes, or until the pastry is cooked and golden brown. 

Cool in the tin(s) for 5 minutes before transferring to a wire cooling tray. 

Sift a little Sukrin icing sugar over the top of the mince pies before serving.


Notes

The mincemeat recipe will make about 36 mince pies. Because it doesn’t contain any sugar, it won’t keep like ordinary mincemeat. However, it can be stored in a covered container in the refrigerator for up to a week.  

These mince pies are good eaten warm or cold. To re-heat them after baking, simply warm them in a pre-heated oven at 180℃ for 5 minutes. Don’t forget to dust with a little extra Sukrin icing sugar before serving, as any previously sprinkled on top of the mince pies dissolves in the heat of the oven second time around!


Carbohydrate 14g Protein 3g - per mince pie


Chocolate Orange Brownies

by Susan Smith in


Excuse me for boasting but these are simply the nicest, fudgiest, most intense chocolate-orange flavoured brownies I’ve ever tasted! Dusted with non-caloric icing sugar and studded throughout with crunchy walnuts (decorate with a sprig of holly for good measure), these no-added sugar brownies capture the look and taste of Christmas in every delicious bite-full. 

I think they’re a brilliant, low-carb alternative to Christmas cake. And, they’re definitely not Terry’s, they’re mine!  

Chocolate Orange Brownies (makes 12)

Ingredients

180g unsalted butter, cut into cubes - plus a little extra for greasing

280g good quality dark chocolate (at least 70% cocoa solids)

160g walnuts

3 large organic eggs

100g Sukrin Gold

Zest of 2 large organic oranges, finely grated

1 tbsp pure vanilla extract (I used Ndali as it doesn't contain sugar)

180g finely-milled organic tiger nut flour

50-60ml freshly squeezed orange juice

Sukrin icing sugar, for dusting


Instructions

Pre-heat the oven to 180℃ / 350℉ / Gas mark 4. Grease a deep sided brownie baking tray (mine measured 18cm x 32cm) and line the bottom and sides with non-stick (parchment) paper. I recommend a single piece of paper cut and inch or so bigger than the dimensions of your baking tray and then cut down into each corner (with a pair of scissors) so the paper sits flat in the tin.

Break up the chocolate into small pieces and put into a heatproof bowl with the butter. Set the bowl over a pan of barely simmering water and leave to slowly melt, stirring occasionally. Alternatively, you can do this directly in a saucepan over a very low heat, stirring regularly. However, to avoid the risk of overheating the chocolate, take the pan off the heat whilst there are a few small lumps of chocolate still not melted - the residual heat will be enough for it to continue melting without spoiling. Allow to cool.   

Chop the walnuts into rough pieces (I do this by pulsing them a few times in a food processor) then set aside. 

Put the eggs, Sukrin Gold and vanilla essence into a large bowl and whisk together until well blended and really frothy. I use an electric whisk and allow about 8-10 minutes to get enough air into the mixture. N.B. Sukrin Gold doesn’t behave like sugar in this recipe insofar that, unlike some cake mixtures, this one won’t become mousse-like no matter how long you whisk it for!

Stir in the melted chocolate and butter mixture, then fold in the walnuts and tiger nut flour. 

Finally, add enough fresh orange juice to loosen the mixture a little and then pour into the prepared tin. The mixture should be just soft enough (though not runny) to find its own level in the tin but you may need to spread it out evenly with a flat spatula. 

Bake at 180℃ for 25 minutes - test with cocktail stick, it should seem ever so slightly under-cooked i.e. a few moist crumbs should stick to the cocktail stick when you withdraw it. 

Cool in the tray, then cut into 12 even squares.

Lightly dust with Sukrin icing sugar before serving.


Carbohydrate 18g Protein 6g - per brownie


Speedy Seedy No-Grain Soda Bread

by Susan Smith in ,


No grains, no dairy, no eggs, no yeast…no kidding! Inspired by Hugh Fearnley-Whittingstall’s Seedy Rye Soda Bread in the River Cottage Light and Easy cookbook this super-speedy, seedy bread is my Paleo/Primal-friendly grain-free ‘take’ on Hugh’s original recipe. I’m loving the fact that you can knock it up in about 15 minutes then bake and eat it within the hour. 

Mr Fearnley-Whittingstall just happens to be my man of the moment in more ways than one. Pioneering war on waste and taking to task the supermarket's ridiculous stance on wonky veg, he is also a brilliant, down-to-earth, imaginative chef that seriously cares about the environment and sustainability. I salute you sir!

For this blog post, my job was to figure out which no-grain flour alternatives would emulate River Cottage’s inspirational rye-based bread i.e. to create a dense, semi-sweet, almost malty, rye-tasting soda bread, without the rye flour or honey that the original recipe calls for. I think I’ve done it! With the help of Sukrin and their fantastic range of alternative cold-pressed, fat-reduced nut and seed flours (I particularly like the cold-pressed sesame flour in this recipe for it’s distinctive depth of flavour), I was fully equipped and ready to go.  

This nutty tasting bread is deliciously satisfying, can be eaten in the context of either sweet or savoury, and is so quick and easy to make I’ve ended up making 4 loaves in the past 5 days! 

Speedy Seedy No-Grain Soda Bread (makes 1 small loaf - serves 6)

Ingredients - dry

20g organic pumpkin seeds

20g organic sunflower seeds

20g organic sesame seeds

20g organic golden linseeds

1 tbsp organic chia seeds

150g organic ground almonds

50g Sukrin sesame flour  

50g fine milled organic tiger nut flour

20g Sukrin reduced-fat organic almond flour plus a little extra for dusting the finished loaf

½ tsp sea salt

1½ tsp baking soda


To finish the loaf before baking

1 tsp seeds - for sprinkling

1 tsp Sukrin almond flour, for dusting


Ingredients - wet

100ml apple juice (I used Coldpress)

1 tsp raw cider vinegar

50ml water

2 tbsp avocado oil 

Instructions

Pre-heat the oven to 200℃ (180℃ fan-assisted) 

Put all the dry ingredients into a mixing bowl and, using a fork, mix everything together really well.

In a jug, whisk together the wet ingredients. Make a well in the centre of the dry ingredients, pour the liquid into the dry ingredients and quickly mix everything together with a fork.

Allow the mixture to stand for 1-2 minutes, during which time the chia seeds will help thicken out the mixture. 

With the help of a spatula, tip the sticky but malleable dough onto a sheet of non-stick (parchment) paper and, using both hands, form into an approximate 15cm / 6” round. Slide or lift the shaped bread, still sat on its parchment paper, straight onto a baking tray.

Make a deep cross in the bread round (cutting at least halfway down through the dough) then sprinkle a teaspoon of extra seeds on top and lightly dust with a little more almond flour. 

Bake for 35-40 minutes in the pre-heated oven, or until a cocktail stick inserted in the centre comes out clean and the crust is a really dark brown.

Cool on a wire rack. Tuck in!

Top left: Make a well in the centre of the combined dry ingredients, then pour in the combined wet ingredients. Top right: Mix everything together with a fork. Bottom left: After shaping, score a cross in the dough. Bottom right: Sprinkle with extra…

Top left: Make a well in the centre of the combined dry ingredients, then pour in the combined wet ingredients. Top right: Mix everything together with a fork. Bottom left: After shaping, score a cross in the dough. Bottom right: Sprinkle with extra seeds and dust with sifted almond flour before baking.

Notes

I regularly purchase organic nuts and seeds online (more availability and at a better price than most supermarkets) These are my go-to suppliers: Healthy SuppliesReal Foods; Red23; and, for tiger nuts, Na'vi Organics.

This bread will keep for up to 3 days in an airtight container. After a couple of days, it can be used to make croutons or made into breadcrumbs for coating. 

If you want a nutritious, no-hassle, low-carb, home-baked bread for breakfast, simply measure out all the dry ingredients into a bowl and the wet ingredients into a jug the evening before, then cover with cling film. Next day, combine everything together and bake…good morning Primal Pronto!


Carbohydrate 15g Protein 12g - per serving

Speedy Seedy No-Grain Soda Bread is delicious served simply with lashings of organic butter.

Speedy Seedy No-Grain Soda Bread is delicious served simply with lashings of organic butter.


Chocolate Fondants

by Susan Smith in , ,


If you’ve ever watched Masterchef you’ll have seen contestant after contestant being warned by Messrs John Torode and Gregg Wallace how tricky it is to make perfect gooey-centred chocolate fondants. Some contestants go ahead anyway (let’s face it, by the time they’re being filmed, they’re already committed!) and get their timings just right so their fondants come out beautifully cooked on the outside and runny in the middle - but many don’t. Today's recipe is a sure-fire way to ensure that you can make chocolate fondants without any of the brouhaha, giving everyone the impression that you’re an absolute genius in the kitchen! (Psst! you can even make them 24 hours before you want to eat them)

Love chocolate? You’ll love these luxurious hot chocolate fondants. Better still, they’re not the ‘unhealthy' indulgence you might have pre-supposed. On the contrary, eaten in moderation, dark chocolate (at least 70% cocoa solids) is very good for you because it’s chock-full of phytonutrients (specifically cocoa flavanolds) that are scientifically proven to be beneficial for the heart, circulation and brain.

Still feeling some parental guilt about consuming chocolate? More information is available in this extensive blog post that fully explains chocolate’s effects on health, its potential benefits and downsides, and the effects of chemical components such as caffeine and theobromine. In summary, don’t gorge on chocolate, but it’s really more than okay to allow yourself to deeply appreciate its wickedly delicious allure.

As part of a Primal lifestyle, best quality dark chocolate does not make you fat. Typically, I eat 2 or 3 squares (up to 15 grams) every day with my morning Nespresso (a double-whammy for the senses which reminds me that life is really worth living) but at least one scientific study found that young people consuming 42.6g of chocolate a day had slimmer waists and lower BMIs than those eating less. 

Nice but not naughty after all, dark chocolate has finally achieved superfood status. I suggest you grab a spoon and get stuck in! 

Chocolate Fondants (Makes 4 large or 6 small fondants)

Ingredients

125g unsalted butter + extra for greasing 

3 whole large organic eggs 

2 organic egg yolks (in addition to the the eggs above)

25g raw organic ‘runny’ honey

8 drops organic liquid stevia 

125g dark chocolate - I used Callebaut Finest Satongo dark chocolate chips

25g tiger nut flour

Good quality chocolate bar, broken into squares (I used Michel Cluizel’s Maralumi dark chocolate bar)

Sukrin icing sugar, for dusting

Organic double or pouring cream, for serving


Instructions

Grease either 4 large or 6 small ramekin dishes.

Melt together the butter and chocolate in a bowl over a pan of hot (not boiling) water on the hob.

Whilst the chocolate/butter mixture is melting, whisk the eggs / egg yolks / honey and liquid stevia together for about 5 minutes until pale and very thick (it should hold its shape for a few seconds when a little of the mixture is flicked over the surface) - you really need an electric whisk for this. 

With a balloon whisk, whisk the tiger nut flour into the chocolate/butter mixture. 

Cool the chocolate mixture and then pour into the whisked egg mixture.

Using a metal spoon, fold gently to combine the two mixtures. 

Divide the mixture equally between the ramekins. 

Leave in the fridge for up to 24 hours before they are required.

Just before cooking, press a square of chocolate into the centre of each ramekin.

Cook for 12-15 minutes at 200℃ / 400℉ / Gas mark 6

Sprinkle with icing sugar and serve immediately.


Notes: 

These chocolate fondants are foolproof because you’re not relying on precise cooking times to ensure that the middle of the fondants are soft and runny - instead the melted chocolate squares create a yummy pool of hot chocolate at their centre. 

The mixture will carry on cooking in the ramekins, so eat immediately. 

Sukrin sweetener is produced via a natural fermentation process from the glucose naturally occurring in pears, melons and mushrooms. The powdered form of Sukrin I’ve used for dusting the chocolate fondants looks, tastes and behaves in exactly the same way as normal white icing sugar made from sugar beet/cane. And, I’m pleased to report, it has no bitter after taste. 


Carbohydrate 16g Protein 9g - per small chocolate fondant

Carbohydrate 25g Protein 14g - per large chocolate fondant


Sweet Potato, Cheese & Chilli Muffins

by Susan Smith in , , , ,


I like Jamie Oliver's recipe and I like Rose Elliot's recipe... but which is better?!

Today’s blog post for Sweet Potato, Cheese & Chilli Muffins was inspired by both and as both are a frequent source of reference for me, I take my hat off to each of them for being the innovative and inspiring food crusaders that they are. Nevertheless, I still think Primal Plate can legitimately take credit for these incredibly tasty, savoury muffins. Let me explain.

I first made Rose Elliot’s Cheese & Sun-Blush Tomato Muffins, featured in her book Vegetarian Supercook, about ten years ago, then last week I was watching Jamie’s Super Food programme on Channel 4 and was again reminded how useful Rose Elliot’s original recipe was for a low-carb, gluten-free lifestyle because it didn’t contain wheat flour. On the other hand, I really liked Jamie’s idea for Sweet Potato Muffins with a chilli ‘kick’, but cannot agree that wheat, or any other grain qualifies as super food.

“Cutting-edge research, for example, has revealed that consumption of modern wheat [the only sort of wheat most people are likely to encounter in their entire lifetime] is the first step in triggering autoimmune diseases such as type 1 diabetes, rheumatoid arthritis, and multiple sclerosis.” says Dr. William Davis, author of Wheat Belly. And, “Wheat raises blood sugar higher than nearly all other foods, including table sugar and many candy bars”.

And for those who think that a gluten-free diet is the answer he advises: “The few foods that increase blood sugar higher than even wheat include rice flour, cornstarch, tapioca starch and potato flour—the most common ingredients used in gluten-free foods, which leads to weight gain, diabetes, cataracts, arthritis, cancer, dementia, heart disease and growing belly fat. This is why many celiac patients who say goodbye to wheat but turn to gluten-free foods become fat and diabetic. Gluten-free foods as they are currently manufactured are very poor substitutes for wheat flour.” For more information visit the Wheat Belly Blog.  And, here's a list of recommended alternative flours for baking.
 
You live and learn! Perhaps it was the tapioca flour in my Primal Naan Bread, which we ate four times in quick succession whilst I was developing the recipe that caused me to gain two pounds in weight in one week (thankfully now lost again)! As with previous health warnings on this food blog, the message is this: Anyone who consumes gluten-free foods, including my gluten-free naan, and/or other baked goods made with healthier sugar/flour substitutes, should still regard them as an occasional indulgence.

Anyway, I digress because there are no bad things listed in the ingredients for these quick, easy-to-make, gluten-free Sweet Potato Cheese & Chilli Muffins. Going back to Rose’s and Jamie’s recipes, the only jar of sun-blush tomatoes that I had in my food cupboard had a sell-by date of 2013 (must have a clear-out!) so I decided to substitute the missing tomatoes with Jamie’s idea for sweet potato and chilli - albeit not weight for weight. Both their recipes included cottage cheese (in massively varying amounts) but to be honest, by the time I’ve changed everything around to make my recipe Primal (grain-free) and/or added or subtracted ingredients and amounts for a different flavour or texture, I always end up forewarning my family that it is by no means certain the end result will be something good for us to eat! On this occasion, I knew about half-way through the cooking time we had a definite ‘winner for dinner’ by the way my muffins were rising admirably to the challenge. High-five me!

Light, puffy and protein-packed these Sweet Potato, Cheese & Chilli Muffins truly are a super delicious super-food for you to enjoy at any time. Two muffins per person served with a bowl of hot soup makes for a simple but filling lunch or supper. Eat them for breakfast and they’ll keep you going until lunchtime. Perfect for picnics (a bit of an obsession of mine as a wedding photographer’s assistant that often needs to pack up healthy food for Sarah and I to eat on-the-move) or as a nutritious snack, they’re sustaining, easy to transport and can be eaten one-handed (important for all busy multi-taskers).   

Taking the best from Jamie and Rose, I reckon I’ve trumped both with this muffin recipe. Cook up a batch this weekend and see if you don't agree!

Sweet Potato, Cheese & Chilli Muffins

Ingredients (Makes 9)

225g sweet potato (approximately 190g peeled weight)                    

2 tbsp fresh chives, finely chopped

2 fresh red chillies, 1 finely chopped, 1 finely sliced            

5 large organic free-range eggs, lightly beaten

250g cottage cheese (can be low-fat if you prefer)

100g ground almonds                                        

50g coconut flour 

50g vegetarian parmesan-style cheese, finely grated

1 tsp baking powder

60ml milk (or water)

sea salt and freshly ground black pepper                 

2 tbsp sunflower seeds


Instructions

Preheat the oven to Preheat oven to 180°C / 350°F / Gas mark 4.

Line a muffin tin with 9 medium-sized (cup-cake sized) paper cases.
 
Peel the sweet potato and coarsely grate into a large bowl. Add the cottage cheese to the bowl with all but 15g of the grated ‘parmesan’ cheese, the chopped chilli and chives, coconut flour, ground almonds, baking powder, beaten eggs and milk.

Mix together with a fork until everything is nicely combined then season with salt and pepper, to taste.

Evenly divide the mixture between the muffin cases (about 105 grams per muffin) - spooning it into the cases until they’re three-quarters full. Scatter each muffin with the reserved cheese, then sprinkle over the sunflower seeds and arrange 2-3 thin slivers of chilli on top.

Bake for 35 minutes or until set, risen & golden brown.

Served warm = totally yum!


Notes

Everyone will enjoy these savoury muffins straight from the oven - just allow them to cool down for about 5 minutes before serving. They’re also surprisingly good cold and will keep for a couple of days in an airtight container stored in the fridge.

Unfortunately, no one seems to sell non-stick baking parchment muffin liners. I certainly don’t fancy spraying the inside of my paper cases with commercial non-stick baking spray (processed oils are not good to eat) but you can make your own non-stick cases by cutting out 12½cm (5 inch) squares of parchment paper and pressing them down into your muffin mould with the aid of a small measuring cup. You can also buy non-stick silicon muffin moulds.

On this occasion I simply opted for baking my muffins in greaseproof paper cases and eating them directly out of their cases with a spoon - using it to scrape off the last crumbs of muffin that were frustratingly ‘glued' to the paper.  

Carbohydrate 9g Protein 14g - per muffin


Primal Naan Bread

by Susan Smith in , , , ,


Following on from last week’s blog post, we’ve recently been going through a spicy phase at our house. We love curry, which is a good thing because for the past week we’ve been eating it most days whilst I tried to figure out how to make the perfect grain-free naan bread accompaniment. Happily (actually I am ecstatic!), Primal Plate has cracked the code for a grain-free naan bread that looks and tastes as close to an authentic Indian flatbread as you can get, without using traditional ingredients.

I had to go from memory when developing this recipe because with rice, legumes and grains all off-limits, I’ve not eaten out at an Indian restaurant or had an Indian ‘take-away’, for a very long time. I always remember the best naan being soft, chewy and subtly sweet, so my first thoughts turned to tiger nut flour, which I knew would give my naan a slight sweetness, without adding sugar. 

Traditionally, naan is made from plain wheat flour and leavened with yeast before baking. To get the taste, smell and texture of traditional naan it seemed important that the raising agent for my naan was also yeast, although I wasn’t certain whether this was a Paleo/Primal-approved ingredient or not. Consulting Mark’s Daily Apple, I discovered that if you drink wine or beer, the type of yeast used to make both is the same as the yeast used for bread making. And, assuming you’re not yeast sensitive, there are some nutritional benefits to eating it, especially if you avoid animal products. As a primal, vegetarian wine drinker, I concluded yeast was good to go! 

For the rest of the recipe I got my inspiration from the queen of Indian cuisine, Madhu Jaffrey. However, when refined wheat flour, the primary ingredient of naan bread isn’t an option, I had to find alternative ingredients and put them together in just the right amounts so that my naan bread would look and taste like the real deal.

To be honest, my first attempt included a high proportion of green banana flour (a brilliant source of resistant starch, which is one of the best foods to feed our good gut bacteria) but it turned out almost exactly like wholewheat pitta bread instead (another recipe for another day). For naan, I wanted it to be altogether softer and fluffier.

Substituting ground almonds for banana flour and changing the ratio of ingredients finally did the trick. The virtually no-need-to-knead dough rose better (doubled in size at the first proving), looked like I’d used plain flour rather than whole-wheat (more naan-like) and had the desired soft, fluffy texture I was looking for.

It was another ‘Eureka!” moment in my Primal cook’s career. I am still totally amazed that each new recipe I attempt to develop with the same handful of ingredients - albeit in differing amounts - can be transformed into an endless variety of grain-free, refined sugar-free cakes, breads, biscuits, scones and pancakes that look and taste no different to those made with conventional ingredients like wheat flour and sugar. 

If you're trying to lose weight and eat low-carb please be aware that these naan are extremely moreish! They’re lovely as an occasional treat, but don’t go overboard. Although a well known supermarket’s plain naan has 50% more grams of carbohydrate than Primal Plate’s naan bread, I have in fact gained 2 pounds this week, which I can only attribute to multiple testing of this recipe. It was worth it!

PRIMAL NAAN BREAD (Makes 3 decent-sized naan)

Ingredients

75ml hand hot milk            

1 tsp raw organic liquid honey                

5g (about 1 heaped tsp) dried active yeast

150g tapioca flour

20g coconut flour

30g tiger nut flour

1½ tsp baking powder                    

¾ tsp xanthan gum

50g ground almonds

½ tsp tsp sea salt    

1 tbsp olive oil + ¼ tsp for greasing            

50ml yogurt, beaten

1 medium egg, lightly beaten

1 tbsp butter or ghee, melted - for brushing        


Instructions

Gently warm 75ml milk to ‘blood’ temperature with the honey. Put the milk/honey in a bowl. Add the yeast. Stir to mix. Set aside for 15-20 minutes or until the yeast has dissolved and the mixture is frothy.

Meanwhile, sift the tapioca, coconut, tiger nut flours, baking powder and xanthan gum into a large bowl. Add the ground almonds and sea salt and make a well in the centre. 

In a separate bowl, combine the beaten egg, olive oil and yogurt, then pour it into the well, along with the bubbling yeast mixture. Gradually bring the mixture together with a fork then gently knead with your hand for a few minutes until it forms a soft, smooth ball of dough.

Pour ¼ tsp oil into a medium/large bowl and roll the ball of dough in it. Cover the bowl with cling film and set aside for 1-1½ hours in a warmish place until doubled in size. (I heat my oven to 40℃, then switch it off and put the covered bowl of dough in the closed oven to prove).

Tip the proofed dough out of the bowl onto a work surface then briefly knead again. Divide the dough into three equal balls. Lightly cover with cling film and set aside whilst you melt the butter or ghee in a small saucepan over a low heat. 

Heat a heavy non-stick frying pan over a high heat for 5 minutes or so and put the oven on low. 

Meanwhile, gently flatten each of the balls between two sheets of cling film then lightly roll or press into a tear-shaped naan, about 25cm long and 13cm wide at its widest point and slightly thicker around the edge. Keep lightly covered until you’re ready to cook them. 

Put the naan into the hot frying pan (no oil is needed) and cook until it starts to puff up and is tinged brown in patches (about 1-2 minutes), then using a flat bladed spatula flip the naan over and cook the other side until that too is patched with brown (another 1-2 minutes). Turn it back over one final time and cook for about another 30 seconds or so until cooked through and there are no doughy bits remaining.

Brush the cooked naan with the melted butter or ghee and put in the warm oven whilst you make the other flatbread(s). Serve with curry. 


Notes

If the dough seems too sticky when you’re trying to knead it, add more tapioca flour - a very little at a time - only just enough so that the dough leaves the sides of the bowl and isn’t sticking to your fingers.

You may have guessed that I regularly cook for three people (hence a recipe for three naan). For a family of four or more, simply double the ingredients to make six. Alternatively, divide the existing dough recipe into four balls to make the finished naan smaller.  

We struggled trying to determine the best and simplest way to cook the naan - or at least that was our excuse to keep taste-testing them! As well as cooking them on top of the hob, they can be baked in a super-hot oven for 5 minutes. Firstly, pre-heat a heavy baking sheet in an oven set to its highest temperature. Literally, ’slap’ each prepared naan down onto the hot baking sheet. It will puff up. Bake for 2½ minutes then turn over and continue cooking for a further 2-2½ minutes. Wrap each naan in a clean tea-towel and keep warm whilst you make the rest in the same way. 

Naan bread cooked in the oven will turn out more evenly golden but not quite as soft and chewy as when cooked on top of the stove in a frying pan. We finally all agreed that the pan-cooked ones had the ‘edge’ i.e. looked and tasted the most authentic. 


Carbohydrate 52g  Protein 8g - per serving

Grain-free, gluten-free Primal Naan Bread is the perfect sharing bread to eat with curries and Indian food, shown here with Cauliflower & Mushroom Curry

Grain-free, gluten-free Primal Naan Bread is the perfect sharing bread to eat with curries and Indian food, shown here with Cauliflower & Mushroom Curry


Tiger Nut Victoria Sponge

by Susan Smith in


I don’t see my sister that often but when I do I try to make it something of an occasion. She travelled up from London to Nottingham on a business trip this week, but since my house is currently akin to ‘Steptoe’s parlour’ (the entire top floor including my dressing room and bedroom have had to be cleared and vacated for refurbishment and re-decoration), I was unable to offer her overnight accommodation. I decided the next best thing I could do was to bake a cake.

Thankfully, Sarah volunteered to host our impromptu tea party at her house, which involved buying a selection of the finest teas she could find (my sister is something of a tea connoisseur) but I still had to devise a last-minute, quick and easy, gluten, grain and refined sugar free cake from scratch. Overwhelmed at the prospect it was a bit touch and go as to whether a visit to our local deli wouldn't be a better option, but then I remembered…

When my two children were little I used to regularly take them on very long walks (at least 5 to 10 miles) mainly because I wouldn’t let them sit for more than 2 hours a day glued to the television screen (thank goodness computer games hadn’t been invented). Anyway, I think more often than not they were persuaded to go the distance with me because I promised them freshly-baked cake on our return. At that time, my go-to cake recipe was for a Victoria Sandwich, which I could weigh out and quickly knock-up in a food processor in about 10 minutes flat.

The memory of an all-in-one method for making cake was sweet relief in the midst of the current crazy-busy situation I’m in. All I had to do was devise a healthy new recipe without a sniff of the refined self-raising flour, flora margarine and caster sugar, which so reliably whizzed itself up to seeming perfection thirty-plus years ago.

Fuelled by a taste for nostalgia, I am so excited that my re-invention of a Victoria Sandwich works just as well as the original. Strictly speaking, a classic Victorian sandwich recipe firstly involves weighing the eggs and then weighing out the same quantity of butter, sugar and flour before laboriously creaming the ingredients together with a wooden spoon - certainly not with a whisk - or, as in this recipe, a food processor. However, only the cook will know the difference, because this cake only takes about 10 minutes to make, not 30 minutes!

The result is an evenly risen, delightful party cake full of golden spongey goodness, which I think owes much of its success to tiger nut flour. Baking it wasn’t all plain sailing. The amount of cake batter my recipe made wasn’t enough to fill two 20cm/8” sandwich tins and, since I don’t have any smaller sized tins, I ended up piling all my cake mixture into just one of the sandwich tins and manually splitting the cooked cake through the middle with a serrated knife after it had completely cooled down (see note below).

Also, because tiger nuts are naturally sweet, I think I could have got away with using less honey i.e. 100g rather than 125g (to make my cake more low-carb) - however, as everyone agreed it wasn’t too sweet for their taste, I’ve left the original recipe alone. Just a word of caution if you’re concerned about your carbohydrate intake, make sure you have a few more friends to share it than I did - four of us happily (and all too easily), devoured the whole cake in just one sitting!

To make my cake extra special, I used whipped cream and fresh strawberries as well as 100% pure fruit spread to fill and decorate it. Whether you prefer to keep your cake simple or make it more luscious, I can promise you that this light and lovely easy-to-make cake recipe is a teatime winner. 

Tiger Nut Victoria Sponge (10 servings)

Ingredients

200g tiger nut flour

2½ level tsp gluten-free baking powder (I used Waitrose Cook’s Homebaking brand)

200g butter, softened + a little extra for greasing the tin(s)

4 large organic eggs

125g raw clear organic honey

150g 100% strawberry fruit spread (I used St Dalfour)

200ml organic double cream

225g fresh strawberries, washed and dried - approximately 150g hulled and sliced and 75g left whole (for decoration)


Instructions

Heat the oven to 175℃ / 350℉ / Gas mark 4

Grease and bottom line (with non-stick baking parchment) either 1 x loose-bottomed 20cm (8 inch) sandwich tin OR 2 x 15cm (6 inch) loose-bottomed sandwich tins.

Sift the tiger nut flour and baking powder together into a medium bowl.

Fix the double-bladed ’S’ shaped knife into the food processor and place the butter, honey, flour/baking powder and eggs into the processor bowl. 

Process for about 30 seconds until well mixed and a creamy (not runny) consistency. You may need to scrape down the sides of the of the bowl once or twice to make sure everything is incorporated.

Tip the cake mix into the prepared cake tin(s), spreading out evenly and levelling off the surface with a palette knife, then place into the oven. 

Bake the single 20cm (8”) cake for about 30 mins OR, if you’ve divided the cake mix between two 15cm (6”) sandwich tins, for about 20 minutes - until risen, golden-brown and firm to the touch. Also, if you put your ear close to the surface of the cooked cake it will kind of ‘sing’.

When ready, remove from the oven and allow to cool for 5 mins in the tin(s), before turning out onto a wire rack and cooling completely.

Split the single cake horizontally into two even halves, if required. Sandwich the two halves (or the two separate cakes) together by spreading the strawberry preserve onto one half. Top with the second half of the cake (cut side down, if you had to slice a whole cake through the middle)

For a special occasion, lightly whip the cream until it stands in soft peaks (don’t over whip it as it’ll be difficult to spread out evenly on top of the fruit spread). Fill the cake with the whipped cream and sliced strawberries. Put the second half of the cake on top (see above) and decorate with whole strawberries if liked.

Notes

N.B. I need to confirm the exact size of sandwich tins best suited to this recipe - 2 x 15cm is a guesstimate based on my only experience of making this cake in a larger tin. It is obviously easier for you to bake the cake halves separately in two tins rather than having to manually cut one cake horizontally through its middle afterwards. Please let the cake cool down completely before attempting to do this, otherwise it might fall apart. You still need a steady hand and clear vision to make an even cut! 

To avoid wire rack marks when you’re baking your cake in two tins, put a clean tea towel over the cooked cake in the tin, put your hand on top of the tea towel and turn the tin upside-down onto your hand and the tea towel - then carefully turn it from your hand onto the wire rack to cool completely.

If you are making a 15cm (6”) diameter sandwich cake, you may want to reduce the amount of whipped cream and strawberries for the filling accordingly. However, if you’re just using fruit spread to sandwich this size of cake together, the quantity shown in the above recipe will still be correct. 


Carbohydrate 29g Protein 5g - per serving


Tigernut ‘Hob-Nobs'

by Susan Smith in


Last week Sarah and I went clothes shopping. We both stared in disbelief at the clothes tag, which read Size 4. The garment we’d picked up looked the right size but in unison we both exclaimed ”I’m never a Size 4!” Well, at least as far as Whistles is concerned, we both are, and so we ended up fighting over a single pair of trousers (Sarah’s sense of Birthday Girl entitlement meant she won!)

The surprising thing is, now I’m developing Primal-friendly recipes for this blog, we eat far more guilt-free baked and sweet treats than ever before, yet we continue to drop dress sizes or, at the very least, 'stay put' at our optimum weight. True, we have recently cut back on our alcohol intake (one bottle of Champagne between three of us is now our idea of binge drinking!) but still…way to go! I am absolutely convinced that an eating strategy that’s highly nutritious, low in carbohydrates and much higher in fat than you’ve been told is good for you, is decidedly the best if you want to lose excess weight.

The downside? For a full-on, enjoyable experience whilst you shed unwanted inches, you actually have to cook! I think It’s a crying shame that most people seem to prefer ready-meals, eating out, microwaving, meal-replacement shakes and other fast food options rather than getting into the kitchen with their family and cooking fresh, nutritious food for themselves. Consequently, they then either have to resort to extreme bouts of exercise or workouts in the gym in the hope they can ‘burn’ off their foodie indiscretions (how much time does that take up in the “I’m too busy to cook’ lifestyle?), or allow themselves to get fat. People need reminding that a good diet isn’t just about weight loss and being thin, it’s about being healthy and giving your body all the nutrients it needs so it doesn’t fall prey to debilitating disease.

To get you started on your real food adventure (if you haven’t already), Tigernut Hob-Nobs are where it’s at! These crunchy, crumbly biscuits are child’s play to make, moreishly delicious to eat and are full of goodness. Perhaps it’s most useful to begin by saying what these biscuits don’t contain:

  • No grains
  • No gluten
  • No sugar
  • No dairy
  • No eggs 

What you do get from taking the time to bake Tigernut ‘Hob-Nobs’ are some remarkable health benefits:

  • Tiger nuts have a high content of soluble glucose and oleic acid, along with high energy content (starch, fats, sugars and proteins)
  • They are rich in minerals such as phosphorous and potassium, calcium, magnesium and iron necessary for bones, tissue repair, muscles, the blood stream and for body growth and development. 
  • They are rich in vitamins E and C. Vitamin E delays cell ageing, improves elasticity of skin and helps to clear the appearance of wrinkles, acne and other skin issues.
  • Sugar-free tiger nut milk (Primal Plate recipe for Horchata coming soon) is suitable for diabetic people and also helps in weight control. It is recommended for those who suffer from indigestion, flatulence and diarrhoea because it contains digestive enzymes like catalase, lipase and amylase. 
  • The high content of oleic acid has positive effect on cholesterol, thereby preventing heart attacks and thrombosis. 
  • Tiger nuts reduce the risk of colon cancer and prevent constipation. 
  • Tiger nuts also contain a good quantity of vitamin B1, which assists in balancing the central nervous system and helps to encourage the body to adapt to stress. 
  • The health benefits reflect a reduction of low density lipoprotein-cholesterol, which is good for sports’ men and women and those intending to lose weight.

In summary, I really can’t imagine any other snack food that would nutritionally support anyone (including gym bunnies and athletes) better than my Tigernut ‘Hob-Nobs' Nor a better way to indulge in some childhood nostalgia than with delicious raw whole milk and biscuits. Scrumptious!

Go nuts for tiger nuts! You can buy them online from The Tiger Nut Company

Our Tigernut Hobnobs are perfect with a glass of raw whole milk

Our Tigernut Hobnobs are perfect with a glass of raw whole milk

Tigernut ‘Hob-Nobs' (Makes 16 biscuits)

Ingredients

75g coconut butter (not coconut oil)                            

2 tsp vanilla essence

150g tiger nut flour

¼ tsp sea salt                

1 tsp baking powder

75g macadamia nuts, chopped (for ease, I pulse the nuts several times in a food processor - however, don’t process them too long or you’ll end up with nut butter!)

50g cup unsweetened shredded coconut 

3 tbsp cold coconut water


Instructions

In a large bowl combine tiger nut flour, salt and baking powder.

Use your fingertips to rub the coconut butter into the flour, salt and baking powder until you have a mixture that resembles coarse breadcrumbs with no large lumps of coconut butter remaining.

Using a fork, stir in the vanilla essence, chopped macadamia nuts and desiccated coconut.

Stir in the coconut water then abandon the fork and knead the mixture with your hand until it all comes together to form a firm dough.

Roll the dough out between two sheets of cling film to 6mm/ ¼ inch thickness. Using a 6cm / 2½ inch biscuit cutter, cut out 16 biscuits. As you go, you’ll need to gather up the off-cuts and press them back together before re-rolling out to make more biscuits N.B. because tiger nut flour is gluten-free, you can work the dough several times over and it won’t get tough.

Lay the biscuits 2cm apart onto a parchment lined baking sheet. Cover the biscuits loosely with cling film then place the baking sheet in the fridge to chill for 20 minutes. 

Preheat oven to 160℃ / 325°F / Gas mark 3

Transfer the baking sheet to the pre-heated oven and bake for 20 minutes until light golden brown. Turn the tray around halfway through the cooking time to ensure the biscuits brown evenly.

Remove from the oven and transfer the biscuits to a wire cooling rack - they’ll crisp up even more as they cool, so try to distract yourself from eating them until they do!


Carbohydrate 12g Protein 2 g - per biscuit


Blueberry & Coriander Seed Muffins

by Susan Smith in ,


It is my twenty-second wedding anniversary today and there’s one food-related delight, baked in honour of my husband, that I want to share with you. After a miserably cold May and start to June, I’d been hoping that the lovely warm weather we enjoyed in April wasn’t the beginning and end of our summer because I’d planned for us to start our special day with a laid-back, leisurely breakfast of Blueberry and Coriander Seed Muffins, eaten ‘al fresco’ in the sunshine, with several delicious cappuccinos. Luckily for me, John is not only the best of husbands and the best barista in North Nottinghamshire, we also woke up to a gloriously sunny day! 

Whilst blueberries are available all year round, the start of the season for British blueberries is June (lasting through till September) so they’re bang-on time for our morning celebration. What could be healthier than field-fresh fruits so chock-a-block with antioxidants and phytonutrients they’ve been labelled a ‘superfood’? Or more sensuous than plump, juicy blueberries with their sweet-sharp ‘pop’ of flavour and the lovely inky juices they release during cooking?

It took me a while to fathom out how to make the perfect gluten-free, grain-free, refined sugar-free blueberry muffin, but I’m proud to say that I think I’ve achieved my goal with this original Primal Plate recipe. The flavour of blueberries combined with a little sweetness from raw honey and the spicy, slightly citrus fragrance of freshly ground coriander seed makes for a delicious, low-carbohydrate, home-baked muffin that’s an aromatic, flavourful and visual treat to share with everyone you love (suggest you make double the quantity if there are more than two of you!). 

Actually, come rain or shine, baking Blueberry and Coriander Seed Muffins to show my appreciation for 22 years of wedded-bliss is absolutely guaranteed to put a smile on my favourite man’s face! #feelingsmug!

Blueberry & Coriander Seed Muffins (V) (Makes 6 Muffins)

Ingredients

65g (2½oz) unsalted butter, melted 

60g (2oz) raw, clear honey

150g (5½oz) ground almonds                                         

20g (¾oz) organic coconut flour, sifted

1 level tsp baking powder                

¼ level tsp sea salt

1 tsp coriander seed, freshly ground (I use a pestle and mortar)

3 large organic eggs                    

1 dessertspoon vanilla essence

60ml (2 fl oz) full-fat whole milk - or enough to make a soft batter 

150g (5½oz) fresh blueberries, preferably organic


Instructions

Preheat the oven to 180℃ / 350°F / Gas mark 4 and line a muffin tin with 6 paper cases.

Put the honey and butter into a small saucepan, set over a low heat until the butter is just melted. Remove from the heat and allow to cool for 5 minutes.

Meanwhile, in a large bowl mix together the ground almonds, coconut flour, freshly-ground coriander seed, baking powder and sea salt.    

In a separate bowl, whisk together the eggs, honey/melted butter and vanilla essence.

Using a rubber spatula, mix the wet and dry ingredients together. Add enough milk to make a soft batter of dropping consistency. 

Gently fold in 125g of the blueberries, then spoon the mixture into the paper cases (about ¾ of the way full - or approximately 105g batter per muffin) 

Top with the remaining 25g blueberries, allowing 2-3 extra blueberries per muffin.

Bake until a toothpick inserted into the centre comes out clean, about 25 minutes

Notes

Look for blueberries that have a firm, smooth skin and a waxy bloom. Most of the nutrients are in the skin so although large, plump fruits are touted as the best, I think smaller ones may in fact be better for you. 

Also, according to a 2008 study, it was found that organically produced blueberries can contain significantly more antioxidants that conventionally grown ones.

Raw blueberries are a wonderful snack - especially useful to give to children instead of sweets!


Carbohydrate 17g Protein 10g - per muffin


Celebration Chocolate Cake

by Susan Smith in


I just couldn’t let Easter pass by without including a fabulous chocolate cake recipe. It also happens to be my eldest daughter’s birthday on Good Friday, so I have the opportunity to mark both occasions with a Primal ‘tah-da’ moment that even impresses me! This delicious cake is grain, gluten, dairy and refined sugar free (although tasting it, you couldn’t possibly guess). I think it is absolutely perfect for an Easter celebration. 

Light in texture, but intensely chocolatey, it really is one of the best chocolate cakes I’ve ever eaten and certainly worthy of any (in our house that actually means every!), special occasion. The recipe has been adapted from another excellent food blog. So, all hail Adriana, Queen of Chocolate Cakes, because I think this recipe is an absolute triumph for healthy-eating chocolate lovers everywhere! 

Because it’s so good (you can never have too much of a good thing!), I’ve increased the ingredients and divided the cake mix between two loose-bottomed sandwich tins, which saves the hassle of trying to cut the finished cake in half and also the risk of it falling apart when you do! 

I’m not the world’s best cake decorator, so I’ve cheated a little (actually a lot!) by purchasing some Callebaut dark chocolate curls, some vegan Hotel Chocolat cocoa dusted eggsedible gold leaf (should have googled how to apply this as most of it stuck to my hands, not the cake!), fresh flowers (pansies, violas and wild violets are all springtime pretty and good to eat too) to create this lovely looking, healthily indulgent cake. I hope you enjoy. 

Happy Birthday Elizabeth and Happy Easter to one and all!

Celebration Chocolate Cake (V) (Serves 16)

Ingredients - for the cake

Dry:

500g (1lb 2oz) ground almonds            

70g (2½oz) coconut flour, sifted        

70g (2½oz) raw cacao powder, sifted        

125g (4½oz) raw coconut palm sugar        

3 tsp baking powder                

1½ tsp sea salt                

Wet:                    

185ml (6 fl.oz) coconut oil, melted

75g (3 tbsp) raw set honey                     

400ml (14 fl.oz) full fat coconut milk            

4 large eggs + 2 yolks, at room temperature         

3 tsp vanilla extract                                

2 large egg whites, whisked separately


Ingredients - middle layer chocolate ganache

400ml (14 fl.oz) full fat coconut milk                

50g (2 tbsp) raw set honey                

20g 4 tbsp raw organic cacao powder            

½ tsp vanilla extract                


Ingredients - chocolate frosting

180ml (9 tbsp) coconut milk (I used ½ coconut cream and ½ coconut milk) 

185g dark chocolate, chopped - I used Callebaut Finest Satongo chocolate chips to save myself the bother of chopping     


Instructions - for the cake

Pre-heat oven at 180°C / 350°F / Gas mark 4

Grease the bottom and sides of 2 x 8-inch (22.5cm) loose-bottomed sandwich tins with coconut oil and line the bottoms of each with a disc of parchment paper.

Put the coconut oil and honey in a small pan and set over a low heat until just melted. Leave to cool.

In a large bowl mix together the almond flour, coconut flour, cacao powder, raw coconut palm sugar, baking powder and salt.

In a medium-sized bowl whisk together the melted coconut oil and honey, coconut milk, eggs, and vanilla.

Using a rubber spatula, gently mix dry ingredients into wet ingredients to form a batter. Do not over mix.

In a small bowl whisk 2 egg whites to a firm snow. Using a large metal spoon, gently fold the egg whites into the cake mixture.

Pour batter into prepared tins and bake for 35 minutes or until a toothpick inserted into the centre comes out clean. If you feel you need to cook it longer, cover cake with foil to prevent burning the top and lower the heat to 165°C (325°F). Cook until toothpick comes out clean.

Let cakes cool completely in the tins before turning out.

Spread the chocolate ganache over one of the cake halves and refrigerate for 30 minutes.

Place the other half of the cake on top of the 'ganached half', then spread the chocolate frosting over the top and sides of the cake (for a smooth finish, it's easiest to pour the frosting directly onto the top of the cake - it will find it's own level and partially run down the sides without you having to work it).

Decorate the top with shaved dark chocolate, wild violets etc., if desired


Instructions - for chocolate ganache (see notes for more information)

In a medium saucepan, bring the coconut milk and honey to a light boil.

Simmer on low heat for two hours, stirring occasionally (be careful, the mixture has a tendency to bubble-up and splatter when stirred!). Do not cover the pan.

Mix in the raw cacao powder and vanilla extract and whisk together until all is combined and smooth.

Let it cool and refrigerate until the cake is ready.


Instructions - for chocolate frosting

Warm the coconut milk in a small saucepan until its hot but not boiling (you should just be able to tolerate inserting a finger into the milk i.e. without scalding yourself!)

Tip the chocolate pieces into the hot coconut milk and whisk together until the chocolate has melted and the mixture is all smooth and glossy.

Let cool for 10 minutes or so before icing the cake.

Notes:

Make the middle-layer of chocolate ganache first - it takes a long time to make, so plan ahead and have it ready before you bake the cake. You’ll know you’ve cooked it long enough when the coconut milk is reduced to about one-third of it’s original volume and it has a thicker consistency and darker colour (similar to sweetened condensed milk).

Get organised before you start to make the cake. Firstly, grease and line your sandwich tins and collect all the ingredients together (I often do this the night before).

Since the complexity of this recipe (it’s not difficult to make but you do need to stay focused!) is equivalent to a 'cook’s meditation on chocolate', I advise you to tick each ingredient off as you add them to their respective mixing bowls (the first time I baked this cake I completely forgot to add the coconut milk to the cake batter and today I threatened to do the same thing again!).

Allow the cake to cool completely before attempting to decorate. Any residual warmth melts the ganache and frosting faster than you can control it and, although the cake will still be delicious, you’ll end up with a messy chocolate cake ‘landslide’ rather than an elegantly decorated cake as befits a special occasion!

N.B. Wild violets are not to be confused with African violets. African violets with their hairy leaves make beautiful potted houseplants but if you eat them, they will make you very sick indeed!


Carbohydrate 21g Protein 13g - per serving (excluding chocolate eggs)