Summer Berry & Lemon Cream Tigernut Tart

by Susan Smith in , ,


This week was the start of Wimbledon (think strawberries and cream) and culminates in Independence Day (Saturday, 4th July) - think, ‘Happy Birthday’, to my beautiful daughter, Sarah! After that Mirror Imaging is into a run of photoshoots and weddings on five consecutive weekends that will keep us both busy until the end of September. So with that in mind, I really wanted to make an extra special summer birthday ‘cake’ for Sarah, not only to celebrate her birthday but also the last of our leisurely weekends for the foreseeable future!

Today, I am so excited to be able to bring something completely new to the party - a delicious summer fruit tart made with tiger nut pastry. “Tiger, erm what?”…I hear you say!

Q. When is a nut not a nut? A. When it’s a tiger nut! 

Tiger nuts, also known as ‘earth almonds’ and in Spain, ‘chufas’, are the sweet, brown, nutty, ‘super’ tubers of the sedge plant (a stubborn, weed-like grass), which is grown and harvested like potatoes. And, they are incredibly good for you. 

Truly Primal/Paleo (our early human ancestors used to forage and feast on this nutrient dense wonder food), tiger nuts have a nutritional profile that really holds its own against red meat, olive oil and even human breast milk. In fact, tigernut milk (recipe for Spanish style ‘Horchata de Chufas' coming soon) is the healthiest substitute for dairy milk because it is rich in monounsaturated fat and does not contain inflammatory omega-6 fatty acids like other nut milks do. Tiger nuts are also full of dietary fibre, particularly resistant starch, are high in minerals (magnesium, phosphorous, potassium, calcium and iron) and Vitamins C and E. Sounds to me like the under-utilised tiger nut might well be the answer to 795 million people around the world still struggling with hunger and malnutrition! 

And, in modern society, where people are often overfed and under-nourished, research suggests that tiger nuts can help reverse or stop the progression of degenerative diseases such as  diabetes, heart disease, circulatory problems, digestive disorders, autoimmune diseases and some cancers, including colon cancer.

I’ve only just re-discovered tiger nuts (they were sold as sweets when I was little) as part of my ongoing search for grain-free, gluten-free and now nut and allergy-free alternatives to grain flours. To say I’m chuffed with the way my chufa pastry lined Summer Berry & Lemon Cream Tigernut Tart worked out, is an understatement! This new kid on the block for lovers of Primal/Paleo treats, ticks all the boxes for healthy, nutritious food that makes you glad to be alive - indeed a little bit smug - because who would guess that this gorgeous Summer Berry & Lemon Cream Tigernut Tart would be entirely compatible with a low-carb, refined sugar-free diet?

When cooked, this tigernut pastry has more the taste and texture of a biscuit cheesecake base than it does shortcrust pastry per se, but I like this. As pastry goes, it’s very user friendly. It rolls out like pâte sucrée (French name for sweet shortcrust pastry) and was incredibly well behaved when I lined the flan case - although a chunk fell off one edge when I lifted my rolled pastry disk off the work surface, it was easy to patch up and press everything back together again with my fingers, once it was in the tin. 

Best of all, because tiger nuts are naturally sweet, you don’t need to add sugar or other sweeteners. I’ve been wanting to devise a recipe for Primal cheesecake for some time, so when I do I’m certain this recipe will double-up, adapting itself to both sweet tarts and cheesecakes beautifully.  

Meanwhile, I hope you’ll make the most of summer’s juiciest berry-fruits in this exceptionally lovely looking tart - I think summer celebrations will be the sweeter for it. 

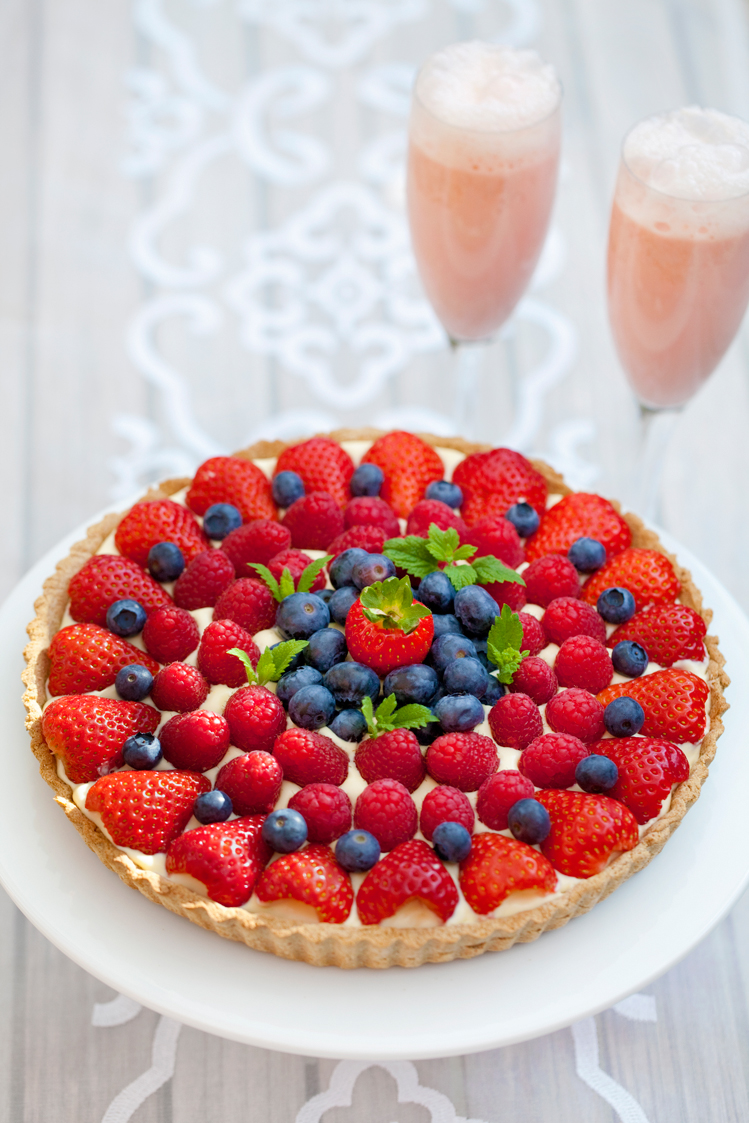
Summer Berry & Lemon Cream Tigernut Tart (Serves 10)

Ingredients - for tiger nut pastry

225g tiger nut flour (available online from The Tiger Nut Company)

1 tsp baking powder

2 tsp pure vanilla essence

30g unsalted butter, melted

1 large organic egg, beaten

a little extra melted butter (about 5g), for greasing 


Instructions - to make the pastry case

Pre-heat the oven to 180℃ / 350℉ / Gas mark 4.

Grease the base and sides of an 8 inch loose-bottomed fluted flan tin with melted butter.

Combine the tiger nut flour, baking powder and vanilla essence in a bowl.

Mix in the melted butter, then add the beaten egg and stir with a fork to combine.

When roughly combined, abandon the fork and bring the mixture together with your hand to achieve a firm but moist dough. 

Roll out to a round thickness of 3mm-6mm between two sheets of plastic cling film (to avoid the dough sticking to your worktop or rolling pin). As you roll, turn regularly to achieve an even round shape that is approximately 2½cm/1” larger than the circumference of your tart tin (this allows for the sides of the tart). 

Carefully peel off the top layer of cling film, then loosely wrap the pastry around your rolling pin removing the bottom layer of cling film as you do, then using the rolling pin to support the pastry, lift it one piece directly into the tart tin. If it splits or breaks in transition (mine did!), don’t worry, just patch it back together by pressing it firmly and evenly into the base and up the sides of the tin with your hands. N.B. Since tiger nut flour is gluten-free it’s easier to handle than normal shortcrust pastry, because it doesn't get harder and tougher if you need to re-work it. Once it’s settled in the tart tin in an even thickness, trim any raggedy bits of pastry off the top edge by going around with a sharp knife (chef’s privilege to eat these pastry off-cuts raw!)

Prick the base of the tart all over with the prongs of a fork. 

Bake for about 12-15 minutes, or until lightly browned and crisp. Leave to cool completely in the tin before transferring to a serving plate.  


Ingredients - for lemon cream filling

150ml Primal Lemon Curd

150ml Crème Fraîche (I used Roddas)

150ml Double Cream


Instructions - to make the lemon cream filling

Put all the ingredients into a bowl and whisk until the mixture thickens and will stand in soft peaks.

Cover and store in the refrigerator until you’re ready to assemble your tart. 


Ingredients - for fruit topping

250g fresh strawberries, picked over and cleaned as necessary

175g fresh raspberries 

100g fresh blueberries

A few sprigs of fresh mint or lemon balm, to decorate


Instructions - to assemble the tart 

Not more than an hour before serving the tart, place the pastry case onto a serving plate. 

Spoon the lemon cream filling into the tart case and spread out evenly.

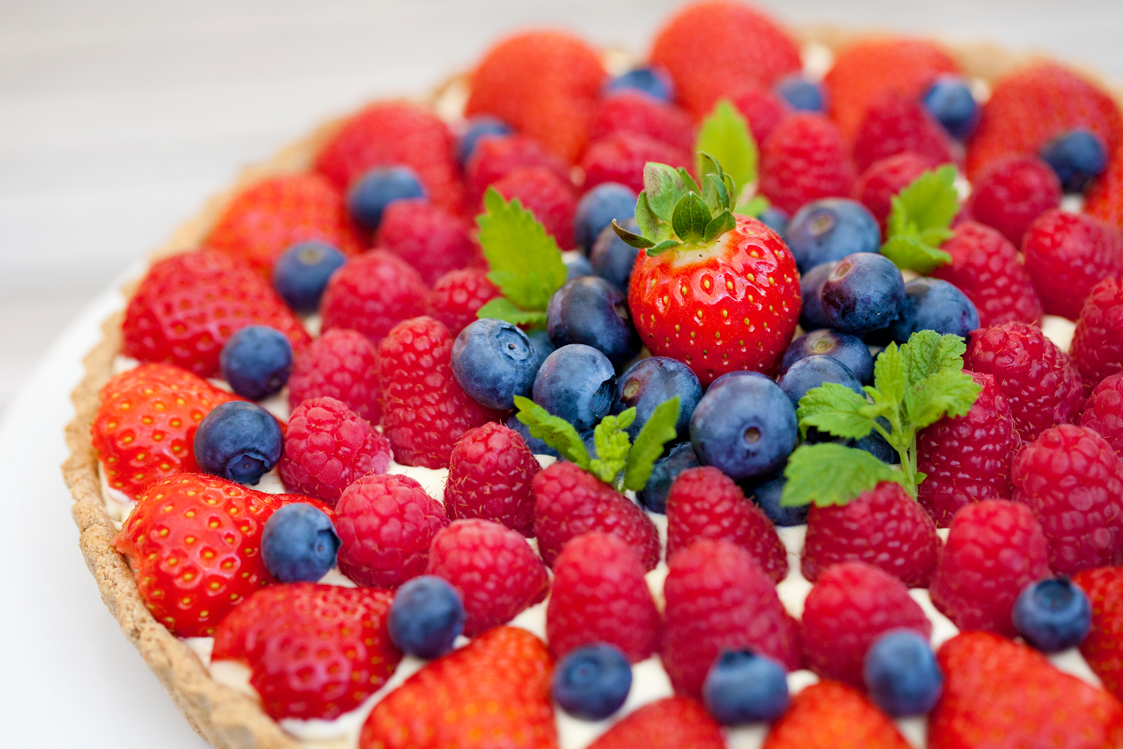
Arrange the fruit attractively on top of the lemon cream filling, then garnish with sprigs of fresh mint or lemon balm. 

Notes

Although this tart looks like ‘fancy-pants’ French patisserie, please do not be intimidated by the recipe. Rolling out the pastry and lining the tart tin is the only challenge - and only then for the novice cook. Everything else is quick and easy to do - including making the pastry and assembling the tart. If you need to, just follow the photographs for how to arrange the fruit topping.

I suggest you make a batch of yummy Primal Lemon Curd up to several days in advance (in readiness for the lemon cream filling) and store (hide!) in the refrigerator until you’re ready to assemble your tart. 

I like the visual treat of using several different types of summer berries as the topping for this tart - and the particular selection I’ve chosen all marry well with the lemon cream filling. However, just one type of fruit (blackberries, cherries, sliced peaches, apricots, etc.), or any combination you like, will work. Just select the sweetest, juiciest and most visually appealing fruit you can find.

Refrigerated in an airtight container, this tart still eats really well the next day.


Carbohydrate 26g Protein 5g - per serving


Lemon Curd Filled Chocolate Cubes With Melba Sauce

by Susan Smith in ,


Easter Sunday was such a beautiful, warm and sunny day. A reminder that summer’s on its way and it’s time to lighten up and enjoy the new season’s zingy, fresh flavours.

The menu I’d chosen for our Easter celebration lunch was Prawn Cocktail (recipe coming soon), Pea & Pistachio Soufflés, Asparagus and Hollandaise Sauce with locally grown Chantenay carrots and baby courgettes and, after much deliberation (was I in danger of going into egg and lemon overload?), a springtime lemon curd based dessert with raspberries. I mean, I love eggs and lemons and they are so quintessentially Easter-time, but savoury soufflés and an egg-based dessert? Lemon hollandaise and lemon curd? Anyway, I found a recipe for the lemon curd, so all I had to do was reduce its carb count and substitute raw organic honey for refined granulated sugar.

Not entirely fazed, I knocked up the lemon curd in the time it took my husband to make me tea and toast after a lengthy Mirror Imaging pre-wedding meeting on Saturday morning. In the early hours (which is when this food blogger’s imagination runs riot!) I’d been toying with the idea of transforming it into lemon curd ice-cream with melba sauce or lemon curd mousse. However, this first ever attempt at making homemade lemon curd was a remarkable revelation! It was so utterly delicious and tangy eaten directly from a spoon that I just couldn’t bring myself to diminish its clean, fresh lemony flavour or colour by adding anything to it. 

Still, to my mind, you can’t just serve up lemon curd and call it pudding! I’d already purchased some ready-made dark chocolate cubes several weeks ago in anticipation of creating an Easter-related ‘surprise’, but felt lemon and chocolate wasn’t an easy combination to pull off. As it turned out, none of this mattered.

Come the day, hungover from an excessive wine-drinking-session the night before and a serious lack of sleep whilst still ruminating on my dessert dilemma, I announced Easter was cancelled this year! Happily, John and Sarah ignored me and got on with the food prep regardless. By 2pm I cautiously accepted a half glass of champagne and the party was back on! By then, there was no time to backtrack and create something more elaborate for dessert, so unadulterated lemon curd spooned into chocolate cubes it was, and Easter joy of Easter joys, it was sublime!

I think that this easy, make-ahead dessert is an absolute triumph. A new go-to recipe for a special celebration lunch or dinner party, expect gasps of appreciation (even a round of applause!) when you serve this as a finale, and moreover, intense satisfaction on guest’s faces as they experience all the sensory delights this perfect little pudding offers. From the first snap! sound as you break into the dark chocolate cube with your spoon, through to the cool, smooth tangy sweetness of the lemon curd, the semi-tart raspberry melba sauce and the silky lingering back notes of good quality chocolate, it delivers everything you could possibly want from a pudding - with little or no effort.

In conclusion, sometimes the most wonderful things come together when you’re in a state of enforced ‘let-go’. Another glass of champagne anyone? 

Lemon Curd Filled Chocolate Cubes With Melba Sauce (V) (Makes enough lemon curd and melba sauce for 8)

Ingredients - for the lemon curd

3 large organic eggs

120g  raw organic ‘runny’ honey

80ml fresh lemon juice (2-3 lemons worth)

60g unsalted butter, at room temperature, cut into small pieces

1 heaped tbsp lemon zest, finely grated

Ingredients - for the melba sauce

250g British frozen raspberries, defrosted (I used Windmill Hill Fruits)

1 tbsp fresh lemon juice

8-10 drops of liquid stevia - I used 8 drops because I think the melba sauce needs to be on the right side of tart for a perfect balance of flavour

72% superior quality dark chocolate cubes, fresh raspberries and lemon balm leaves (or mint leaves) to serve


Instructions - for the lemon curd

In a stainless steel bowl, whisk together the eggs, honey and lemon juice until well blended.

Cut the butter into small pieces. 

Place the bowl over a saucepan of gently simmering water. Do not let the bottom of the bowl come into contact with the water. 

Cook for approximately 10 minutes, whisking constantly with a balloon whisk (to prevent it from curdling) until the mixture becomes thick (like soured cream or hollandaise sauce). Don’t get distracted, the mixture can quickly and suddenly turn from thin to thick! 

Remove from heat and immediately pour into a clean bowl. 

Add the butter to the mixture and whisk until it has melted, then add the grated lemon zest and give everything a good stir.

Take a sheet of plastic cling-film and immediately lay it directly onto the surface of the lemon curd to stop the air getting to it (to prevent a skin forming). Allow the mixture to cool completely. The lemon curd will continue to thicken as it cools. Keep covered and refrigerate until needed.


Instructions - for the melba sauce

Tip the defrosted raspberries into a food processor or blender with the lemon juice and blitz to a smooth puree. If the mixture seems a little too thick, add 1-3 tablespoons of cold water and blitz again until it’s the right consistency i.e. thick enough to hold together but thin enough to pour.

Pass the mixture through a fine sieve. Add 8 drops of liquid stevia to the melba sauce and stir well to combine. Taste, if you think it is too tart, add another one or two drops of stevia (less is more!), then cover and refrigerate until needed.


Instructions - to assemble the dish

Just before you’re ready to serve, spoon a generous quantity of lemon curd into each chocolate cube (1 cube per person) 

Place each one onto a flat plate and drizzle the melba sauce around. 

Stand three fresh raspberries on top of each and garnish with lemon balm.


Notes: 

You must use freshly squeezed lemon juice and freshly grated zest (preferably from organic lemons) for this recipe - not imitation bottled lemon juice or Jif squeezy lemon juice.

Store the chocolate cubes in their original wrapping at room temperature or a coolish place until you need them (not a refrigerator, unless it’s the height of summer and you don’t have air conditioning!)

The lemon curd and the melba sauce will keep covered in a refrigerator for up to a week.


Carbohydrate 17g Protein 3g - per portion (incl. melba sauce & raspberry garnish)


Lemon Cake with Blueberry Compote and Crème Fraîche

by Susan Smith in ,


No refined sugar, no grains, no flour, no fat? How’s it possible to bake a cake without any of these ingredients? Welcome to the sunny side of Primal cookery magic! We have organic lemons, eggs, raw honey and ground almonds with a few drops of pure liquid stevia and that my friends, is all!

Unbelievably, this beautiful moist lemon cake has absolutely no rubbish ingredients to wreck your health or expand your waistline! It is intense-lemon-flavoured cake nirvana! A gorgeous celebratory springtime cake, perhaps to say “thank you” to mums everywhere on 15 March 2015.

Adapted from Rose Elliot’s book Fast, Fresh and Fabulous, I’ve simply substituted organic raw honey and liquid stevia for refined sugar and voilà…you cannot see or taste the difference! What I am glad to say is that this golden beauty of lemon cakes has only half the carbohydrates of the original!

It works perfectly served with a Blueberry Compote and crème fraîche but it’s also good to eat on its own.

So now you know that a low-carb diet can mean having your cake and eating it, I hope you are inspired to make this delicious and nutritious treat. I am keen to know how you get on so please post your comments below and, if you’re feeling brave, a photo would be good too! 

Lemon Cake (Serves 12) with Blueberry Compote and Crème Fraîche 

Ingredients - for the lemon cake

2 organic lemons

6 organic eggs - preferably at room temperature

125g raw organic clear honey

10 drops organic liquid stevia

250g ground almonds

Blueberry compote & crème fraîche, to serve - optional


Instructions

Wash the lemons then put them in a small saucepan and cover with cold water. Bring to the boil and simmer gently until soft (about 45 minutes). Take off the heat and leave to cool.

Pre-heat the oven to 150℃ / 300℉ / Gas mark 2.

Grease a loose-based 8” cake tin (preferably springform) and line the sides and base with non-stick baking parchment.

Drain the lemons, cut them into quarters and remove any pips. Put the lemon quarters into a food processor or blender and whizz to a golden puree.

Using an electric whisk, whisk the eggs, honey and liquid stevia together for about 6 to 8 minutes until they are pale and thick and until the mixture holds its shape for a few seconds when it’s flicked across the surface of the rest of the mix.

Whisk in the lemon puree. Then, using a large metal spoon, gently fold in the ground almonds.

Pour into the prepared tin and bake for 1¼ hours, or until a cocktail stick inserted into the centre of the cake comes out clean. If the cake starts to get too brown, cover lightly with a sheet of greaseproof paper. 

Leave the cake to cool completely in the tin, then turn out carefully and remove the paper.


Ingredients - for the blueberry compote (Serves 6)

300g fresh blueberries

100g no-added sugar blueberry or blackcurrant fruit spread (I used Clearspring organic blueberry fruit spread) 

1 tbsp lemon juice

1 tsp lemon zest


Instructions

Combine the blueberries, lemon juice, lemon zest and the fruit spread in a medium saucepan over medium heat and cook for about 5 minutes or until the fruit spread dissolves, the blueberry juices start to run and the mixture becomes syrupy - don’t let the berries cook too long or they will become mushy and lose their beautiful shape. 

Remove from the heat. Serve warm or cold with the lemon cake.


Notes

The blueberry compote is also really good with plain Greek yogurt for a low-carb breakfast, topped with toasted flaked almonds.


Carbohydrate 10g Protein 9g  - per serving of cake

Carbohydrate 13g Protein 0g  - per serving of blueberry compote


Banana Cashew & Rum Ice Cream with Hot Chocolate Sauce

by Susan Smith in , ,


It’s not really warm enough outside to be thinking about ice cream but when faced with yet another bowl of over-ripened bananas, what to do? 

Well, it could have been Banana Poppy Seed Cake with White Chocolate Vanilla Bean Frosting, but in fact it was a recipe for Banana Cashew Ice Cream in last month’s edition of Waitrose Kitchen adapted from Hugh Fearnley-Whittingstall’s latest book River Cottage Light & Easy: Healthy Recipes for Every Day that really grabbed my attention because it looked to be, and in fact is, dead simple to make, problem-free and above all, refreshingly delicious.

My ice cream just naturally evolved into Banana Cashew & Rum Ice Cream because banana flavour marries so well with rum that I couldn’t resist adding a tablespoon or three of alcohol to the recipe! Nor is my version dairy-free, since the colour (the bananas discolour whilst you’re waiting for the mixture to cool) and the texture are enhanced by adding double cream (it makes for a paler and creamier ice). Furthermore, as the total carbohydrate count is identical for both recipes there’s no need to beat myself up over the extra indulgence! In fact, in for a penny in for a pound, I suggest you serve this ice cream with hot chocolate sauce spooned over.

As ever, the quality of your ingredients will determine the results. Hold your nerve with the bananas - they need to be ripened to the stage where the skins are beginning to be mottled with black. Also, make sure that you buy the finest chocolate you can afford (at least 70%). You can then sit back because you will have created something totally scrumptious.

Banana, rum and chocolate is simply a flavour match made in heaven, add to that the contrast between hot and cold and we could all be screaming for ice cream!

Banana Cashew & Rum Ice Cream with Hot Chocolate Sauce (V) (Serves 6)

Ingredients - for the ice cream

75g (2¾oz) raw organic cashews - soaked in cold water for 4-6 hours (or overnight) and drained

2 large or 4 small slightly over-ripe bananas (about 400g / 14oz unpeeled weight)

125g (4½ oz) clear organic honey

½ lemon, juice

125ml (4½ fl oz) double cream

3-4 tbsp rum


Instructions

Peel the bananas and break into chunks. Put them in a blender with the drained cashews, honey, lemon juice and 100ml cold water and blend until smooth.

Pour into a jug and press a piece of cling film directly on top of the liquid and up the sides of the jug to prevent air getting to it - this will minimise the bananas discolouring. Chill until cold.

When cold enough, stir in the chilled double cream then gradually start adding the rum a tablespoon at a time, tasting as you go. Even if you like it strong, 4 tablespoons is probably the optimum amount you’ll need.

Churn the ice cream in an ice cream maker until it is the consistency of very thick cream, then quickly transfer to a plastic freeze-proof container and freeze until solid.

If you don’t have an ice cream machine, pour into a plastic freeze-proof container and freeze for about an hour until the sides start to get solid. Then mash with a fork to combine the solid ice cream at the sides of the container with the still liquid centre. Straightaway, put it back into the freezer for another half-hour then take it out again and repeat the mixing and mashing. Continue doing this every half hour until the ice cream is soft-set, then let it freeze solid.

Take out of the freezer and put in the refrigerator 20-30 minutes before serving to allow the ice cream to soften slightly.


Ingredients - for the chocolate sauce

200ml (7fl oz) whipping or double cream

100g (3½oz) good quality dark chocolate, chopped (I use Callebaut’s finest dark chocolate chips, which saves me the bother of chopping!)

1 tsp pure vanilla essence

Knob of good quality salted butter (I used Rodda’s)


Instructions

In a small pan heat the cream to scalding point (just below boiling). Take the pan off the heat. 

Add the chocolate to the cream, whisking continuously until the chocolate is melted and you have a smooth sauce.

Add the vanilla essence and finally whisk-in the butter.

Gently re-heat the sauce if necessary but do not allow it to boil. Spoon immediately over ice cream.

Alternatively, keep warm over a pan of barely simmering water until you're ready to serve.


Carbohydrate 34g Protein 2g - per serving of ice cream

Carbohydrate 9g Protein 3g - per serving of chocolate sauce


Primal Pancakes

by Susan Smith in ,


It’s Shrove Tuesday today and traditionally the day for eating pancakes!

According to Christian tradition this day is all about being ‘shriven’ (to confess and be absolved of your sins) before a period of penance (oh for heaven’s sake!).

Otherwise known as “Fat Tuesday”, (much more realistic terminology, I think) in Catholic and Protestant countries outside of the UK, Ireland, Australia and Canada - presumably because it’s an excuse for a day of feasting on rich food before a period of fasting.

Since I neither desire to be “shriven” from my sins nor get fat, I can’t see why it can’t be pancake day every day once you’ve got the knack of making them grain and gluten-free! These crêpes are so close to the real thing no one will tell the difference.

According to Historic UK a pancake is a thin, flat cake, made of batter and fried in a frying pan - so are ours! Traditional English pancakes (and French crêpes) are very thin and are served immediately - so are ours! Golden syrup or lemon juice and caster sugar are the usual toppings for pancakes - okay we’ll pass on the golden syrup in favour of real maple syrup, the caster sugar in favour of coconut sugar or, better still, no sugar at all if we choose oranges instead of lemons!

I’ve kept this recipe simple and made them child-friendly as well as healthy - though I suppose we should still limit ourselves to just two pancakes each!  I hope you enjoy.

Basic Pancake Batter Ingredients (V) (Makes 8 pancakes for 4 servings)

Ingredients

225ml (8 fl oz) raw whole milk (or almond milk, if preferred)

3 large eggs

30g (1 oz) organic ground almonds

45g (1½ oz) coconut flour

40g (1½ oz) arrowroot flour

15g (1 tbsp) coconut oil

1 tbsp clear, preferably raw (unheated) organic honey

½ tsp apple cider vinegar

½ tsp baking powder


To Serve

Orange or lemon juice

Orange or lemon wedges

Organic maple syrup or raw coconut palm sugar (the latter crushed fine in a pestle and mortar or alternatively with the end of a rolling pin in a pudding basin)


Instructions

Place all the ingredients for the batter into a blender and blend thoroughly until it is smooth and the consistency of pouring cream - add a little more milk or water if it seems too thick.

Heat a 20cm (8 inch) non-stick pancake pan until it is hot. Lightly oil or butter the pan, then ladle in just enough of the batter (about 3 tablespoons) to coat the base thinly. Working quickly, immediately tilt and turn the pan in a clockwise direction to spread the batter evenly - the pancakes should be as thin as possible.

Fry over a medium-high heat for 30-60 seconds until just set. Flip over with a palette knife and continue to cook for a further 30 seconds. Serve immediately.

Or to make a batch, slide the pancake onto a large warm plate (set over a pan of just simmering water) and cover loosely with cling film. Repeat this process until all the batter has been used to make 8 pancakes.

When you are ready to eat, sprinkle each pancake with freshly squeezed lemon or orange juice and maple syrup (or coconut sugar), fold in half, then in half again to form triangles.

Serve sprinkled with a little more juice, extra sweetener and wedges of lemon or orange if liked.


Notes

Use a ladle (or jug) to pour all the batter into the pan in one go so it doesn’t set before it has chance to spread out evenly.

The side of the pancake fried last never looks as nice, so make sure that it’s this side that becomes the inside of the pancake when you fold it into a triangle.


Carbohydrate 10g Protein 6g - per pancake

Carbohydrate 14g Protein 0g  - per serving of orange/lemon juice/maple syrup per pancake


Chocolate Mousse

by Susan Smith in ,


A chocolatey climax to a romantic Valentine’s dinner, what’s not to love?

Sarah actually wanted me to write about her all-time favourite chocolate mousse, which is a Raymond Blanc recipe (not the one with lemon juice!) but frankly, I prefer all my ingredients to be fully used up rather than having to store an excess in the refrigerator, where there’s always the risk of it getting pushed to the back and being forgotten. So, sorry Sarah but the disparity between using one egg yolk to ten egg whites in that recipe, sends me into a tail spin whilst I try to figure out what to do with the remaining glut of yolks! I suppose I could have blogged mayonnaise and hollandaise sauces but since I’m focused on cooking for two people this week, I wanted an altogether more streamlined chocolate mousse recipe that has no need for added sugar.

The one I finally settled on is an Elizabeth David recipe, which really appealed to me because, at its simplest, you only need an ounce of quality dark chocolate, a tablespoon of water and an egg per person. My chocolate mousse calls for the same ingredients except I’ve swapped the water for a ‘shot’ of strong espresso coffee and added a smidge of salted butter for a little more sophistication. I think it  is the perfect finale to an intimate celebration meal for low-carb, Primal diet aficionados.

Surprisingly quick and easy to make, the taste and texture are in my view balanced to perfection - not too sweet, light as a feather and deeply chocolatey.

Quality ingredients are vital. Being short on the number of ingredients it’s not expensive to make, so buy the very best 70% dark chocolate (no more than 70% cocoa solids, as this can turn your mousse ‘grainy’), decent quality butter and the freshest organic free-range eggs you can find. I used a Nespresso Kazaar coffee pod to make a fresh strong espresso to further enhance the chocolate flavour.

The result is a divinely unctuous dessert that provides mouthfuls of pure pleasure. I really can’t think of anything more appropriate for the occasion! 

Chocolate Mousse (V) (Serves 2)

Ingredients

60g (2oz) fine quality dark chocolate, chopped - I used Callebaut Finest, Satongo dark chocolate chips (saves the time and hassle involved in breaking or chopping up a chocolate bar!) available from an amazing website called Chocolate Trading Co

2 large eggs, separated

10g salted butter

2 tbsp strong espresso coffee


Instructions

Put the chocolate in a heatproof bowl and set it over a pan of barely simmering water. (alternatively, you can put the bowl of chocolate in an oven switched down to it’s lowest setting). Leave it to melt.

When the chocolate is melted, remove it from the heat. Stir in the espresso coffee and the butter.

Separate the egg yolks and whites into two separate bowls. Beat the egg yolks thoroughly, then stir them into the chocolate mix.

With a clean whisk beat the egg whites until they are white and thick but still fluffy. Don’t overbeat them and let them get too stiff or they will be difficult to combine with the chocolate.

Stir a third of the egg whites into the chocolate to loosen it, then immediately fold in the rest. Be very gentle with cutting and folding in the egg whites but be thorough - if you’re too heavy-handed youll knock the air bubbles out and end up with a flat mousse, but if you dont combine the egg whites into the chocolate completely youll have white streaks running through it.

Pour the mousse into two individual glasses or ramekin dishes and refrigerate for 3 to 4 hours. The longer it’s left the more dense it becomes.


Notes

There are a few tricks to making good chocolate mousse:

  • The eggs and butter should be at room temperature before you start
  • Don’t stir the chocolate whilst it’s melting because it may seize up
  • Use a large metal spoon (not a wooden one) to fold the egg whites into the chocolate

N.B. If you have any concerns about eating raw eggs (to the extent that you won’t eat a soft boiled egg) sadly, this recipe is not for you.


Carbohydrate 9g Protein 8g  - per portion


Chocolate Banana Muffins

by Susan Smith in , ,


You will probably have noticed how Primal Plate posts to date have been biased in favour of low-carb replacements for those ‘naughty but nice foods’ that you’ve always been happy to eat, but might have assumed were essentially off the radar for low carb life-stylers. 

Introducing Primal Plate with Grain-Free Bread, Spiced Fruit Scotch Pancakes and Chocolate Banana Muffins is quite deliberate; a ploy to explode the myth that eating grain-free is an uncomfortably restrictive diet plan. 

That said, these relatively healthy alternatives are not intended to be eaten every day. Carbohydrate intake is the deciding factor in gaining or losing weight and the sweet spot for losing those extra pounds is between 50 to 100 grams of carbohydrate per day. 

One of these Chocolate Banana Muffins uses up 28 grams… so go steady, these are only intended as an occasional treat!

Chocolate Banana Muffins (Makes 6 Muffins)

Ingredients

100g (1 cup) ground almonds                

40g (¼ cup) organic coconut flour

1 level tsp baking powder                

½ level tsp sea salt

1 level tsp cinnamon

½ level tsp nutmeg

30g (2 tbsp) organic coconut oil, melted        

3 large eggs

85g (¼ cup) raw coconut nectar (or maple syrup)        

2 tsp vanilla essence

2 medium-large mashed ripe bananas (300g unpeeled weight)

50g (¼ cup) dark chocolate chips (70% cocoa solids)        


Instructions

Preheat oven to 180ºC (350º F).

Mix dry ingredients (ground almonds, coconut flour, baking powder, salt, cinnamon, nutmeg) well in a large bowl. 

Beat the eggs and mix in the rest of the wet ingredients (coconut oil, bananas, coconut nectar, vanilla). 

Combine the wet ingredients into the dry ingredients mixing well. 

Fold in chocolate chips. 

Pour into cupcake liners in a muffin tin (about ¾ of the way full).

Bake for 30 minutes. 


Carbohydrate 28g Protein 9g - per muffin


Spiced Fruit Scotch Pancakes with Orange & Apricot Syrup

by Susan Smith in , , ,


Tuesday 17th February 2015 is Pancake Day!  It must be at least 25 years since I last allowed myself the indulgence of eating pancakes. My prohibition began with the Hay System Diet, a diet that promotes separating food into three meals a day - one meal carbohydrate, one protein and the third entirely alkaline. I followed the Hay Diet, which subsequently evolved into Vegetarian food combining, for over two decades.

Pancakes are normally made of wheat-flour, eggs and milk, that is to say, high starch wheatflour, protein eggs and milk and, if you’re a traditionalist like me, alkaline lemon juice to serve. Add to this the generous quantity of refined sugar people like to sprinkle on top, for Food Combiners and Atkin dieters (that dietary exploration came later!) pancakes were probably one of my most obvious dietary ‘no nos’ of all time. Until now…

Thanks to this brilliant grain-free pancake batter recipe all things ‘pancake’ have been at the forefront of my mind recently - big time! Sweet or savoury, perfect pancakes have the potential to fill so many of the previous gaps in my culinary repertoire. 

Spiced Fruit Scotch Pancakes is my first offering. Stacked high and served with sugar-free Orange & Apricot Syrup and perhaps a dollop of creme fraiche, it makes for a very impressive dessert when entertaining. Alternatively, leave out the fruit and spice and serve these little beauties plain for a lazy Sunday breakfast, perhaps accompanied by a mixed berry compote (recipe to follow in due course!) or with fresh blueberries and a drizzle of maple syrup. 

spicedfruitpancakes


Spiced Fruit Scotch Pancakes (Makes 16) (V)

Basic Pancake Batter Ingredients

180ml (¾ cup) raw whole milk (or almond milk, if preferred)

3 large eggs

30g organic ground almonds

45g Sukrin reduced fat organic coconut flour

40g arrowroot flour

15g (1 tbsp) coconut oil

1 tbsp clear, preferably raw (unheated) organic honey

½ tsp apple cider vinegar

½ tsp baking powder

Plus:

1 tsp mixed spice

85g (½ cup) mixed dried fruit e.g. currants, sultanas, raisins, cranberries


Instructions

Blend all the basic pancake batter ingredients in a blender. Fold in the mixed spice and mixed dried fruit. Set aside. 

Add some coconut oil to a pre-heated non-stick frying pan.

Drop good tablespoons of batter into the pan (one spoonful per pancake - obviously these need to be cooked in batches). 

Even them out slightly with the back of a spoon then leave alone to cook for 2 - 3 minutes (small bubbles will appear on the surface when they’re ready to turn). 

Cook for 2 minutes more, until the pancakes are cooked through, then remove from the pan. Cover with a tea towel to stop them drying out.

To serve, warm through in a low oven and stack them into a tower on each plate, allowing four to five per person.

Drizzle Orange and Apricot Syrup around the pancake stack and top with a spoonful of creme fraiche, if liked.


Carbohydrate 8g Protein 3g - per pancake with fruit


If you don’t like dried fruit or you want to minimise your carb intake, just cook 3-4 tablespoons of the basic pancake batter first...  

Carbohydrate 5g Protein 3g - per pancake w/o fruit


Orange & Apricot Syrup (4 servings) (V)

Ingredients

2 heaped tbsp All-Fruit Apricot Conserve (St Dalfour’s range of all natural 100% fruit spreads are available in most supermarkets and health food shops) 

Juice & finely grated zest of 1 large orange, preferably organic

1 tbsp clear, preferably raw, organic honey (or 1 tbsp Sukrin icing sugar)


Instructions

Heat all the ingredients together in a small saucepan over a low to medium heat for 3-4 minutes.

When bubbling and slightly reduced, pass through a fine sieve into a bowl, pressing as much of the apricot flesh through as possible.

Return to a clean pan and gently warm through when ready to serve.


Carbohydrate 18g Protein 1g - per serving (made with honey)

Carbohydrate 14g Protein 1g - per serving (made with Sukrin icing sugar)